Installation Instructions Advantium® 120V Built-In SpeedCook Ovens CSB9120 PSB9120 ZSC1201 ZSC1202 31-2000001 MFL59060920 08-16 GEA
Safety Information CONTENTS BEFORE YOU BEGIN Design Information Models Available ............................................... 2 Product Dimensions and Clearances ................ 3 Tools Required .................................................. 3 Parts Supplied ................................................... 3 Advance Planning ............................................. 3 Read these instructions completely and carefully. IMPORTANT — Save these instructions for local inspector’s use.
Design Information PRODUCT DIMENSIONS AND CLEARANCES 21-1/2Ǝ NOTE: Appearance will vary by model. 29-3/4Ǝ 1-3/5Ǝ 19Ǝ 1Ǝ 1-1/10Ǝ 13Ǝ TOOLS AND PARTS REQUIRED (NOT SUPPLIED) ADVANCE PLANNING • 7KHVH RYHQV PD\ EH LQVWDOOHG GLUHFWO\ LQWR D Ǝ wide oven cabinet with standard installation. • Cutout height dimensions are different for installations with an accessory storage drawer. Make sure to use the correct cutout when preparing the opening.
Installation Preparation ELECTRICAL REQUIREMENTS Single Advantium 120 Installation: This product requires a 120-volt, 60 Hz, 15-amp circuit and draws 1.8 kilowatts. This product must be connected to a supply circuit of the proper voltage and frequency. • Wire size must conform to the requirements of the National Electrical Code or the prevailing local code for this kilowatt rating. • The power supply cord and plug should be brought to a separate 15 or 20 ampere branch circuit single grounded receptacle.
Standard Installation Preparation IMPORTANT: Always maintain 36-3/4” minimum height from the floor to the cutout in any single or combined installation unless plastic trim is installed. PREPARE THE OPENING PREPARE THE OPENING The Advantium 120 can be installed in combination with other GE Appliances/ Monogram appliances. Always follow each product’s Installation Instructions to complete the installation.
Standard Installation Preparation IMPORTANT: Always maintain 36-3/4” minimum height from the floor to the cutout in any single or combined installation unless plastic trim is installed. PREPARE THE OPENING (CONT.) PREPARE THE OPENING Installation over a GE Applainces/ Monogram Oven: Construct 30” 23-1/2” 25-1/4” 17-1/2” (CONT.) Installation over a GE Appliances/ Monogram Oven and Warming Drawer: solid bottom - Min. 3/8” plywood supported on all four sides.
Standard Installation Preparation IMPORTANT: Always maintain 36-3/4” minimum height from the floor to the cutout in any single or combined installation unless plastic trim is installed. PREPARE THE OPENING (cont.) PREPARE THE OPENING (cont.) Installation over another GE Appliances/ Monogram Built-In SpeedCook Oven: Installation under a GE Appliances/ Monogram Microwave Oven and over a Warming Drawer: 30Ǝ 23-1/2Ǝ 25-1/4Ǝ 17-1/2Ǝ Construct solid bottom - Min. 3/8” plywood supported on all four sides.
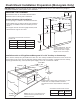
Standard Installation Preparation IMPORTANT: Always maintain 36-3/4” minimum height from the floor to the cutout in any single or combined installation unless plastic trim is installed. 23-1/2Ǝ PREPARE THE OPENING (cont.) Installation beside another GE Appliances/Monogram Built-in Speedcook Oven: • If you are mounting a GE Appliances/ Monogram Built-In SpeedCook Oven beside another, use the dimensions shown. The middle rail separating the two openings may need to be larger than the 4-1/2Ǝ minimum shown.
Flush Mount Installation Preparation (Monogram Only) IMPORTANT: Always maintain 36-3/4” minimum height from the floor to the cutout in any single or combined installation unless plastic trim is installed. PREPARE THE INTERIOR PREPARE THE OPENING Cut and install side cleats: The Advantium 120 can be installed in combination with other GE Appliances/ Monogram appliances. Always follow each product’s Installation Instructions to complete the installation.
Flush Mount Installation Preparation (Monogram Only) IMPORTANT: Always maintain 36-3/4” minimum height from the floor to the cutout in any single or combined installation unless plastic trim is installed. PREPARE THE OPENING 23-1/2” min. The Advantium 120 can be installed beside another Advantium 120 in a side-by-side combination. Double Advantium 120 Installation: G* Cut the opening in a cabinet to the dimensions shown. H* • Center divider acts as cleat for side of each respective unit.
Installation Preparation Preparation WITH an Accessory Storage Drawer • PSB9120 is the only approved model to be installed under 36-3/4” height with a storage drawer. CSB9120, ZSC1201 and ZSC1202 are not approved. • As needed, see the Standard Mount Installation Preparation OR Flush Mount Installation Preparation for configuration details. Note the modified cutout height below. • Model ZSC1202 cannot be installed with an accessory storage drawer.
Installation Instructions 1 REMOVE THE PACKAGING AND PARTS • Remove all packing material and tape. • Locate parts package containing mounting screws. • Remove the oven from the carton. Do not lift unit by handle or conduit. Two people are required to lift this oven. • Open the door and remove any packaging in oven.
Installation Instructions 2 DOOR TRIM REMOVAL FOR ABOVE 36Ǝ INSTALLATION ONLY 3 SLIDE THE OVEN INTO THE CUTOUT CAUTION Two people are required to lift the oven into the opening. Grasp the bottom at front and rear. DO NOT USE THE HANDLE TO LIFT THE OVEN. DAMAGE WILL OCCUR. If installing the Advantium 120V Oven above 36Ǝ from the floor, you may remove the plastic trim from the bottom of the door for esthetic purposes if desired.
Installation Instructions 4 INSTALL BOTTOM TRIM 6 INSTALL MOUNTING SCREWS If installing the Advantium 120V Oven below 36Ǝ, you must use the plastic bottom trim due to burn risk to children. The plastic trim acts as insulation and will help prevent burns to children from hot surfaces. CAUTION NOTE: If installing the Advantium 120V Oven with an accessory storage drawer, the bottom trim is not required. Proceed to Step 5.
Notes 15
NOTE: While performing installations described in this book, safety glasses or goggles should be worn. Printed in Korea NOTE: Product improvement is a continuing endeavor at GE Appliances. Therefore, materials, appearance and specifications are subject to change without notice.
Instrucciones de Instalación Hornos con Velocidad de Cocción Incoporada de 120V de Advantium® CSB9120 PSB9120 ZSC1201 ZSC1202 31-2000001 MFL59060920 08-16 GEA GE es una marca de la Empresa General Electric. Fabricado bajo licencia de la marca registrada.
Información sobre Seguridad CONTENIDOS ANTES DE COMENZAR Información de Diseños Lea estas instrucciones en su totalidad y atentamente. IMPORTANTE — Conserve estas instrucciones para uso del inspector local. IMPORTANTE — Cumpla con todos los códigos y ordenanzas gubernamentales. • Nota para el Instalador — Asegúrese de que el Comprador conserve estas instrucciones. • Nota para el Consumidor — Guarde estas instrucciones con su Manual del Propietario para referencia futura.
Información de Diseños DIMENSIONES Y ESPACIOS DE DESPEJE DEL PRODUCTO NOTA:El aspecto variará dependiendo del modelo. 21-1/2Ǝ 29-3/4Ǝ 1-3/5Ǝ 19Ǝ 1Ǝ 1-1/10Ǝ 13Ǝ HERRAMIENTAS Y PIEZAS REQUERIDAS (NO SUMINISTRADAS) PLANIFICACIÓN ANTICIPADA • Estos hornos pueden ser instalados directamente en un gabinete para horno de 30” de ancho, utilizando la instalación estándar. • Las dimensiones de altura de la abertura son diferentes para las instalaciones con un cajón de almacenamiento de accesorios.
Preparación de la Instalación REQUISITOS ELÉCTRICOS Instalación Simple del Advantium 120: Este producto requiere un circuito de 120 voltios, 60 Hz, 15 amperes y consume 1.8 kilowatts. Este producto se debe conectar a un circuito con un suministro correcto de voltaje y frecuencia. • El tamaño del cable deberá ser conforme a los requisitos del Código Eléctrico Nacional o del código local obligatorio con relación a la cantidad de kilowatts.
Preparación de la Instalación Estándar IMPORTANTE: Siempre deje una altura mínima de 36 ¾” desde el piso hasta el recorte en cualquier instalación, ya sea simple o combinada, a menos que se instale una moldura de plástico. PREPARACIÓN DE LA ABERTURA PREPARACIÓN DE LA ABERTURA El Advantium 120 puede ser instalado junto con otros electrodomésticos de GE Appliances/Monogram. Siempre siga las instrucciones de instalación de cada producto, a fin de completar la instalación. (CONT.
Preparación para la Instalación Estándar IMPORTANTE: Siempre deje una altura mínima de 36 ¾” desde el piso hasta el recorte en cualquier instalación, ya sea simple o combinada, a menos que se instale una moldura de plástico. PREPARACIÓN DE LA ABERTURA PREPARACIÓN DE LA ABERTURA (CONT.) (CONT.
Preparación para la Instalación Estándar IMPORTANTE: Siempre deje una altura mínima de 36 ¾” desde el piso hasta el recorte en cualquier instalación, ya sea simple o combinada, a menos que se instale una moldura de plástico. PREPARACIÓN DE LA ABERTURA (cont.) PREPARACIÓN DE LA ABERTURA (cont.
Preparación para la Instalación Estándar IMPORTANTE: Siempre deje una altura mínima de 36 ¾” desde el piso hasta el recorte en cualquier instalación, ya sea simple o combinada, a menos que se instale una moldura de plástico. 23-1/2Ǝ PREPARACIÓN DE LA ABERTURA (cont.) Instalación junto a otro Horno con Velocidad de Cocción Incorporada de GE Appliances/ Monogram: 25-1/4Ǝ • Si montará un horno de Velocidad de Cocción Incorporado de GE Appliances/ Monogram junto a otro, use las dimensiones mostradas.
Preparación de la Instalación para el Montaje al Ras (Monogram Únicamente) IMPORTANTE: Siempre deje una altura mínima de 36 ¾” desde el piso hasta el recorte en cualquier instalación, ya sea simple o combinada, a menos que se instale una moldura de plástico. PREPARE EL INTERIOR PREPARACIÓN DE LA ABERTURA Corte e instale los ristreles laterales: El Advantium 120 puede ser instalado junto con otros electrodomésticos de GE Appliances/Monogram.
Preparación de la Instalación para el Montaje al Ras (Monogram Únicamente) IMPORTANTE: Siempre deje una altura mínima de 36 ¾” desde el piso hasta el recorte en cualquier instalación, ya sea simple o combinada, a menos que se instale una moldura de plástico. PREPARACIÓN DE LA ABERTURA Mín. de 23-1/2” El Advantium 120 puede ser instalado junto a otro Advantium 120 combinando uno al lado del otro.
Preparación de la Instalación Preparación CON un Cajón de Almacenamiento de Accesorios • PSB9120 y PSB7030 son los únicos modelos aprobados para su instalación debajo de una altura de 36 3/4” con un cajón de almacenamiento. CSB9120, ZSC1201 y ZSC1202 no están aprobados. • Según sea necesario, consulte la Preparación para la Instalación de Montaje Estándar O la Preparación para la Instalación de Montaje al Ras para conocer los detalles de la configuración.
Instrucciones de Instalación 1 RETIRE EL EMBALAJE Y LAS PIEZAS • Retire todo el material de embalaje y la cinta. • Ubique el paquete de piezas que contiene los tornillos de montaje. • Retire el horno del cartón. No levante la unidad de la manija ni del conducto. Es necesario que el horno sea levantado por dos personas. • Abra la puerta y retire cualquier embalaje que haya dentro del horno.
Instrucciones de Instalación 2 RETIRO DE LA MOLDURA DE LA PUERTA PARA INSTALACIONES SUPERIORES A 36” ÚNICAMENTE 3 DESLICE EL HORNO POR LA ABERTURA PRECAUCIÓN Se requiere contar con dos personas para colocar el horno en la abertura. Se deberá tomar la parte inferior sobre la parte frontal y trasera. NO USE LA MANIJA PARA LEVANTAR EL HORNO. SE PRODUCIRÁN DAÑOS.
Instrucciones de Instalación 4 INSTALE LA MOLDURA INFERIOR 6 INSTALACIÓN DE LOS TORNILLOS DE MONTAJE PRECAUCIÓN Si instalará el Horno Advantium 120V por debajo de 36”, deberá usar el borde inferior de plástico debido a riesgos de quemaduras de los niños. El borde de plástico actúa como aislante y ayudará a evitar que los niños sufran quemaduras sobre las superficies calientes. NOTA: Si instalará el Horno Advantium 120V con un cajón de almacenamiento de accesorios, la moldura inferior no será necesaria.
Notas 15
NOTA: Al realizar las instalaciones descriptas en este libro, se deberán usar anteojos o gafas de seguridad. Impreso en Corea NOTA: GE Appliances se esfuerza de forma constante para mejorar sus productos. Por lo tanto, los materiales, el aspecto y las especificaciones están sujetos a cambios sin aviso previo.