Bottom Freezer Refrigerators GEAppliances.com Safety Instructions . . . . . . . . . . . .2, 3 Operating Instructions Features . . . . . . . . . . . . . . . . . . . . . . . . . .4, 5 Controls . . . . . . . . . . . . . . . . . . . . . . . . . .6–9 Dispenser* . . . . . . . . . . . . . . . . . . . . . . . . .10 Autofill* . . . . . . . . . . . . . . . . . . . . . . . . . . . .11 Water Filter . . . . . . . . . . . . . . . . . . . . . . . .12 Fresh Food Storage Options . . . . .
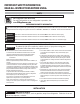
IMPORTANT SAFETY INFORMATION. READ ALL INSTRUCTIONS BEFORE USING. SAFETY IMPORTANT SAFETY INFORMATION READ ALL INSTRUCTIONS BEFORE USING GE Appliances website For more information on your refrigerator’s operation, visit www.GEAppliances.com REFRIGERATOR SAFETY INFORMATION This is the safety alert symbol. This symbol alerts you to potential hazards that can kill or hurt you and others. All safety messages will follow the safety alert symbol and the word “DANGER”, “WARNING”, or “CAUTION”.
GEAppliances.com SAFETY (CONT.) WARNING Tip Over Hazard. Built-in style models (model PYE, CYE, and PWE) are top heavy, especially with any doors open. These models must be secured with the anti-tip floor bracket to prevent tipping forward, which could result in death or serious injury. Read and follow the entire installation instructions for installing the anti-tip floor bracket packed with your refrigerator. CONNECTING ELECTRICITY WARNING Electrical Shock Hazard.
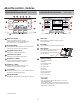
About the features. * Space-saving ice maker* QuickSpace™ shelf Ice maker and bin are located on the door creating more usable storage space. Functions as a normal full-sized shelf when needed and easily slides back to store tall items below. Showcase LED lighting Spillproof shelves LED lighting is positioned throughout the interior to spotlight areas in the refrigerator. LEDs are located under the fresh food door to light the freezer when opened. Designed to capture your spills for easier clean up.
About the features. * GEAppliances.com Door ice bin* 1. Open left fresh food door. 2. Pull down latch to release bin door. 3. Using handhold lift ice bucket up and out to clear locators in bottom of bin. 4. To replace the ice bucket, set it on the guide brackets and push until the ice bucket seats properly. 5. If bucket cannot be replaced, rotate the Ice Bucket Fork 1/4 turn clockwise. Latch Ice bucket Drop down dairy bin* 1. Open right fresh food 2.
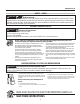
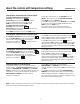
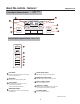
About the controls with temperature settings.
About the controls with temperature settings. Changing the Temperature for Control Style A GEAppliances.com To turn OFF cooling system, access SETTINGS from the HOME screen. Page over and tap COOLING SYSTEM ON. Press DONE to return to HOME screen. To turn ON cooling system, access SETTINGS from the HOME screen. Page over and tap COOLING SYSTEM OFF. Press DONE to return to HOME screen. Turning the cooling system off stops the cooling to refrigerator, but it does not shut off the electrical power.
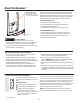
About the controls - features.
About the controls - features.* GEAppliances.
About the dispenser.* If no water is dispensed when the refrigerator is first installed, there may be air in the water line system. Press the dispenser paddle for at least five minutes to remove trapped air from the water line and to fill the water system. To flush out impurities in the water line, throw away the first six full glasses of water.
About autofill.* GEAppliances.com To Use HANDS FREE AUTO FILL: Center container on Recess Dispenser Tray (not touching bottom sensors) and remove hand from container 3UHVV AUTO FILL To Stop AUTO FILL Press CANCEL, to resume filling press AUTO FILL. Important Facts about AUTO FILL )RU RSWLPXP UHVXOWV XVH D XQLIRUP FRQWDLQHU EHWZHHQ µ WDOO DQG µ ZLGH &RQWDLQHU VKRXOG EH DV WDOO DV WKH ERWWRP sensors.
About the GE® RPWF water filter cartridge. Water Filter Cartridge The water filter cartridge is located in one of the following places: Bottom-freezer (BF) refrigerators: - In the water filter compartment on the right side wall of the left-hand fresh food door. - In the fresh food interior on the left side wall, near the top. When to replace the filter cartridge The filter cartridge should be replaced every six months or earlier if the flow of water to the dispenser or icemaker decreases.
About the fresh food storage options. Rearranging the Shelves Shelves in the refrigerator compartment are adjustable. To remove: Remove all items from the shelf. Tilt the shelf up at the front. Lift the shelf up at the back and bring the shelf out. To replace: While tilting the shelf up, insert the top hook at the back of the shelf in a slot on the track. Lower the front of the shelf until the bottom of the shelf locks into place.
About the fresh food storage options. Non-Adjustable Dairy Bin To remove: Lift the dairy bin straight up, then pull out. To replace: Engage the bin in the molded door supports and push down. The bin will lock in place. See page 33. Adjustable Bins on the Door Adjustable bins can easily be carried from refrigerator to work area. Drop down tray * (tray open) To remove: Lift bin straight up, then pull out. 1. Open right fresh food door 2. Depress both buttons on lower sides of bin and bin will drop down.
About the climate zone and temperature controlled drawer. GEAppliances.com ClimateZone Keep fruits and vegetables organized in separate compartments for easy access. Excess water that may accumulate in the bottom of the drawers or under the drawers should be wiped dry.
About the climate zone and temperature controlled drawer. How to Remove and Replace the Adjustable Deli/Produce Drawer To remove: Pull the drawer out to the stop position. Lift the front of the drawer up and out. To replace: Pull left and right slides until fully extended. Place drawer back in first and rotate drawer front down to seat on slide. Push the drawer in to closed position. How to Remove and Replace Drawer Divider To remove: Pull the drawer out to the stop position.
About the freezer. GEAppliances.com Freezer Basket and Drawer Basket. Drawer Utility Bin / Ice Bucket Non-Adjustable Bin in the Freezer To remove: push in plastic tab on either left or right side To replace: slide bin into location until it locks into place. Basket Removal To remove, Standard Depth models only: Open freezer door to the stop position. Remove freezer door bin by pushing plastic tab on either left or right side to release bin hinge pin.
About the automatic ice maker. A newly installed refrigerator may take 12 to 24 hours to begin making ice. Ice maker Feeler Arm Automatic Ice Maker* The ice maker will produce seven cubes per cycle approximately 100–130 cubes in a 24-hour period, depending on freezer compartment temperature, room temperature, number of door openings and other use conditions. The ice maker will fill with water when it cools to 15°F (–10°C). A newly installed refrigerator may take 12 to 24 hours to begin making ice cubes.
Care and cleaning of the refrigerator. GEAppliances.com Cleaning the Outside The stainless steel panels, door handles and trim. Do not use appliance wax, polish, bleach, or other products containing chlorine on stainless steel. Stainless steel (on some models) can be cleaned with a commercially available stainless steel cleaner. A spray-on stainless steel cleaner works best. Silver-accented plastic parts. Wash parts with soap or other mild detergents. Wipe clean with a sponge, damp cloth or paper towel.
Replacing the lights. Refrigerator Lights (LEDs) There is LED lighting in fresh food compartment and on the bottom of the fresh food doors to light the freezer compartment.* An authorized technician will need to replace the LED light. If this assembly needs to be replaced, call GE Service at 1.800.432.2737 in the United States or 1.800.561.3344 in Canada.
Installation Instructions Refrigerator GE and GE Profile™ models 4XHVWLRQV" &DOO *( &$5(6 or visit our Website at: GEAppliances.com ,Q &DQDGD FDOO or visit our Website at: www.GEAppliances.ca BEFORE YOU BEGIN TOOLS YOU MAY NEED Read these instructions completely and carefully. WARNING Tip Over Hazard. Built-in style models (model PYE, CYE, and PWE) are top heavy, especially with any doors open.
Installation Instructions DIMENSIONS All measurements are given with leveling leg fully retracted.
Installation Instructions INSTALLING THE REFRIGERATOR 1 REMOVE THE FRESH FOOD REFRIGERATOR LOCATION DOOR HANDLE 'R QRW LQVWDOO WKH UHIULJHUDWRU ZKHUH WKH WHPSHUDWXUH will go below 60°F (16°C) because it will not run often enough to maintain proper temperatures. 'R QRW LQVWDOO WKH UHIULJHUDWRU ZKHUH WKH WHPSHUDWXUH will go above 100°F (37°C) because it will not perform properly. ,QVWDOO LW RQ D IORRU VWURQJ HQRXJK WR VXSSRUW LW IXOO\ loaded.
Installation Instructions INSTALLING THE REFRIGERATOR (cont.) 3 REMOVE THE REFRIGERATOR DOORS REMOVE THE REFRIGERATOR DOORS (cont) A Securely tape the door shut with masking tape or have D Disconnect the water line from the back of the unit by a second person support the door. pressing down on the dark grey collar while pulling up on the water line. Pull water line through case conduit from the top to free the line for door removal.
Installation Instructions INSTALLING THE REFRIGERATOR (cont.) REMOVE THE REFRIGERATOR DOORS (cont) 5 REINSTALLING THE REFRIGERATOR DOORS Reverse steps 1 through 4 to reinstall refrigerator, follow details below for critical alignments. Note: for proper installation later, please follow the next step carefully. F Remove the tape and keeping the door as straight as possible, open the door to 90º then lift straight up to remove it. A 5HLQVWDOO FHQWHU KLQJH ILUVW DQG WRUTXH WKH VFUHZV WR in-lbs.
Installation Instructions INSTALLING THE REFRIGERATOR (cont.) 6 REMOVE THE FREEZER DOOR 7 REPLACING THE FREEZER DOOR A Pull the freezer door open to full extension. B Remove 3 attachment screws, located at the bottom on each side of the freezer door using 3/8” hex socket driver. A Pull the slide Mechanism to full extension using both hands simultaneously. B Remove the basket resting on the slides. CAUTION Lifting Hazard Freezer door is heavy Use both hands to secure the door before lifting.
Installation Instructions INSTALLING THE REFRIGERATOR (cont.) Instructions for adjusting freezer door gaps: IMPORTANT! The 6 mounting screws (3 on each side) are NOT interchangeable with the center or top hinge screws. Drawer screws have flat washer heads, and other screws have lines/ribs on washer heads. After installation of the freezer door, check for uniform gaps (top and bottom of right and left hand side) with the template provided.
Installation Instructions INSTALLING THE REFRIGERATOR (cont.) 8 LEVEL THE FREEZER DOOR 9 LEVEL THE FREEZER DOOR (cont.) A Lift the door on the side requiring adjustment, rotate the cam to required position. A 0 - Initial position 1 - Lift by 0.050” -1 - Lower by 0.050” -2 - Lower by 0.100 -3 - Lower by 0.150” Locate the height adjuster cam in the freezer door. Slightly loosen the three door attachment screws on both sides using a 3/8” hex socket driver.
Installation Instructions WARNING Anti-Tip Floor Bracket PYE, PWE Models Only TOOLS YOU WILL NEED Tip Over Hazard. 1/8” (3 mm) Drill Bit and Electric or Hand Drill Built-in style models (model PYE, CYE, and PWE) are top heavy, especially with any doors open. These models must be secured with the anti-tip floor bracket to prevent tipping forward, which could result in death or serious injury.
Installation Instructions AT-2 LOCATING THE ANTI-TIP FLOOR B CONCRETE Wall and Floor Construction: $QFKRUV UHTXLUHG QRW SURYLGHG 4 each 1/4” (6 mm) x 1-1/2” (38 mm) lag bolts 4 each 1/2” (12 mm) O.D. sleeve anchors 'ULOO WKH UHFRPPHQGHG VL]H KROHV IRU WKH anchors into the concrete at the center of the holes marked in Step 2. ,QVWDOO WKH VOHHYH DQFKRUV LQWR WKH GULOOHG holes. Place the anti-tip floor bracket as indicated in Step 2. Remove the locator template from the floor.
Installation Instructions INSTALLING THE REFRIGERATOR (cont.) 11 CONNECTING THE REFRIGERATOR B If you are using copper tubing, insert the end of the tubing into the refrigerator connection, at the back of the refrigerator, as far as possible. While holding the tubing, tighten the fitting. If you are using GE SmartConnect™ tubing, insert the molded end of the tubing into the refrigerator connection, at the back of the refrigerator, and tighten the compression nut until it is hand tight.
Installation Instructions INSTALLING THE REFRIGERATOR (cont.) 12 TURN ON THE WATER SUPPLY 15 LEVEL THE REFRIGERATOR DOORS Remember a level refrigerator is necessary for getting the doors perfectly even. If you need help, review the previous section on leveling the refrigerator. When the left door is lower than the right door. Turn the water on at the shutoff valve (house water supply) and check for any leaks. When the left door is higher than the right door.
Installation Instructions Non-Dispense Models Refrigerator Assembly Instructions, suggested assembly. ,QVWUXFWLRQV ĈDVVHPEODJH GX UpIULJHUDWRU ĈDVVHPEODJH VXJJpUHU Instrucciones de montaje del refrigerador, ensamble sugerido. H H G J G G Divider (Select models only) To place bins into doors: Match your bin with the letter shown. Position the bin hooks over the bin locator and push forward until inserted fully. Push bin down until locked into position.
Installation Instructions INSTALLING THE WATER LINE For PFE29 and PYE23P Models: If the refrigerator is operated before the water connection is made to the ice maker, see ICE MAKER under SETTINGS menu of the LCD Operations section and follow the screen commands to turn the ice maker OFF. Do not install the ice maker tubing in areas where temperatures fall below freezing.
Installation Instructions INSTALLING THE WATER LINE (cont.) Install the shutoff valve on the nearest frequently used drinking water line. WHAT YOU WILL NEED (CONT.) NOTE: The only GE approved plastic tubing is that supplied in GE SmartConnect™ Refrigerator Tubing kits. Do not use any other plastic water supply line because the line is under pressure at all times. Certain types of plastic will crack or rupture with age and cause water damage to your home.
Installation Instructions INSTALLING THE WATER LINE (cont.) 4 FASTEN THE SHUTOFF VALVE 7 CONNECT THE TUBING TO THE VALVE Fasten the shutoff valve to the cold water pipe with the pipe clamp. Place the compression nut and ferrule (sleeve) for copper tubing onto the end of the tubing and connect it to the shutoff valve. Pipe Clamp Make sure the tubing is fully inserted into the valve. Tighten the compression nut securely.
Normal operating conditions. GEAppliances.com Newer refrigerators sound different from older refrigerators. Modern refrigerators have more features and use newer technology. Do you hear what I hear? These sounds are normal. HUMMM... WHOOSH... The new high efficiency compressor may run faster and longer than your old refrigerator and you may hear a high-pitched hum or pulsating sound while it is operating. You may hear a whooshing sound when the doors close.
Before you call for service… Troubleshooting Tips Save time and money! Review the charts on the following pages first and you may not need to call for service. Problem Possible Causes What to Do Water filter indicator light remains lit after replacing filter Water filter indicator must be reset Non-LCD models: -Press and hold reset button. LCD models: -On the LCD screen select SETTINGS, then WATER FILTER. Select RESET. Water filter indicator light is not lit This is normal.
Before you call for service… GEAppliances.com Troubleshooting Tips (cont) Problem Possible Causes What to Do No water or ice cube production* Supply line or shutoff valve is clogge Call a plumber Water filter is clogged Replace filter cartridge or remove filter and install bypass plug Filter cartridge not properly installed Remove and reinstall filter cartridge, being certain that it locks in place. Ice maker is turned off Check that the ice maker is turned on.
SERVICE Before you call for service, review the detailed troubleshooting tips in the Owner’s manual. If needed, service can be scheduled by visiting us online GEAppliances. com or calling 800.ge.CARES 800.432.2737 Truth or Myth Truth or Myth? Answer Explanation The refrigerator water filter may require replacement, TRUE even though the filter indicator has not turned red, or reads “Filter Expired.” The water filter indicator will indicate the need to replace the water filter every six months.
SERVICE Before you call for service, review the detailed troubleshooting tips in the Owner’s manual. If needed, service can be scheduled by visiting us online GEAppliances. com or calling 800.ge.CARES 800.432.2737 Truth or Myth (cont.) Truth or Myth? Answer Explanation Door removal is always required for installation. MYTH Check chart on reverse side of this instruction. Doors should only be removed when necessary to prevent damage from passage way or access to final location.
GET CONNECTED. Maintenance Alerts Get text or email alerts if your Brillion-enabled appliances need attention, as well as reminders Manage your appliances from your computer or iPhone® Combine a GE Brillion™ Get Connected Starter Kit with your Brillion-enabled refrigerator, and you’ll have insight to help protect your investment and track your energy costs from your computer.
Refrigerator Warranty. (For customers in the United States) All warranty service provided by our Factory Service Centers, or an authorized Customer Care® technician. To schedule service, visit us online at GEAppliances.com, or call 800.GE.CARES (800.432.2737). Please have serial number and model number available when calling for service. Staple your receipt here. Proof of the original purchase date is needed to obtain service under the warranty.
RPWF Water Filter Cartridge Limited Warranty. Contact us at www.geapplianceparts.com, or call 800.GE.CARES. Appliance Service GE Appliances 800-GE-CARES Staple your receipt here. Proof of the original purchase date is needed to obtain service under the warranty.
Performance Data Sheet Model: GE RPWF Use Replacement Cartridge RPWF. The concentration of the indicated substances in water entering the system was reduced to a concentration less than or equal tothe permissible limit for water leaving the system as specified in NSF/ANSI Standard 42 and Standard 53. System tested and certified by NSF International against NSF/ANSI Standard 42 and Standard 53 for the reduction of substances listed below. Capacity 170 Gallons (643.5 Liters).
State of California Department of Public Health Water Treatment Device Certificate Number 11- 2110 Date Issued: November 16, 2011 Trademark/Model Designation GE RPWF Replacement Elements RPWF Manufacturer: 3M Purification Inc.
Consumer Support. GE Appliances Website In the U.S.: GEAppliances.com Have a question or need assistance with your appliance? Try the GE Appliances website, 24 hours a day, any day of the year! For greater convenience and faster service, you can now download Owner’s Manuals, order parts or even schedule service on-line. In Canada: www.GEAppliances.ca Schedule Service In the U.S.: GEAppliances.com Expert GE repair service is only one step away from your door.