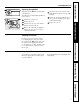
Top-Freezer Refrigerators www.GEAppliances.com Safety Instructions . . . . . . . . . 2, 3 Operating Instructions Owner’s Manual and Installation Instructions Care and Cleaning . . . . . . . . . .6, 7 Control Settings . . . . . . . . . . . . . .4 Ice Service . . . . . . . . . . . . . . . . . . .5 Storage Drawer . . . . . . . . . . . . . . .4 Models 11 and 12 Installation Instructions Preparing to Install the Refrigerator . . . . . . . . . . . . . 8 Reversing the Door Swing . . .
WARNING! Use this appliance only for its intended purpose as described in this Owner’s Manual. SAFETY PRECAUTIONS When using electrical appliances, basic safety precautions should be followed, including the following: ■ This refrigerator must be properly installed and located in accordance with the Installation Instructions before it is used. Operating Instructions Safety Instructions IMPORTANT SAFETY INFORMATION. READ ALL INSTRUCTIONS BEFORE USING.
WARNING! HOW TO CONNECT ELECTRICITY Do not, under any circumstances, cut or remove the third (ground) prong from the power cord. For personal safety, this appliance must be properly grounded. Have the wall outlet and circuit checked by a qualified electrician to make sure the outlet is properly grounded. Where a standard 2-prong wall outlet is encountered, it is your personal responsibility and obligation to have it replaced with a properly grounded 3-prong wall outlet.
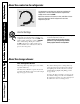
The temperature control on your refrigerator regulates the temperature in the fresh food and freezer compartments. Initially set the control at COLD. Adjust the control one increment at a time, and allow 12 hours after each adjustment for the refrigerator to reach the temperature you set. Control Settings The temperature control maintains the temperature in both the fresh food and freezer compartments. Setting the control at COOL is the warmest setting.
www.GEAppliances.com Ice Trays To release ice cubes, turn the tray upside down, hold it over a container and twist both ends. For only one or two ice cubes, leave the tray right-side up, twist both ends slightly and remove as many cubes as you want. Wash ice trays in lukewarm water only—do not put them in an automatic dishwasher. Safety Instructions About ice service. Operating Instructions Icemaker Accessory Kit (Model 12 only) An icemaker accessory kit is available from your dealer.
Cleaning the Outside Keep the outside clean. Wipe with a clean cloth lightly dampened with mild liquid dish detergent. Dry with a clean, soft cloth. Do not wipe the refrigerator with a soiled dish cloth or wet towel. These may leave a residue that can erode the paint. Do not use scouring pads, powdered cleaners, bleach or cleaners containing bleach because these products can scratch and weaken the paint finish. Operating Instructions Safety Instructions Care and cleaning of the refrigerator.
Replacing the Light Bulb Moving the control to OFF does not remove power to the light circuit. The bulb is located behind the shield next to the control. Unplug the refrigerator. Remove the screw. Insert the tabs at the bottom of the light shield with the slots in the bulb housing. Rotate the shield up until the tabs at the top of the shield pop into place in the bulb housing. Operating Instructions Replace the screw. Push in near the top of the shield and rotate down and out.
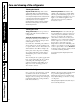
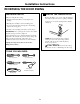
Installation Instructions Refrigerator Models 11 and 12 If you have questions, call 1.800.GE.CARES or visit our Website at: www.GEAppliances.com BEFORE YOU BEGIN CLEARANCES Read these instructions completely and carefully. Allow the following clearances for ease of installation, proper air circulation and plumbing and electrical connections. • IMPORTANT – Save these instructions for local inspector’s use. • • Sides 1″ (2.5 cm) • Top 4″ (10.
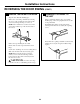
Installation Instructions REVERSING THE DOOR SWING IMPORTANT NOTES 1 REMOVE THE FREEZER DOOR When reversing the door swing: Remove the hinge cover screws (some models have lock washers with each screw), top hinge and shim. • Read the instructions all the way through before starting. Set the door on a non-scratching surface with the outside up. • Handle parts carefully to avoid scratching paint. • Set screws down by their related parts to avoid using them in the wrong places.
Installation Instructions REVERSING THE DOOR SWING 2 REMOVE THE FRESH FOOD DOOR (CONT.) 3 TRANSFER TOP HINGE TO THE LEFT Tape the door shut with masking tape. Remove the center hinge and shim by removing the screws (some models have lock washers with each screw). Lift up the hinge to remove it. Using a putty knife with the edge covered with masking tape, remove the plug buttons. Be careful of the paint finish. NOTE: Some models have a washer between the center hinge and the top of the fresh food door.
Installation Instructions 4 TRANSFER BOTTOM HINGE 5 TRANSFER FRESH FOOD DOOR TO THE LEFT HANDLE TO THE RIGHT To access the bottom hinge, move the refrigerator so it is 30″ from a wall. Then carefully tip the refrigerator back until it rests against the wall. After removing the handle: Remove the plug buttons from the right edge of the door top and insert them into the handle screw holes on the left side. (CONT.
Installation Instructions REVERSING THE DOOR SWING 6 TRANSFER FRESH FOOD DOOR (CONT.) 8 TRANSFER FREEZER DOOR STOP TO THE LEFT STOP TO THE LEFT Remove the door stop from the bottom of the right side of the door. Transfer the plug buttons from the bottom left side to the right side. Remove the door stop from the bottom of the right side of the door. Transfer the plug buttons from the bottom left side to the right side. Install the door stop on the left side. Install the door stop on the left side.
Installation Instructions 10 REHANG THE FRESH FOOD DOOR 12 REHANG THE FREEZER DOOR Make sure the washer(s) are in place on the bottom hinge pin. Place the fresh food door on the bottom hinge, close the door and tape it in place with masking tape. Place the freezer door on the center hinge over the pin. Raise the top hinge by hand and insert the top hinge pin into the hole in the door. Then swing the door shut.
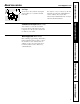
Safety Instructions Operating Instructions Installation Instructions Newer refrigerators sound different from older refrigerators. Modern refrigerators have more features and use newer technology. Do you hear what I hear? These sounds are normal. HUMMM... WHOOSH... ■ The new high efficiency compressor may run faster and longer than your old refrigerator and you may hear a high-pitched hum or pulsating sound while it is operating. ■ You may hear a whooshing sound when the doors close.
www.GEAppliances.com Troubleshooting Tips Save time and money! Review the charts on the following pages first and you may not need to call for service. Refrigerator does not operate Refrigerator in defrost cycle. • Wait about 30 minutes for defrost cycle to end. Control in OFF position. • Move the control to a temperature setting. Refrigerator is unplugged. • Push the plug completely into the outlet. The fuse is blown/circuit breaker is tripped. • Replace fuse or reset the breaker.
Safety Instructions Operating Instructions Troubleshooting Tips Problem Possible Causes What To Do Refrigerator has odor Foods transmitting odor to refrigerator. • Foods with strong odors should be tightly wrapped. • Keep an open box of baking soda in the refrigerator; replace every three months. Interior needs cleaning. • See Care and cleaning. Defrost water pan needs cleaning. • See Care and cleaning. Moisture forms on outside of refrigerator Not unusual during periods of high humidity.
GE Service Protection Plus™ GE, a name recognized worldwide for quality and dependability, offers you Service Protection Plus ™—comprehensive protection on all your appliances— No Matter What Brand! Benefits Include: • Backed by GE • All brands covered • Unlimited service calls • All parts and labor costs included • No out-of-pocket expenses • No hidden deductibles • One 800 number to call We’ll Cover Any Appliance. Anywhere. Anytime.
Consumer Product Ownership Registration Dear Customer: Thank you for purchasing our product and thank you for placing your confidence in us. We are proud to have you as a customer! Follow these three steps to protect your new appliance investment: 1 2 3 Complete and mail your Consumer Product Ownership Registration today. Have the peace of mind of knowing we can contact you in the unlikely event of a safety modification. After mailing the registration below, store this document in a safe place.
All warranty service provided by our Factory Service Centers, or an authorized Customer Care® technician. To schedule service, on-line, 24 hours a day, visit us at www.GEAppliances.com, or call 800.GE.CARES. Staple your receipt here. Proof of the original purchase date is needed to obtain service under the warranty. GE Will Replace: One Year From the date of the original purchase Any part of the refrigerator which fails due to a defect in materials or workmanship.
Consumer Support. GE Appliances Website www.GEAppliances.com Have a question or need assistance with your appliance? Try the GE Appliances Website 24 hours a day, any day of the year! For greater convenience and faster service, you can now download Owner’s Manuals, order parts, catalogs, or even schedule service on-line. You can also “Ask Our Team of Experts™” your questions, and so much more... Schedule Service www.GEAppliances.com Expert GE repair service is only one step away from your door.