Range Hoods ge.com Safety Information . . . . . . . . 2, 3 Operating/Care and Cleaning Instructions Charcoal Filter . . . . . . . . . . . . . . .5 Grease Filter . . . . . . . . . . . . . . . .4 Hood Light . . . . . . . . . . . . . . . . .5 Hood Surfaces . . . . . . . . . . . . . . .5 Controls . . . . . . . . . . . . . . . . . . . .4 Installation Instructions . . .6–14 Consumer Support Consumer Support . . .Back Cover Warranty . . . . . . . . . . . . . . . . . .
Safety Instructions IMPORTANT SAFETY INFORMATION. READ ALL INSTRUCTIONS BEFORE USING. SAFETY PRECAUTIONS WARNING – TO REDUCE THE RISK OF FIRE, Operating Instructions ELECTRIC SHOCK OR INJURY TO PERSONS, OBSERVE THE FOLLOWING: A. Use this unit only in the manner intended by the manufacturer. If you have questions, contact the manufacturer. B. Before servicing or cleaning unit, switch power off at service panel and lock the service disconnecting means to prevent power from being switched on accidentally.
Safety Instructions INSTRUCTIONS DE SÉCURITÉ IMPORTANTES. LISEZ TOUTES LES INSTRUCTIONS AVANT D’UTILISER.
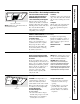
Safety Instructions Using the hood controls. Throughout this manual, features and appearance may vary from your model. Switch Pad Controls (on some models) Control Knobs (on some models) ON OFF Operating Instructions LO MED HI OFF ON NITE OFF OFF LO FAN Control LIGHT Control Turn to HI, MED or LO as needed. Continuous use of the fan system while cooking helps keep the kitchen comfortable and less humid. It also reduces cooking odors and soiling moisture that create a frequent need for cleaning.
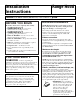
Replaceable charcoal filter NOTE: DO NOT rinse, or put charcoal filters in an automatic dishwasher. To remove: Pull down on the center of the front edge of the filter. The filter will then slip out of the retaining tabs on the back. To replace: Slip the back edge of the filter into the retaining tabs and push the front edge up until it snaps into place. Stainless Steel Surfaces (on some models) Do not use a steel-wool pad; it will scratch the surface.
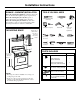
Installation Instructions Range Hood Questions? Call 800.GE.CARES (800.432.2737) or Visit our Website at: ge.com BEFORE YOU BEGIN DUCTWORK REQUIREMENTS Read these instructions completely and carefully. NOTE: Read the ductwork sections only if you do not have existing ductwork. If you have existing ductwork, skip to the “Damage” section and proceed. • IMPORTANT – Save these instructions for local inspector’s use. • • • • • • • The venting system must exhaust to the outside.
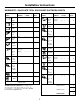
Installation Instructions WORKSHEET—CALCULATE TOTAL EQUIVALENT DUCTWORK LENGTH DUCT PIECES EQUIVALENT NUMBER LENGTH x USED = TOTAL 31⁄4″ x 10″ Rect., straight 1 Ft. 7″ Round, straight 1 Ft. 6″ Round, straight 1 Ft. 31⁄4″ x 10″ Rect. 90° elbow 14 Ft. x ( ) = Ft. 31⁄4″ x 10″ Rect. 45° elbow 8 Ft. x ( ) = Ft. 31⁄4″ x 10″ Rect. 90° flat elbow 33 Ft. x ( ) = Ft. 31⁄4″ x 10″ Rect. wall cap with damper 24 Ft. (18 ft. w/o damper) x ( ) = Ft. x ( ) = Ft. 31⁄4″ x 10″ Rect.
Installation Instructions DAMAGE – SHIPMENT/INSTALLATION TOOLS YOU WILL NEED • If the unit is damaged in shipment, return the unit to the store in which it was bought for repair or replacement. • If the unit is damaged by the customer, repair or replacement is the responsibility of the customer. • If the unit is damaged by the installer (if other than the customer), repair or replacement must be made by arrangement between customer and installer.
Installation Instructions 1 CHOOSE VENT OPTION Determine the vent option that your installation will require and that is available for your model from the below choices. A IMPORTANT: If the hood is to be installed in a recirculating, non-vented ductless manner, do not knock out any vent openings in the hood. Only an electrical access hole will be knocked out of the hood.
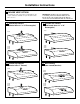
Installation Instructions 5 REMOVE WIRING COVER 2 REMOVE EXHAUST ADAPTOR If exhausting/venting using the 3 ⁄ ″ x 10″ rectangular duct—optional for JV338, JV347, JV348 and JV367 models only: Remove the exhaust adaptor from the inside of the hood. Set it aside along with its mounting screws. Remove the wiring cover from inside the hood. Set the cover and its mounting screw aside.
Installation Instructions 8 FOR 31⁄4″ X 10″ RECTANGULAR 10 FOR RECESSED-BOTTOM CABINETS ONLY DUCTED DISCHARGE INSTALLATIONS ONLY: Attach exhaust adaptor/damper over the appropriate knockout opening (for vertical or horizontal, depending on installation) with two exhaust adaptor screws. Make sure damper pivot is nearest to top/back edge of hood. Remove tape from damper flap.
Installation Instructions 11 MARK HOLES C. Outside rear exhaust (Horizontal duct–31⁄4″ x 10″ Rectangular) Select the vent option that your installation will require and proceed to that section: • Use the diagram or the hood as a template and mark the locations on the cabinet for ductwork, electrical wiring and keyhole screw slots. A.
Installation Instructions 14 SCREW IN PARTWAY 17 SECURE HOOD Drive a mounting screw (from the hardware packet) partway into each center of the narrow neck of the keyhole slots marked on the cabinet bottom. Slide the hood back against the wall. Tighten the mounting screws. Be sure the screw heads are in the narrow neck of the keyhole slot.
Installation Instructions 19 INSTALL LIGHT BULB 23 REPLACE FILTER NOTE: A light bulb is not shipped with the hood. Obtain one locally. Purchase and install an ordinary screw-base light bulb, not more than 60 watts. Make sure fan blade turns freely and replace the filter. NOTE: Install the metal grease filter if ducted or the charcoal filter if recirculated. 20 FOLLOW ELECTRICAL CODE Complete the electrical wiring according to National Electrical Code and local codes.
All warranty service provided by our Factory Service Centers, or an authorized Customer Care® technician. To schedule service, on-line, 24 hours a day, visit us at ge.com, or call 800.GE.CARES (800.432.2737). Please have serial number and model number available when calling for service. Staple your receipt here. Proof of the original purchase date is needed to obtain service under the warranty.
Consumer Support. GE Appliances Website ge.com Have a question or need assistance with your appliance? Try the GE Appliances Website 24 hours a day, any day of the year! For greater convenience and faster service, you can now download Owner’s Manuals, order parts or even schedule service on-line. Schedule Service ge.com Expert GE repair service is only one step away from your door. Get on-line and schedule your service at your convenience 24 hours any day of the year! Or call 800.GE.CARES (800.432.