Geberit Duofix Installation Manual Montageanleitung Instructions de montage Istruzioni per il montaggio
© 03-2021 968.075.00.
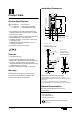
Installation Dimensions 19¾" ½" NPT For optional washlet water supply stop Product Data Product Specifications Geberit Model No. / Flush volume: • 111.798.00.1 / 1.6/0.8 gpf (6.0/3.0 lpf) • 111.597.00.1 / 1.28/0.8 gpf (4.8/3.
For convenience, values for a “typical” situation are included in the following chart: FOR REFERENCE Installation Installation Requirements To install tank and carrier, a 2 x 4" wood frame or metal frame construction is required. Studs must be placed 19 3/4" apart (clearance) where carrier will be positioned inside the wall.
Duofix Element in Holzständerwand montieren Installation Overview 19¾" min. 5½" wall or chase 04 FF RH, LH or vertical drainage runs allowed with 5 ½" minimum wall thickness. Vertical drainage run only for 3 ½" maximum walls. 1 13 mm 07 A H A B B © 03-2021 968.075.00.
2 4 H A A A B FF B B 3 5 ø ⅜'' 6 © 03-2021 968.075.00.
6 8 13 mm 9 10 mm 7 13 mm A H A B B © 03-2021 968.075.00.
2 H Duofix Element in Trockenbauwand montieren 19¾" min. 5½" wall or chase FF FF RH, LH or vertical drainage runs allowed with 5 ½" minimum wall thickness. Vertical drainage run only for 3 ½" maximum walls. 3 1 13 mm A H A B B 8 B © 03-2021 968.075.00.
4 6 ø ⅜'' 13 mm 7 PH 3 12" 5 12" 13 mm A H A 8 PH 3 B B © 03-2021 968.075.00.
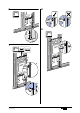
3 Abgangsbogen montieren min. 3½" wall min. 5½" wall 1¾" 3½" 4 5 1 min. 3½" wall 1¾" min. 5½" wall 3½" ≥ 45° ≥ 45° 2 ≤ 45° 10 ≤ 45° © 03-2021 968.075.00.
4 Wasseranschluss montieren 1 1 2 1 2 3 3 ¾" ½" 5 NPT ½" elbow 2 1 3 2 3 © 03-2021 968.075.00.
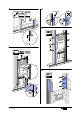
6 Stromanschluss bei Duofix Element vorbereiten ` 1¾" 7 9" 7⅛" / ø 1½" 1⅜" 3⅛" 4" ø 3" 5½" 8 3½" 7⅛" / 9" ø 1½" 1⅜" ø 3" 4" 12 ø 5½" © 03-2021 968.075.00.
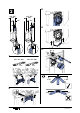
Bowl installation 1 4 Remove yellow protection plugs and seals from pipes. Add dimension X and 1/8". Using that dimension, mark a line on the pipe measuring from the hub side. Cut off the pipe at the line with a pipe cutter. 1 +1/8" +(3 mm) 2 5 2 Insert discharge pipe into the pipe hub in the wall. Place a straight edge flush against the wall and mark a line on the pipe. Fit finned rubber seal onto flush pipe. Repeat same procedure for discharge pipe. X X Add dimension Y and 1/8".
8 Remove protective sleeves from mounting rods. Determine protruding rod length for bowl installation. Install both pipes into the hubs in the wall. A A 2 1 +13/16" +(20 mm) 2 CAUTION High torque forces WC ceramic appliance may break ` Do not overtighten hex nuts. 9 Place bowl onto rods. Attach cap washer with nose up and facing forwards onto rods. Install washer and hex nuts, tighten loosely. Level bowl. Tighten hex nuts. Snap on the bolt caps. 10 Seal gap around bowl with waterproof sealant.
© 03-2021 968.075.00.
Geberit , 2100 Clearwater Drive, Des Plaines, IL 60018-5999 Phone: (847) 803 5000 Fax: 847/803-5454 For Technical Assistance: 800 / TEC-TRUE (800-832-8783) Geberit International AG, Schachenstrasse 77, CH-8645 Jona T +41 55 221 63 00 F +41 55 221 63 16 documentation@geberit.com ➔ www.geberit.us ➔ www.geberit.com 16 © 03-2021 968.075.00.
0GU187 Installation Manual \ Manual de instalación \ Manuel d'installation \ Manual de instalação Wall Hung Bowl Perform the installation work according to these instructions to ensure the product is safe and functions well. This product should be installed by a professional. After installation, explain the use and care of this product to the customer. Installez le produit selon les instructions à l'installation du produit est fait correctement et en toute sécurité.
Peças Piezas B-2 A-1* * D-shape bowl shown * Modelo forma D representado * Modèle D forme représenté * Modelo forma D representado B-2 or o ou o Product may appear different from images in manual depending on the model. El producto real puede variar en apariencia dependiendo del modelo. Le produit réel peut varier en apparence en fonction du modèle. O produto real pode variar de acordo com o modelo. Before Installation \ Antes de la instalación Water supply inlet Suministro aqua Alimentation en eau
Installation \ 11⁄16” (18mm) Instalación \ Installation \ Instalação 1-9⁄16” (40mm) Screw B-2 onto the threaded rods according to the indicated dimensions. Atornille el B-2 en las varillas roscadas según las dimensiones indicadas. Vissez B-2 dans les tiges filetées selon les dimensions indiquées. Aperte o B-2 nas hastes roscadas de acordo com as dimensões indicadas. B-2 11⁄16” (18mm) 1-9⁄16” (40mm) WARNING: Make sure plastic pressure reducer is installed as shown.
Installation \ Instalación \ Installation \ Instalação Use B-1 to securely fasten A-1 to the wall. Verify that A-1 is level and flat against the wall. Do not remove the guide tubes after installation. Use B-1 sujetar A-1 a la pared. Verifique que A-1 esta nivelado y plano contra la pared. No retire los tubos de guía después de la instalación. Utilisez B-1 pour attacher solidement A-1 au mur. Vérifiez que A-1 est de niveau et à plat contre le mur. Ne retirez pas les tubes guides après l'installation.
Warranty 1. TOTO warrants its vitreous china products (“Product”) to be free from defects in materials and workmanship during normal use when properly installed and serviced, for a period of one (1) year from date of purchase. This limited warranty is extended only to the ORIGINAL PURCHASER of the Product and is not transferable to any third party, including but not limited to any subsequent purchaser or owner of the Product.
Garantía 1. TOTO ® garantiza que su vitreos china producto no presenta defectos en sus materiales ni de fabri cación durante su uso normal cuando es instalado y mantenido adecuadamente, por un periodo de uno (1) año(s) a partir de la fecha de compra. Esta garantía limitada es válida solamente para el COM PRADOR ORIGINAL del Producto y no es transferible a una tercera persona, incluyendo, pero sin limi tarse a, cualquier comprador o propietario subsecuente del Producto.
Garantie 1. TOTO ® garantit sa vitreous china produits contre tout défaut de matériau et de fabrication pendant l’utilisation normale, lorsqu`elle est correctement installée et maintenue pour une période de une (1) ans à dater de l`achat. La présente garantie limitée ne peut être prolongée que pour le seul ACHETEUR D`ORIGINE de l`appareil et n`est pas transférable à un tiers, y compris mais pas limité à tout acheteur ou propriétaire subséquent du produit.
Garantia 1. A TOTO garante que o seu sistema de depósito na parede (“produto”) não tem defeitos de material e de fabrico durante a utilização normal quando instalado e mantido adequadamente, pelo período de um (1) ano a partir da data da compra. Esta garantia aplica-se apenas ao COMPRADOR ORIGINAL do produto e não é transmissível a terceiros, incluindo - mas não limitado a - posteriores compradores ou proprietários do produto.
INSTALLATION MANUAL MONTAGEANLEITUNG INSTRUCTIONS DE MONTAGE ISTRUZIONI PER IL MONTAGGIO
A ✓ 6LJPD FP A 6LJPD FP 22 6LJPD FP 1 B 27 2 2 5735637771 © 11-2018 996.653.00.
6 3 4 7 5 8 5735637771 © 11-2018 996.653.00.
9 12 PP 13 PP 10 11 4 5735637771 © 11-2018 996.653.00.
16 14 PP 15 ² FP 17 5735637771 © 11-2018 996.653.00.
18 NN 19 O O 6 5735637771 © 11-2018 996.653.00.
3 B ✓ 6LJPD FP 4 1 5 2 5735637771 © 11-2018 996.653.00.
8 6 7 9 8 5735637771 © 11-2018 996.653.00.
13 10 11 PP 14 ² FP 12 PP 5735637771 © 11-2018 996.653.00.
17 15 PP NN 18 O 16 O 10 5735637771 © 11-2018 996.653.00.
5735637771 © 11-2018 996.653.00.
996.653.00.0 Geberit International AG Schachenstrasse 77, CH-8645 Jona documentation@geberit.com www.geberit.com 12 5735637771 © 11-2018 996.653.00.