On-Lap 1306H User Manual ユーザーガイド
English Table of Contents Notices, Cautions & Warranty Exclusions LCD Pixel Statement FCC Statement & CE Conformity WEEE Symbol Information —I —II —II —III Chapter 1 Parts of On Lap Monitor & Accessories —1 —1 —2 —2 —2 Section 1 Parts Description Section 2 Accessories Description Chapter 2 Installation Instructions Section 1 Instructions for Using Monitor and Protective Cover Stand Section 2 Connect to Apple® MacBook Pro/Air or Other Devices Supporting USB Type-C(DP Alt) Mode Section 3 Connect to Sma
目次 ご使用上の注意事項と警告および製品保証について 液晶ディスプレイの使用と画素について WEEE マークについて 第一章 内容物の解説 その 1. モニター本体の解説 その 2. 付属品の解説 第二章 インストールガイド その 1. モニターと保護カバースタンドの使用説明 —IV —V —V —12 —12 —13 —13 —13 その 2. Apple® MacBook Pro/Air に接続、または他の USB Type -C(DP Alt)モードをサポートするコンピュータデバイス —15 その 3 .スマートフォンと接続する(USB type-C(DP Alt)モードをサ ポート) —15 その 4. HDMI 出力に対応したコンピュータやゲーム機 などの機 器に接続する —16 その 5 .イヤホンやスピーカーと接続する 第三章 ホットキー、LED、OSD 表示について その 1. ホットキー、LED、OSD 表示について その 2. OSD の解説 第四章 モニター拡張モードの設定 その 1. 拡張モードの設定- Windows 10 その 2.
I Notices, Cautions & Warranty Exclusions Warning: The sign alerts you to potential hazards that can hurt you or damage the product. 1. When carrying On-Lap Monitor, please put it into the protective cover with glass side inward and avoid pressing the monitor violently and rubbing the glass surface by any sharp objects. 2.
II (1)The bar code has been removed or worn down, and cannot be identified. (2)This product has been modified, disassembled, or refitted. (3)Display and touch function working normally; only variation in appearance (i.e., ageing, attrition, scratch, color changing and etc.). (4)Any breakdown caused by power supply. (i.e., inputting power over 5V or unsteady current) (5)Any damage caused by disoperation or failure to follow this manual. (i.e.
III CE Declaration of Conformity This product complies with the following standards: ● EN 62368-1:2014+A11:2017 (Safety requirement of Audio/video, information and communication technology equipment) ● EN 55032:2015 Class B(Radio Disturbance requirement of Information Technology Equipment). ● EN55024:2010+A1:2015(Immunity requirement of Information Technology Equipment). ● EN 61000-3-2:2014 (Harmonic current emissions).
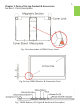
Chapter 1 Parts of On Lap Product & Accessories Section 1 Parts Description Fig.: Part description of 1306H Cover Stand Fig: On-Lap 1306H Monitor & Connection Ports Fig.
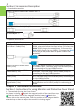
2 Section 2 Accessories Description 1. Standard Accessories HDMI-A to Micro HDMI Video Cable(1.2m)*1 USB-A to USB-C Power Cable(1.2m)*1 USB Type-C Video Cable(1.0m)*1 5V 2A Adapter *1 2. Optional Accessories Product Name Description USB Type-C Video and Independ- To connect this cable to smartphone and On-Lap 1 Connect the ent Power Y-Cable(0.5m) 1306H, please do follow the steps below.○ 2 Connect the BLACK USB-C plug to the smartphone. ○ 3 Connect the BLUE BLUE USB-C plug to On-Lap 1306H.
1 ○ 2 ○ 3 ○ 3 The min. viewing angle of horizontal display is 40 degrees. Do not attach the rubber side of the magnetic buckle higher than 12cm from the bottom of the sheet mental, otherwise it may cause the monitor overturning. 2. Take out and Set up the Monitor As the fig. below, rotate aside the Cover Locks firstly, and take the monitor out.
4 Section 2 Connect to Apple® MacBook Pro/Air or Other Devices Supporting USB Type-C(DP Alt) Mode ※ Notice 1: USB Type-C port on PC, smartphone or any devices must meet the following two conditions in order to connect to On-Lap 1306H. ▲ USB Type-C port must support DisplayPort Alternate Mode (USB Type-C(DC Alt)) ▲ USB Type-C port must output 5V 1.5A current to On-Lap1306H monitor. ※ Notice 2: Products such as tablet PCs or smart phones may not be able to stably output 1.
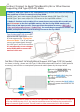
Section 4 Connect to PC, Game Console or Other Devices that Supporting HDMI Output 5 1. Connect to a Laptop or Desktop PC As shown in the fig. below, use HDMI-A to Micro-HDMI Video Cable (1.2m) to connect to HDMI-A port on PC, and USB-A to USB-C Power Cable (1.2m) to connect to USB-A port on PC or 5V-2A adapter. 2. Connect to Nintendo® Switch As shown in fig. below, please use Switch dock to power 1306H by USB-A to USB-C Power Cable(1.2m).
6 Section 5 Connect to Headphone or Speaker As shown in fig. below, connect a headphone or external speakers to the Headphone out port on the monitor, and then connect HDMI-A to Micro-HDMI video cable (1.2m) to a PC, a game console or other products with HDMI-A port. Or, if a PC’s USB Type-C port supports “DisplayPort Alternate Mode”, please choose USB Type-C Video Cable to connect to USB Type -C port. ※ Notice: Headphone out port supports 2-channel audio output.
7 Hot Keys Description: Power Press the Power Button to power on/off the Monitor. Exit In the OSD panel, press the Exit Button to exit and back to the previous page. Menu/Select Press the Menu Button to launch OSD panel. In OSD panel, press this button to select and enter the next page. Increase Volume/UP Press this Button to show "Volume bar." In the OSD menu, press this button to move up or to the left. Press and hold this button to increase the volume continuously.
8 3. Color Settings 1) Color Effect: In Color Effect, there are 4 modes: "Standard", "Photo", "Game", and "Movie" offered to be selected. 2) Blue Light Reduction: Select "On" to reduces the screen's blue light automatically. 3) Color Temperature: Select "Cool" to increase the blue color of the image; Select "Warm" to increase the red color of the image. Select "User" to adjust the RGB color settings manually. 4.
9 Select "1920x1080" at Resolution and select "Landscape" at Orientation for horizontal display. Section 2 Settings of Extended Display on Mac (OS X) Click , then select 【System Preference】→ choose 【Arrangement】tab, and uncheck "Mirror Displays". Select one of the blue rectangles, and drag to the desired position .Click【Display】tab, select resolution of the laptop firstly, then click "Gather Windows", and select resolution to "1080p" for On-Lap 1306H.
10 Section 2 Intel Graphics Card Settings R In desktop mode, right-click on the Desktop and select [NVIDIA Control Panel]. On the pull -down menu of [Display], select On-Lap 1306H. Click Change Resolution, and find Output Dynamic Range at the third item then select [Full] and click apply. Section 3 AMD Graphics Card Settings In desktop mode, right-click on the Desktop and then select [AMD Radeon Settings]. Find Display 2.
11 Chapter 6 Product Specification Section 1 General Specification On-Lap1306H Item Panel True Resolution Color Depth Brightness Contrast Ratio Viewing Angle Response Time Video Input Audio Output HDCP Support HDCP CEC Support Plug and Play Power Consumption Power Consumption- Standby Mode Power Consumption- Off Mode Rated Voltage Environment Conditions Wide screen 13.3-inch (16:9) 1920x1080 16.7M colors 300 (cd/m²) (Typ.) 800:1(Typ.) 170°(H)/170°(V)(CR>10) 12.5ms(Typ.) HDMI*1, USB Type-C (DP 1.
12 Resolution Refresh Rate Horizontal Frequency (kHz) Vertical Frequency (Hz) 848x480 960x600 1024x768 1152x864 1280x600 1280x720 1280x768 1280x800 1280x960 1280x1024 1360x768 1366x768 1360x1024 1400x1050 1440x900 1600x900 1600x1024 1680x1050 1920x1080 60Hz 60Hz 60Hz 60Hz 60Hz 60Hz 60Hz 60Hz 60Hz 60Hz 60Hz 60Hz 60Hz 60Hz 60Hz 60Hz 60Hz 60Hz 60Hz 31.02 37.212 48.363 53.783 37.377 45.000 47.776 49.702 60.000 63.981 47.712 47.712 63.606 65.317 55.935 55.990 63.675 65.290 67.500 60.000 59.635 60.004 59.
13 Chapter 7 Troubleshooting Problem Solutions 1. When I connect On- On-Lap 1306 has dual channel speakers. Lap monitor to the game Please select 2 ch. audio output rather than 5.1 ch. in the audio console or play videos, output settings of the game console or DVD player. the monitor only plays background music but no human voice or part of sound. 2.
IV ご使用上の注意事項と警告および製品保証について この表示に従わなかった場合、けがをする恐れや製品に物理的な破損が生じる可能性があ ることを示します。 1.外出時には、必ずモニターに保護カバーを装着してパネル面を内側にして携帯してくださ い。モニターが押されたり鋭利な物に接触しないようご注意ください。 2.HTC® スマートフォン(U11、U12 など)をモニターに接続している時、スマホのメ ディア音量は自動的に最大に調整されます。 音量が大きすぎると、使用者の聴力に影響 する恐れがあります。あらかじめ画面の音量を最小にし、それでも音量が大きすぎる場合 は、聴覚障害を防ぐためイヤホンを使用しないでください。 3.
V 12.
12 第一章 内容物の解説 その 1.
13 その 2. 付属品 の説明 1. 標準付属品 HDMI-A to Micro-HDMI ビデオケーブル(1.2m) 1 本 USB-A to USB-C 電源信号ケーブル (1.2m)1 本 USB Type-C ビデオケーブル(1.0m) 1 本 AC アダプター(5V,Max.2A) 1 個 2. 別売付属品 付属品名称 USB Type-C ビデオと独立電源 Y ケーブル(0.5m) 説明 このケーブルでスマートフォンと On-Lap1306H を使用 1 黒い USB-C プラグをス し、次のステップで接続します。○ 2 青い USB-C プラグを Onマートフォンに接続します。○ 3 青い USB-A プラグをモバイ Lap1306H に接続します。○ ルバッテリーに接続し、1306H に電力が供給さます。 HDMI-A to Micro-HDMI ビデオ ケーブル (2.
14 マグネットボタンが金属片に吸着する位置に調整すると、モニターの表示角度を変更できま す。 1 ○ 2 3 ○ ○ 横置き表示の最低角度は 40° です。マグネットボタンのラバー面の 最大吸着位置は金属片の底面から 12cm です。それよりも高いところに おくと倒れることがあります。 2. モニターの取り出しと設置 図のように、保護カバーロック(Cover Lock)を回し開けてモニターを取り出し、モニター背面部 1 モニター下部を先に保護カバーに を保護カバーの方向に向けます。ボタンを上に向けて○ 2 モニター上部を保護カバーの上部の切り込み口に入れ、保護カバーロック 入れてから、○ (Cover Lock)を下に向けて回転させます。 2.
15 注意:モニター背面の厚みのある側が下になるようにカバーに収納してください。モニター の上下を逆にして保護カバーに入れると、画面がこすれるもとになったり、保護カバーロック (Cover Lock)をかけることができなくなります。 その 2. Apple® MacBook Pro/Air に接続、または他の USB Type-C(DP Alt)モー ドをサポートするコンピュータデバイス ※ 注意 1 : On-Lap 1306H モニターに接続するには、コンピュータやスマートフォン等の USB Type-C ポートが以下の 2 つの条件を満たす必要があります。 ▲USB Type-C ポートは DisplayPort Alternate Mode モード(USB Type-C(DP Alt))をサポー トしている。 ▲USB Type-C ポートは On-Lap 1306H モニターに 5V 1.5A 電流を出力できる。 ※ 注意 2 :タブレット PC またはスマートフォン等の製品は、On-Lap 1306H モニターに 1.
16 3 で電流を On-Lap1306H に伝送する必要があります。ステップ ○ 1 または 2 で 注意:ステップ○ 先に On-Lap1306H に電流が供給されている場合、モニターは立ち上がっていても携帯がモ ニターとのメッセージを直ちに交換できない可能性があり、 これにより DP Alt モードのビデオ 接続が失敗を生じてしまいます。 その 4. HDMI 出力に対応したコンピュータやゲーム機などの機器に接続する 1.ノートパソコン、またはコンピュータに接続 下図のように、HDMI-A to Micro-HDMI ビデオケーブル(1.2m)を使用してコンピュータの HDMI-A ポートに接続し、USB-A to USB-C 電源ケーブル(1.2m)を使用してコンピュータの USB-A ポートまたは 5V-2A 充電器に接続します。 図:モニターを保護カバー内に入れる 2. Nintendo® Switch に接続 下図のように、1306H モバイル電源を起動するには、USB-A to USB-C 電源ケーブル(1.
17 その 5. イヤホンやスピーカーと接続する 下図のように、ヘッドフォンまたは外部スピーカをモニターのイヤホンジャック (Headphone out port)に接続し、もう一方の端をコンピュータ、ゲーム機、または その他の製品の HDMI-A ポートに接続します。または、コンピュータの 「DisplayPort Alternate Mode モード」を対応する USB Type-C ポートを接続して ください。 ※注意:イヤホンジャック(Headphone out port) は 2 チャンネル音声出力に対 応しています。マイクの音声入力(Audio in)は挿入しないでください。コンピュー タまたはゲーム機のサウンドフォーマットが 5 または 7 チャンネルの場合、ヘッ ドフォンからすべての音が出力されないことがあります(例えば、ゲーム中ボーカ ルが消える)。コンピュータまたはゲーム機の音声設定を 2 チャンネル音声出力 に選択してください。 or 第三章 ホットキー、LED、OSD 表示について その 1.
18 ホットキーの説明: 電源ボタン 退出 電源ボタン:モニターの On/Off に使用します。 OSD メニューの操作時にこのボタンで一つ前のページに戻ること ができます。 メニュー/選択 このボタンで OSD メニューを呼び出すことができます。 OSD メニューが表示されていないときはこのボタンでスピーカの 音量を上げる/ ボリュームを上げることができます。押し続けることで連続的にボ リューム操作ができます。OSD メニューが表示されているときは 上 カーソルを上/左移動するために使用します。 OSD メニューが表示されていないときはこのボタンでスピーカの 音量を下げる/ ボリュームを下げることができます。押し続けることで連続的にボ リューム操作ができます。OSD メニューが表示されているときは 下 カーソルを下/右移動するために使用します。 + リセット 「音量を下げる/下」ボタンと「終了」ボタンを同時に押すと、モニ ターの各設定を工場出荷時の設定値に戻すことができます。 + ミュート 「音量を上げる/上」ボタンと「音量を下げる/下」ボタンを同時に押 すと、ミュートモードになり、もう一度
19 3. 色設定 (Color Settings) 1) ”色設定”を開いた後、””カラーモード”で、”標準”、”ゲー ム”、”写真”と”映画”等 4 種のプリセットモードが選択で きます。 2) ブルーライト軽減 (Blue Light Reduction):「オン」を選択す ると、ディスプレイのブルーライトが自動で軽減されます。 3) 色温度(Color Temperature): 「寒色系」を選択すると、画 面の青みが強くなり、「暖色系」を選択すると、画面の赤み が強くなります。「カスタム設定」を選択すると、手動で RGB 値を設定できます。 4.
20 第四章 モニター拡張モードの設定 その 1. 拡張モードの設定(Windows10) マークをクリック後、 [設定]をクリックします。[システム]を選 択後、[ディスプレイ]を選択します。[複数のディスプレイ]という 項目から「表示画面を拡張する」を選択します。[解像度]で 「1920x1080」を選択し、[向き]で「横」を選択します。「変更の維 持」を選択し、設定を保存して終了します。 その 2. 拡張モード設定の Mac (OS X) 【システム環境設定】を選択→【ディスプレイ】を選択→【配置】を選択し、「ディスプレ イをミラーリング」のチェックボックスのチェックをはずすことで拡張モードとして使用できま す。 また、いずれかのモニターをドラッグすると、モニターの配置を自由に変更することがで きます。【ディスプレイ】を選択し、モニタの解像度を選択してから「ウィンドウを集める」を クリックすると、On-Lap 1306H の解像度が「1080p」に設定されます。 第五章 製品仕様 その 1.
21 規格 プラグ&プレイ 消費電力 消費電力- スタンバイ 消費電力- Off 定格電圧/電流 環境温度 サイズ(W/H/T) 重量 認証 On-Lap1306H VESA DDC2B/C1 ≦ 8W <0.5W <0.5W 5V 1.6A(Typ.) 操作: 0~50℃ ストレージ: -20~60℃ 320mm*203mm*9mm (モニター) 325mm*214mm*15.4mm (モニターと保護カバー) 670g (モニター) 935g (モニターと保護カバー) R53848 RoHS その 2.
22 その 3. 対応映像モード 対応映像モード 1920x1080P (50Hz/59.94Hz/60Hz) 1280x720P (50Hz/59.94Hz/60Hz) 720x480P (59.94/60Hz) 640x480P (59.94/60Hz) 第六章 トラブルシューティング 症状 解决方法 1. On-Lap モニターを ゲームコンソールや DVD プレーヤーはすべて 5.1ch サラウンドで DVD プレーヤーやゲーム はなく、 2ch ステレオをオンにしてください。 コンソールに接続する と、BGM は再生されます が、人の声は再生されま せん。 2.コンピュータ/携帯の On-Lap1306H モニターに接続するためには、コンピュータやス USB Type-C ポートを接 マートフォン等の製品の USB Type-C ポートが、DisplayPort 続しますが、モニターに Alternate Mode モード(USB Type-C(DP Alt))に対応している必要 画面が表示されません。 があります。 デバイスが USB Type-C(DP Alt)モードに対応し、5V 1.
GeChic Corporation 11F-3, No. 138, Zhongming S. Rd., West Dist., Taichung, Taiwan Customer Service : service@gechic.com Rev.
保証書 保証規定 当製品ご購入から 1 年間(12ヶ月)に限り、通常の使用状態において、万が 一故障した場合、該当製品を無償にて修理致します。なお、修理が困難な場 合、同等品との交換となる場合があります。 保証期間内であっても以下のような場合は有償修理となります。 ・お客様の不適切な取扱が原因で故障、破損が生じた場合。 ・火災、地震、水害、落雷、その他の天地異変などによる故障及び破損の場合。 ・弊社の修理部門以外で修理や改造などを行った製品。 ・部品や付属品などの破損及び遺失等。 マニュアルをよく閲覧された上、製品をご使用ください。 より詳細な保証内容、条件、使用方法等につきましては、弊社のマニュアル 及びホームページにてご確認ください。 【製品情報】 モデル: On-Lap1306H シリアル No : 購入日付: 販売店 : 1年 保証 (販売店のスタンプ)