L H 1 0 0 TM User Guide 1 Notice 17 Benutzerhandbuch 47 Guia del Usario 51
CONTENTS INTRODUCTION CONTENTS 1 INTRODUCTION Unpacking the loopHEARTM 2 3 DESCRIPTION 4 INSTALLATION Setting Up Locating the loopHEARTM 6 6 9 USING THE loopHEARTM Turn the loopHEARTM On Turn the loopHEARTM Off Using the Headset Using the External Microphone 10 10 10 10 10 TROUBLESHOOTING 12 SAFETY INFORMATION 13 GUARANTEE 14 RECYCLING DIRECTIVES 16 1 Congratulations on purchasing your GeemarcTM loopHEARTM.
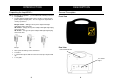
DESCRIPTION INTRODUCTION Unpacking the loopHEARTM General Description TM When unpacking the loopHEAR , you should find the following in the box: • 1 loopHEARTM • 1 power adaptor/charging Unit. There are three country specific power adaptor/charging units.
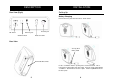
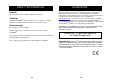
INSTALLATION DESCRIPTION Rear View (Fig A) Setting Up Battery Charging Remove the base plate from the unit as shown below: DC Power EXT mic jack ON/OFF switch Headset jack Headset Volume Base View See Fig. B for further detail Removable Base Plate Insert a screwdriver into the opening of the catch mechanism. This is found on the bottom right of the base plate. Push the catch gently with the screwdriver - this will release the base plate. Lift the loopHEARTM unit off the base plate.
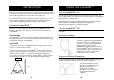
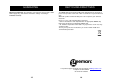
INSTALLATION INSTALLATION Replace the base plate by placing the hook found on the bottom left of the loopHEARTM into the catch on the base plate. Press the loopHEARTM down gently until you hear a click.: Fig B Opening of the catch mechanism Hook Catch Remove the battery door. Insert the supplied rechargeable battery, plug the connector into the socket and replace the battery door. Plug the power cable into the power socket found on the rear of the unit.
INSTALLATION Please use the strain relief mechanism as displayed. This provides extra protection for the cable at the connection point. It will extend the life of the power cable and reinforce the connection to the equipment. The loopHEARTM will need to charge for 4 hours before its first use. The power indicator will blink red whilst the battery is charging. When the power indicator is blinking green, the battery is fully charged.
USING THE loopHEARTM The external microphone can also be wall mounted with the wall clip supplied. Simply stick the wall clip to the wall in the most convenient location. Gently push the external microphone into the microphone holder. TROUBLESHOOTING The RED LED is flashing • Charge the battery The loopHEARTM keeps on switching off • Make sure that the batteries are fully charged You cannot hear clearly due to interference or you cannot hear at all • .
SAFETY INFORMATION General Do not open the unit. Contact the helpline for all repairs. Cleaning Clean the loopHEARTM with a soft cloth. Never use polish or cleaning agents - they could damage the finish or the electronics inside. Environmental GUARANTEE From the moment your GeemarcTM product is purchased, GeemarcTM guarantee it for the period of one year. During this time, all repairs or replacements (at our discretion) are free of charge.
GUARANTEE Electrical connection: The apparatus is designed to operate from a 230V 50Hz supply only. (Classified as ‘hazardous voltage’ according to EN60950 standard). RECYCLING DIRECTIVES The WEEE (Waste Electrical and Electronic Equipment) has been put in place for the products at the end of their useful life are recycled in the best way. When this product is finished with, please do not put it in your domestic waste bin.
SOMMAIRE INTRODUCTION SOMMAIRE 17 INTRODUCTION Contenu du colis 18 19 DESCRIPTION 20 INSTALLATION Mise en place Utilisation du LoopHEARTM 22 22 25 FONCTIONNEMENT Allummez le LoopHEARTM Eteindre le LoopHEARTM Utilisation du casque Utilisation du microphone externe 26 26 26 26 26 PROBLEMES EVENTUELS 28 RECOMMANDATIONS 29 INFORMATIONS GENERALES 30 17 Félicitation pour l’achat de votre Geemarc LoopHEARTM.
DESCRIPTION INTRODUCTION Contenu du colis Description générale Une fois le colis déballé, vérifiez que vous disposez de l’ensemble des éléments présentés ci-après : • 1 LoopHEARTM • 1 adaptateur secteur. Il existe 3 modèles spécifiques de adaptateur secteur. Un seul adaptateur secteur est livré par colis, suivant votre pays : Vue de face Europe version – adaptateur secteur type VDE avec 3 mètres de cordon. UK version – adaptateur secteur type UK avec 3 mètres de cordon.
INSTALLATION DESCRIPTION Vue arrière (Fig A) Mise en place Installation du bloc de batterie Retirez le couvercle de protection comme décrit ci-dessous : Bouton ON/OFF Adaptateur secteur Prise casque Prise microphone Bouton volume Vue de la base Reportez-vous à la figure B pour plus de détail Insérez un tournevis à l’intérieur du compartiment pour ouvrir le couvercle de protection, situé sur le côté droit de l’appareil. Poussez le tournevis délicatement vers le bas – cela libéra le couvercle.
INSTALLATION INSTALLATION Remettez le couvercle en plaçant le crochet de celui-ci à gauche du LoopHEARTM. Appuyez sur le couvercle pour fermer. Fig B Ouverture du compartiment à batterie Crochet Catch Branchez l’adaptateur secteur à une prise murale. Branchez le cordon électrique de l’adaptateur secteur à l’arrière de la base Ouvrez le bloc de batterie. Insérez la batterie rechargeable fournie. Branchez le connecteur dans la prise électrique et replacez le compartiment de batterie.
FONCTIONNEMENT INSTALLATION Utilisez « le passage de fil » pour sécuriser la connexion. Allumez le LoopHEARTM Avant la première utilisation, le LoopHEARTM a besoin d’être chargé pendant 4 heures. Pendant le temps de charge, le voyant lumineux rouge s’allume. Lorsque le voyant lumineux passe au vert, la batterie est complètement chargée. Basculez l’interrupteur du LoopHEARTM sur la position « I » situé derrière l’appareil.
FONCTIONNEMENT Le microphone externe peut être également accroché au mur grâce à son clip mural. Accrochez le clip mural à un endroit pratique. Positionnez délicatement le microphone externe dans le clip. PROBLEMES EVENTUELS Le voyant lumineux clignote rouge • Rechargez la batterie. Le LoopHEARTM s’etient • Vérifiez que les batteries soient correctement chargées. Vous entendez des interferences ou vous n’entendez pas correctement : • • Vérifiez que le LoopHEARTM soit allumé et placé en face de vous.
RECOMMANDATIONS Informations générales Ne pas ouvrir l’appareil. En aucun de problème, appelez le Service Après Vente au 03 28 56 78 99. Nettoyage de l’appareil Nettoyez le LoopHEARTM avec un chiffon doux. N’utilisez jamais de produits d’entretiens car cela pourrait endommager les composants électriques de l’appareil. INFORMATIONS GENERALES Cet appareil est garanti 1 an pièces et main-d'oeuvre. La date d'achat figurant sur le ticket de caisse fera foi.
INFORMATIONS GENERALES Recommandations pour le recyclage : La directive DEEE (Déchet d'Equipement Electrique et Electronique) a été mise en place dans le but d'assurer la collecte sélective en vue de la valorisation, réutilisation ou recyclage des produits en fin de vie. Lorsque votre produit ne fonctionne plus, ne le jetez pas dans votre poubelle ménagère. Suivez l'une des procédures décrites ci-dessous: - Déposez les batteries et votre ancien appareil dans un lieu de collecte approprié.
INHALT EINLEITUNG TM INHALT 33 EINLEITUNG Auspacken des loopHEARTM 34 35 BESCHREIBUNG 36 INSTALLATION Einstellungen Aufstellen des loopHEARTM 38 38 41 BENUTZUNG DES loopHEARTM Einschalten des loopHEARTM Ausschalten des loopHEARTM Benutzung des Headset Benutzung des externen Mikrofons 43 43 43 43 43 FEHLERSUCHE 45 SICHERHEITSHINWEIS 46 GARANTIE 47 RECYCLINGVORSCHRIFT 49 33 TM Herzlichen Glückwunsch zum Kauf Ihres Geemarc loopHEAR .
EINLEITUNG BESCHREIBUNG Auspacken des loopHEARTM Allgemeine Beschreibung TM Beim Auspacken des loopHEAR sollten Sie Folgendes in der Verpackung finden: • 1 loopHEARTM • 1 Spannungsadapter/Aufladeeinheit. Spannungsadapter und Aufladeeinheit sind in drei länderspezifischen Ausführungen erhältlich, von denen das für Ihr Land geeignete Modell im Lieferumfang enthalten ist.
BESCHREIBUNG INSTALLATION Rückansicht Abb A Einstellungen Batteriewechsel Entfernen Sie die Bodenplatte von dem Gerät, wie unten gezeigt: EIN-/AUS-Schalter Gleichstromanschluss Headset-Buchse Lautstärkeregler Headset Externe Mikrofonbuchse Bodenansicht Siehe Abb. B für weitere Details Stecken Sie einen Schraubenzieher in die Öffnung des Verriegelungsmechanismus. Diesen finden Sie unten rechts an der Bodenplatte.
INSTALLATION INSTALLATION Bringen Sie die Bodenplatte wieder an, indem Sie den Haken unten links am loopHearTM am Verschluss an der Bodenplatte positionieren. Drücken Sie den loopHEARTM sanft nach unten bis Sie ein Klicken hören. Abb. B Öffnen des Verriegelungsmechanismus Haken Verschluss Entfernen Sie die Batterieklappe. Legen Sie die mitgelieferte wiederaufladbare Batterie ein, stecken Sie den Anschluss in die passende Buchse und setzen Sie dann die Batterieklappe wieder ein.
INSTALLATION Bitte nutzen Sie die Zugentlastung, wie in der Abbildung gezeigt. Diese Vorrichtung dient zum zusätzlichen Schutz des Kabels an der Verbindungsstelle, was zu einer längeren Lebensdauer des Kabels führt und den Anschluss am Gerät festigt. Der loopHEARTM muss vor dem ersten Gebrauch für vier Stunden geladen werden. Die Spannungsanzeige blinkt rot während die Batterie geladen wird. Wenn die Spannungsanzeige grün blinkt, ist die Batterie vollständig geladen.
BENUTZUNG DES loopHEARTM Einschalten des loopHEARTM Stellen Sie den EIN-/AUS-Schalter auf der Rückseite des Gerätes auf die Position “I”. Die Spannungsanzeige leuchtet auf. (permanent grün für den Fall, dass der Spannungsadapter nicht eingesteckt ist, grün-blinkend wenn er eingesteckt ist). Wenn die Batterie schwach ist, wird der Spannungsanzeiger rot leuchten (permanent rot für den Fall, dass der Spannungsadapter nicht eingesteckt ist, rotblinkend wenn er eingesteckt ist).
FEHLERSUCHE Die rote LED blinkt • Laden Sie die Batterie. SICHERHEITSHINWEISE Allgemeines TM Das loopHEAR schaltet sich immer selbständig aus • Stellen Sie sicher, dass die Batterie voll geladen ist. Der Ton ist auf Grund von Störeinflüssen nicht klar oder gar nicht zu hören • Stellen Sie sicher, dass das loopHEARTM eingeschaltet ist und in Ihre Richtung zeigt • Stellen Sie das loopHEARTM näher an sich heran Öffnen Sie das Gerät unter keinen Umständen.
GARANTIE GeemarcTM bietet Ihnen eine Garantie für den Zeitraum eines Jahres ab Kaufdatum. Während dieser Zeit sind alle Reparaturen oder Ersatzleistungen (nach unserem Ermessen) für Sie gratis. Sollten Sie ein Problem feststellen, so kontaktieren Sie bitte unsere Hotline oder besuchen Sie unsere Internet-Seite unter www.geemarc.com. Die Garantie deckt weder Unfälle, Fahrlässigkeit, noch Bruchschäden an irgendwelchen Teilen ab.
RECYCLING VORSCHRIFT Das WEEE (Waste Electrical and Electronic Equipment) wurde festgesetzt um Geräte am Ende ihres Produktlebenszyklus auf die beste Art und Weise zu recyceln. Wenn dieses Produkt unverwendbar geworden ist, werfen Sie es bitte nicht in Ihren normalen Haushaltsabfall. Bitte nutzen Sie eine der folgenden Entsorgungsmöglichkeiten: - Entfernen Sie die Batterien und werfen Sie sie in den entsprechenden WEEE Müllcontainer.
ÍNDICE INTRODUCCIÓN ÍNDICE 51 INTRODUCCIÓN Desempacar el loopHEAR™ 52 53 DESCRIPCIÓN 54 INSTALACIÓN Montaje Ubicación del loopHEAR™ 56 56 59 USO DEL loopHEAR™ Encendido del loopHEAR™ Apagado del loopHEAR™ Uso del auricular Uso del micrófono externo 60 60 60 60 60 LOCALIZACIÓN DE FALLAS 62 INFORMACIÓN DE SEGURIDAD 63 GARANTÍA 64 DIRECTIVAS DE RECICLAJE 66 51 Felicitaciones por la compra de su loopHEAR™ Geemarc™.
DESCRIPCIÓN INTRODUCCIÓN Desempacar el loopHEAR™ Descripción general Cuando desempaque el loopHEAR™, encontrará en la caja lo siguiente: • 1 loopHEAR™ • 1 adaptador de potencia/cargador. Hay unidades tres unidades adaptadoras de potencia/cargadoras diferentes para distintos países.
INSTALACIÓN DESCRIPCIÓN Vista trasera (Fig A) Montaje Carga de la pila Quite la placa base de la unidad como se indica abajo. Toma mic. externo Corriente DC Interruptor ON/OFF Toma del auricular Volumen del auricular Vista de la base Vea más detalles en la Fig. B Inserte un destornillador en la abertura del mecanismo de traba situado en la parte inferior derecha de la placa base. Empuje suavemente la traba con el destornillador para soltar la placa base.
INSTALACIÓN INSTALACIÓN Reponga la placa base colocando el gancho situado en la parte inferior izquierda del loopHEAR™ en la traba de la placa base. Presione levemente el loopHEAR™ hacia abajo hasta oír un clic. Fig B Abrir el macanismo de traba Gancho Traba Quite la tapa de la pila. Inserte la pila recargable suministrada, enchufe el conector en la toma y reponga la tapa de la pila. Conecte el cable en el enchufe situado en la parte posterior.
USO DEL loopHEAR™ INSTALACIÓN Use el mecanismo liberador de presión como indica la figura. Esto proporciona protección adicional al cable en el punto de conexión, prolonga la vida del cable y refuerza la conexión al equipo. Antes de usarlo por primera vez, será necesario cargar el loopHEAR™ durante 4 horas. El indicador de potencia destellará en rojo mientras la pila se esté cargando. Cuando el indicador de potencia destelle en verde, la pila estará plenamente cargada.
USIO DEL loopHEAR™ El micrófono externo también se puede montar en la pared con el gancho suministrado. Simplemente inserte el gancho en la pared en el lugar más cómodo. Empuje suavemente el micrófono externo dentro del soporte.
INFORMACIÓN DE SEGURIDAD General No abra la unidad. Llame al servicio telefónico de asistencia para cualquier reparación. Limpieza Limpie el loopHEAR™ con un paño suave. Nunca use pulidores ni detergentes que podrían dañar el acabado o la electrónica interna. Medioambiente No exponerlo a la radiación solar directa. Asegure siempre que haya libre flujo de aire sobre las superficies del loopHEAR™. GARANTÍA Geemarc™ le confiere un año de garantía desde el momento de la compra del aparato.
GARANTÍA Conexión eléctrica: El aparato está diseñado para operar solamente con una alimentación de 230V 50Hz. (Clasificado como ‘voltaje peligroso’ según la norma EN60950). DIRECTIVAS DE RECICLAJE Los WEEE (Residuos de aparatos eléctricos y electrónicos) del producto puestos en el lugar correspondiente al final de su vida útil, serán reciclados de la mejor manera. Cuando este producto haya finalizado su vida, no deberá ponerlo en su cubo de basura doméstico.