Digital Cordless Telephone with Large Buttons MyDECT
3 4 5 5 11 11 12 12 13 14 14 15 18 19 20 21 22 23 24 25 25 26 26 27 27 27 28 29 29 29 29 30 30 INTRODUCTION Unpacking the Telephone DESCRIPTION General Description INSTALLATION Location Setting Up Battery Use Using the Belt Clip HANDSET SETTINGS On/Off Settings Ringer Settings Key Tone Settings Dialling Mode (T/P) Time Settings Personal Identification Number Settings Access Code Settings Smart Dialling Settings Caller Display Settings USING THE TELEPHONE Making a Call Receiving a Call Mute Function Rec
55 Telephone connection: Voltages present on the telecommunication network are classified TNV-3 (Telecommunication Network Voltage) according to the EN60950 standard. Electrical connection: The apparatus is designed to operate from a 230V 50Hz supply only. (Classified as ‘hazardous voltage’ according to EN60950 standard). The apparatus does not incorporate an integral power on/off switch. To disconnect the power, either switch off supply at the mains power socket or unplug the AC adaptor.
3 This guide applies to single and multiple handset systems. MyDECT This guide explains how to use the following telephone: Its is important that you read the instructions below in order to use your Geemarc telephone to its full potential. Keep this user guide in a safe place for future reference. Congratulations on purchasing your Geemarc MyDECT telephone.
✑ Telephone line cord • • 53 The telephone is designed for working within a temperature range of 5°C to 45°C. Unplug your phone from the telephone socket during thunderstorms because it could damage your telephone. Your guarantee does not cover thunderstorm damage. Do not expose your product to fire or other hazardous conditions. Do not place any part of your product in water and do not use it in damp or humid conditions e.g. bathrooms.
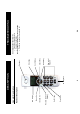
Scroll Key On/Off Key Receive and End Call Key Intercom Key Menu Key LCD Display Handset Description General Description 5 Microphone DESCRIPTION Numerical Keypad Redial Key Cancel Key Confirm Key Scroll Key Speaker 52 Consistently short battery life • Clean the charge contacts • Replace the batteries Nothing happens when you press any button • Check the the keylock is switched off TROUBLESHOOTING
51 No tone when you press • See general checks. • Check for the handset number on the LCD display e.g. HS1. If this is not present you must register the handset (see Handset Registration section) A warning tone is heard during a call: • The batteries are empty. The handset needs to be replaced in the base in order to recharge. • You are out of the base coverage area. No number is displayed when the telephone rings: • Please contact your telephone network provider to get the caller display service.
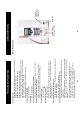
** Line Socket 7 (*) Classified “hazardous voltage” according to EN60950 standard (**) Classified TNV-3 according to EN60950 standard *Power Adaptor Socket DESCRIPTION to activate the menu 50 Press OK to confirm the reset Press OK Use the keypad to type in your PIN (default 0000) Press OK ‘HS RESET’ Use S and T to scroll through the menu to select Press The factory settings can be restored to the telephone.
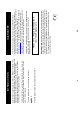
49 The headset socket is located on the right side of the handset. It is a standard 2.5mm plug. Simply plug the headset into the socket. The headset will be activated whilst the microphone on the handset will be deactivated. Other Optional Accessories ADDITIONAL HANDSETS & BASES 8 Battery Status icon This is always displayed when your telephone is switched on. It shows the level of battery charge. More bars indicate more battery charge Mute icon This indicates mute is activated.
9 The telephone will automatically return to standby mode from any menu if no button is pressed for 30 seconds. The C/R key is used to cancel an action/entry. If you press C/R from any menu (except whilst in number input mode), the telephone returns to the previous screen. If you press and hold C/R from any menu (except whilst in number input mode), the telephone returns to standby mode. The OK key is used to confirm an action or choice on a screen.
Press or . or . 47 . The normal external call ring tone will be heard, press pressing to answer the call. Notes: If there is an external call during the course of an internal call, low beeps will be heard in the background. The internal call can be finished by To end the call, press either To answer, press any button The paged handset will ring.
This icon will flash when handset is out of range 11 The telephone has a range of 30-50 metres indoors and up to 300 metres outdoors. The range will be reduced when there is no clear line of sight between the base and handset. Place the base as high as practically possible to ensure the best signal between the base and the handset. The icon at the top left of the LCD displaywill flash and the signal strength bars will disappear to warn you if you have moved out of range of the base.
to activate the menu 45 Press OK and return to standby Use S and T to scroll through the available bases. Select the base number you require. If you select ‘BEST BASE’, the handset will automatically find the first available base if you lose contact whilst moving Press OK BASE’ Use S and T to scroll through the menu to select ‘SELECT Press Plug the power cable into the power socket on the base. Plug the adaptor into the mains supply and switch the supply on.
13 Insert a screw driver along the edge of one of the belt clip arms and release the clip. Lift the clip off the handset. Remove Belt Clip Attach the belt clip to to the rear of the handset. Make sure the belt clip locks into place. Attach Belt Clip The belt clip supplied allows you to conveniently carry the handset around.
43 You can also register up to 4 base units to each handset. This will increase the phone range, allowing you to move between the telephone coverage areas. Up to 6 handsets can be registered to one base unit. This means you can make internal calls between registered handsets, transfer an incoming call between handsets and answer a call anywhere in the office or home at any time as all the handsets will call at the same time.
to activate the menu ‘RING TYPE’ 15 Press OK to save the ringer tone selection and return to standby Use S and T to scroll through the menu to select desired ringer tone. Each time you press S and T , the handset demonstrates the ring you have selected Press OK Press OK to access Press OK ‘RING’ Use S and T to scroll through the menu to select Press There is a choice of six handset ringer tones to notify you of incoming calls.
to activate the menu 41 Press OK to save the changes and return to standby Use C/R to correct a mistake. C/R will clear the last digit entered. To clear all digits, press and hold C/R, then enter the correct number.
to activate the menu and Press OK to scroll through the the two VIP telephone number options. RING 1’ or ‘VIP RING’ 2’ 17 Press OK to save the VIP ringer tone selection and return to standby ringer tone.
to activate the menu to activate the menu 39 until P appears in the LCD display. Inserting a pause provides a delay of 3 seconds. This is necessary with some telephone systems. To insert a dialling pause between numbers when storing a number, press Insert Pause 18 Press OK to save the key tone selection and return to standby Each time you press S and T, the handset demonstrates the key tone you have selected Press OK to save the number and return to standby Note: Use C/R to correct a mistake.
to activate the menu Press OK and return to standby. The telephone number will no longer be held in the phone book 38 19 Press and hold C/R until the number disappears from the LCD display Use S and T to scroll through the stored numbers until you find the entry to be deleted PHONE’ to activate the menu Press OK to select ‘STORE Press Delete a Phone Book Entry Press OK to save the modified number and return to standby Use C/R to modify the phone book entry. C/R will clear the last digit entered.
To end the call simply press 37 or place the handset on the base In standby mode, press and hold the entry number required (0-9) until the telephone number appears on the LCD display. The number will be dialled automatically.
to activate the menu 21 Press OK to save the new PIN and return to standby Use the keypad to type in the new PIN again for confirmation purposes. Press OK 36 until P appears in the LCD display. Inserting a pause provides a delay of 3 seconds. This is necessary with some telephone systems. To insert a dialling pause between numbers when storing a number, press Insert Pause Note: Use C/R to correct a mistake. C/R will clear the last digit entered.
to activate the menu to activate the menu 35 Press OK to confirm and return to standby Press OK Use the keypad to type in your PIN (default 0000) Press OK ‘CLR CALL LOG’ Use S and T to scroll through the menu to select Press Delete All Entries from the Caller Display List Press OK to confirm and return to standby Press OK Use S and T to scroll through the caller display list until you find the telephone number you wish to delete Press OK ‘CALL LOG’ Use S and T to scroll through the menu to s
to activate the menu 23 Press OK to save the smart dial selection and return to standby ‘ON’ or ‘OFF’ Use S and T to scroll through the menu to select desired option Press OK DIAL’ Use S and T to scroll through the menu to select ‘SMART Press Your telephone can search for a complete number when you simply enter the first digit(s) of the number. The telephone number can only be displayed if this number is currently stored in the telephone memory (either phonebook, received or dialled recently).
to activate the menu 33 Notes: If there are no caller ID telephone numbers in the call log, EMPTY is displayed Use S and T to scroll through the caler display list.
Press Pick up handset. again or place the handset on the base to activate the menu ‘CALL BAR’ Press OK and return to standby.
to activate the menu ‘CALL BAR’ 31 Press OK to save the number and return to standby Using the keypad, enter the desired number (up to 4 digits) Use S and T to scroll through the 4 call bar memory locations (14) until you find the required memory location Press OK to access Press OK Use the keypad to type in your PIN (default 0000) Press OK ‘BASE MENU’ Use S and T to scroll through the menu to select Press To Activate a Call Barring Number When an incoming call is received the telephone rings
to dial the number Press in standby mode • 27 The displayed number can be modified before pressing using C/R. by Press to dial the number Notes: • When no numbers are found, EMPTY is displayed • If the redial memory is full i.e. 10 numbers stored, each time you dial a new number, the oldest number stored is automatically erased and the redial memory is updated. Use S and T to scroll through the dialled numbers until you find the number you wish to call Press Pick up handset.
, located on the front of the base to stop paging mode 29 Your handset automatically times the duration of every external call. The time is shown during the call and for a few seconds after the call has ended. Call Timer Alternatively, press Press any button on the located handset to stop paging mode.