/ Pressure Washer Owner's Manual Questions? Call: Generac Help is just a moment Generator Helpline Web: www.generac-portables.com - 1-800-270-1408 away! M-F 8-5 CT or www.briggsandstratton.com Model No. 1675-0 (2,400 PSi Pressure Washer) Manual No.
TABLE OF CONTENTS Safety Rules.................................. Know Your Pressure Washer ...................... Assembly .................................... Operation .................................. Product Specifications........................... Maintenance ............................... Storage...................................... Troubleshooting ............................... Replacement Parts........................... Warranty ...............................
,_ ,_ WARNING WARNING Do not wear loose clothing, jewelry or anything that may be caught in the starter or other rotating parts. Tie up long hair and remove jewelry. Keep spray nozzle between 8 to 24 inches away from cleaning surface. Be extremely careful if you must use the pressure washer from a [adder, scaffolding or any other relatively unstable location. ,_ WARNING The cleaning area should have adequate slopes and drainage to reduce the possibility of a fail due to slippery surfaces.
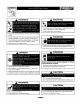
KNOW YOUR PRESSURE WASHER Read this owner's manual and safety rules before operating your high pressure washer. Compare the illustrations with your high pressure washer to familiarize yourself with the locations of various controls and adjustments. Savethis manual for future reference.
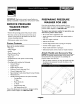
PREPARING WASHER IMPORTANT: Read entire owner's manual before you attempt to assembleor operate your new pressure washer. REMOVE PRESSURE WASHER FROM CARTON PRESSURE FOR USE If you have any problems with the assembly of your pressure washer or if parts are missing or damaged, call the pressure washer helpline at 1-800-270-1408. To prepare your pressure washer for operation, you will need to perform these tasks: • Remove the parts bag packed with pressure washer.
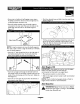
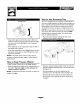
• Secure tray to handle with self tapping screws using a #2 phillips screwdriver. Ensurescrews are tight but not crushing the plastic accessory tray. • Pinch the chemical hose and slide it into the metal clip as shown in Figure 5. • Placethe handle assembly onto the handle supports connected to the main unit. Make sure the holes in the handle align with the holes on the handle supports (Figure 2).
A • Attach the high pressure hose to the high pressure outlet on the pump (Figure 9). Pull down on the collar of the quick connect, slide fitting into the pump and let go of collar. Pull on hose to be sure of a tight connection. ARNING! fill fuel tank completely full. Provide spaceforNever fuel expansion.Wipe away anyfuel spillagefrom engine and equipment before starting. • Use fresh, clean unleadedautomotive gasolineand store in approved, clean, covered containers. Use clean fill funnels.
CAUTION! There MUST be at least ten feet of • Connect the garden hose to the water inlet on the pressure washer pump. Turn ON the water. unrestricted garden hose between the pressure washer inlet and any flow shut off device, such as a 'Y' shut-off connector or other Damage to pressure caution • Turn gun _ convenience-type will not ON the to purge be washer covered water the and pump water resulting by the CAUTION! Do Not run the pump without the water supply connected and turned on.
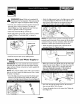
How to use Accessory Throttle Lever Tray The unit is equipped with an accessory tray with places to store your nozzle extension and quick connect nozzles, and slots to hold the cleaning solution bottle and the detergent siphoning filter. There are also two hooks at the ends of the handle to hold your spray gun and high pressure hose. NOTE: The extra holes in the tray are for storing a brush and a turbo wand. The brush and turbo wand are NOT included with your pressure washer.
How _ to Use the Nozzles Cleaning and Applying Chemical CAUTION! You must attach all hoses before you start the engine. Starting the engine without all the hoses connected and without the water turned ON will damage the pump. AUTION! safety Never nozzles without lockingthe latch exchange on the trigger. The quick-connect on the nozzle extension allows you to switch between five different nozzles. The nozzles vary the spray pattern as shown below (Figure 17).
• Remove the black chemical nozzle from the nozzle • Placethe small filter end of the detergent siphoning tube into the detergent container. extension. • Select and installthe desired high pressure nozzle following the instructions "How to Use the Nozzles" on page 10. CAUTION! Keep the chemical injection tube from coming in contact with the hot muffler. • Make sure the black nozzle is installed. • Keep the spray gun a safe distance from the area you plan to spray.
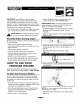
GENERAL MAINTENANCE RECOMMENDATIONS The pressure washer warranty been subjected to operator full value from the warranty, high pressure washer • Some adjustments properly maintain manual • Once should as instructed engine your high pressure in this pressure Check washer. Check nozzle extension assembly manual engine and the washer. the in this manual.
Nozzle Detach spray gun and nozzle extension from high pressure hose. Detach nozzle extension from spray gun and remove o-ring and screen from nozzle extension. Flush the screen, spray gun, and adjustable nozzle extension with clean water to clear debris. I. A pulsing sensation felt while squeezing the spray gun trigger may be caused by excessive pump pressure. The principal cause of excessive pump pressure is a nozzle clogged or restricted with foreign materials, such as dirt, etc.
O-Ring 3. Maintenance Through the normal operation of your pressure washer, o-rings, which keep the connections of the hoses and spray gun tight and leak-free, may become worn or damaged. liquid in the pump. Provided with your pressure washer is an O-Ring Maintenance Kit which includes replacement o-rings, rubber washer and water inlet filter. Refer to the • a worn or damaged Use a small flathead screwdriver o-ring and pry it off.
TROUBLESHOOTING Problem Cause Pump has following problems: failure to produce pressure, erratic pressure, chattering, loss of pressure, low water volume. Detergent fails to mix with spray. Engine runs good at no-load but "bogs" added. I. Low pressure nozzle installed. I. 2. 3. 4. 5. 6. 7. 2. 3. 4. 5. 6. 7. 8. Water inlet isblocked. Inadequate water supply. Inlet hose iskinked or leaking. Clogged inlet hose strainer. Water supply isover 100°F. High pressure hose is blocked or leaks. Gun leaks.
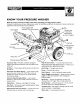
2 ¸ _rs EXPLODED VIEW --- UNIT _1o lO 15_ 11 \ \ 5 7 _ 18_ 19_ 20_ \ \\ \ 17 / \ \\ _35 / 16 28
2 ¸ _rs PARTS Item I 2 3 4 5 7 8 9 10 II 12 13 14 15 16 17 18 19 20 21 22 23 24 25 26 27 28 30 31 32 33 34 35 36 900 LIST--- PaX # Q_ 190153GS I AI87602GS I AI90156GS I 30809GS 5 191413GS 2 188194GS 2 B4966GS 2 190147GS 2 191429GS 187918GS 187916GS 190537GS 187915GS 190151GS 187952GS 186301GS 23139DGS 92479GS 4 23707GS 4 67989GS 8 21217GS 4 95518GS 95519GS 190249GS 21783GS 190862GS 87815GS 97837GS B4224GS B3858GS 190049GS BB3061BGS 190164GS B3294GS NSP UNIT Description DECALS/BILLBOARD, 1675-0 HANDLE,
2 ¸ _rs EXPLODED VIEW PUMP 1 A D A,D (_ B F H oL C)_@ E % ,iii 18
2 ¸ _r3 PARTS LIST-Item Part # I 190568GS 3 190569GS 9 190671GS Qty. I I I 19 23 28 29 30 34 190571GS 190573GS 190673GS 190575GS 190576GS 190577GS 45 46 47 62 68 69 76 77 A 190578GS 190579GS 190580GS 190581GS 190582GS 190584GS 21783GS 190585GS 190672GS o l0 .... 2 II 12 13 15 16 17 70 74 77 B .... .... .... .... .... .... .... ...... ...... 190670GS 8 ...... 20 ...... 21 ...... 22 D 16 70 71 72 73 74 77 E 24 25 26 27 44 74 ...... 190590GS ...... ...... .... .... .... .... ......
TABLA DE CONTENIDOS ADVERTENCIA ReglasDe Seguridad .............................. Conozca Su Generador .............................. 20-21 22 Ensamblaje...................................... Funcionamiento.................................. Especificaciones Del Producto ......................... Mantenimiento ................................... AImacenamiento .................................... Notas ............................................ 23-26 26-29 29 30-32 32 33 Diagnosticos De Averias ....
ADVERTENCIA ADVERTENCIA No use ropa suelta, ioyas o elementos que puedan quedar atrapados en el arranque o en otras partes rotatorias. Ate para arriba el pelo largo y quite la joyeria. Manteng_ la boquilla de rociado de 8 a 24 pulgadasde la superficie de limpieza.
CONOZCA SU MAQUINA LAVADORA DE ALTA PRESION Lea el manual del propietario y las reglas de seguridad antes de poner en marcha su m_quina lavadora a presi6n. Compare las ilustracionescon su m_quina lavadora a presi6n para familiarizarse con las ubicaciones de los diferentes controles y ajustes. Guarde este manual para referencias futuras.
PREPARANDO EL LAVADOR A ALTA PRESION PARA SU USO IMPORTANTE: Lea totalmente el manual del propietario antes que intente ensamblar u operar su lavador a alta presi6n. REMUEVA EL LAVADOR ALTA PRESION DEL A Si usted tiene un problema al ensamblar la unidad o si hacen falta algunas piezas o se encuentran dafiadas, Ilame a la linea directa del lavador a alta presi6n, al 1-800-270-1408. EMPAQUE Remuevala bolsa con las piezas,incluidascon el lavador de alta presi6n.
Coloque elmanubrio sobre lossoportes delmismo queya est_n adheridos ala unidad principal Aseg_rese de que los orificios en el manubrio est_n alineados con los orificios en los soportes del mismo manubrio (Figura 23). \ Inclinela unidad arriba pot el asidero y conecte el dip de metal a la costilla en la cara inferior central de la bandeia accesoria (Figura 27). Deslice la manga quimica por el clip de metal para que no sea apretado pero kinked.
De la misma manera, conecte el otto extremo _IL de la manguera a alta presi6n, a la salida de alta presi6n de la bomba (Figura 30). ADVERTENClA! Ilene por completo el del tanque de combustible. Nunca Deje espacio para la expansi6n combustible.Limpie cualquierderrame de combustibledel motor y del equipo antes de darle arranque a la unidad. Hale el collar de la conexi6n r_oida, desltcelo apropiado en la bombay suelte el collal: Hale la manguera para asegurarse que esta bien conectada.
presi6ny eualquier dispositivo de controlde fluio de agua,seaelcaso Revise que la manguera de alta presibn se encuentre conectada flrmemente a la pistola de rociado y a la bomba. Vea"Preparandoel Lavador a Alta Presi6n Para su Uso". de un eonector 'Y'o de eualquier otro tipode v_Ivula. Elda_o a la Aseg_rese que la unidad est_ nivelada.
Utilizaci6n de la Charola Accesorios NOTA: Para encender de nuevo un motor caliente, deie la palanca de la bobina en la posicibn de "Abierto" ("Open"). Mueva la palanca reguladora a la posicibn de "En" ("On") (Figura 36). de El unidad est_ equipado con una charola de accesorios. Posee tres oriflcios para sostener la extensibn de su boquilla, conexibn r_pida boquillas, su varilla turbo y su cepillo, asi como dos ranuras para sostener la botella de solucibn limpiadora y el filtro para el detergente.
C6mo Usar las Boquillas Limpieza iPRECAUCI_N! _L PRECAUCI_N! Nunca de intercambie boquillas haber asegurado el cerroio seguridad del gatillo. sin La conexibn cuatro patrones Para r_pida de la extensibn boquillas diferentes. de rociado cambiar para boquillas le permite de seguridad boquiHa insta_ada. Almacene NOTA: (Figura 38). Para aplicar r_pida y saque la de 40 ° o verde de 25 °.
Coloque el pequeho extremo final del fiItro del tubo de inyeccibndel detergente dentro del contenedor del detergente. Despu_s de haber aplicado el detergente, refriegue la superficie y enjuagela de la siguiente manera: Co_oque el cerrojo de seguridad a _apistola de rociado. Retire la boquiHanegra para quimicos de _aextensi6n para boquiHas. iPRECAUCI_N! Evite que el tubo de inyeccibnde quimicos entre en contacto con el silenciador caliente.
RECOMENDACIONES G EN ERALES _IL La garantta de la m_quina lavadora a presi6n no cubre los elementos que hart sido sujetos a abuso o negligencia por parte del operador. Para hacer v_lida la cobertura total de la garantia, el operador deber_ mantener la lavadora de presi6n tal y como se indica en el manual. Chequee el Tubo de Sif6n del Detergente Examineel flltro en el tubo del detergente y Hmpielo si se encuentra sucio. El tubo deberla quedar apretado en la pieza.
Si el colador 2. est_ dahado, encontrar_ un colador 2. Remueva la boquilla del extremo de la extensi6n de la boquilla (Figura 4 I). para el filtro en linea y un anillo 'o' de repuesto en el iuego de anillos 'o'. Si no est_ daffado, vuelva a usarlo. 3. Coloque el colador del filtro rosca de la extensi6n en linea en el extremo para boquillas. Su direcci6n el colador importa. Coloque borrador de un Igpiz hasta que se asiente por completo rondo de la abertura.
MANTENIMIENTO MOTOR DEL Proteger la Bomba A protege al PumpSaver de uso de bomba Generac a previene congelar el da_o y lubrica_mbolos y sellos. Consulte e[ manual del propietario del motor para las instruccionesde cbmo mantener adecuadamente el motor. NOTA: El PumpSaverde Generac, el modelo numera 01559, est_n disponible s61ocomo un accesorio opcionaL No es incluido con la arandela de [a presi6n. _L iPRECAUCI_N! Usted deber_ proteger su unidad de las temperaturasde congelamiento.
NOTAS 33
REPARACION DE DAI IOS P_blem_ L_ bomb_ presenr_ i0s s_guienr.esproblemas: no produce presidn, produce una presi_n errad_, tra.quer.eOi EstdusandoI_.b0quilla de baia presi6n 3 4 J 5 Sumrnistro dc agUainadccu_.do. _ m_.ngucr_d_ entr_da es_ d0bl_da 0 pr_s_nm E!¢o!adorde !a mangu_ de cn_da _ ElSurn(n(Stro de _gU_._st_ p0r en¢im_. d_10sl00_F. _ m_nguemd_ al_ p_s]_ nos_ 8 9 _ p(s_olapresen_afugas.
PGLiZA DE GARANI"|A _ LOS PROPiETARiOS DE PRODUCTO$ PORR'AI"iLES GARANTiA GENERAC EfecLiv_ d_sde el Iro de OcLubre; 200i LIM ITADA !'LOSpr_du¢cos p0i't_u!esGetier_¢,I_I_Cr_r_r_ 0 _enlpl_r_; Sii__Osto _l._Ui_o, cu_.!quiei _i'te o p_rtes de! equip0 _e esc_i_del_e¢_ en ni_ePi_.[e$ 0 IT_n0 de 0bra; 0 _b0S; Lo_ Carg0s p_r €0ncep_o de Cr"al_Spor_ en!Bs par_e_ S0rne_id_S _ rep_r_¢i6n 0 reernp!_zo b_j0 est_ _r_nd_ _beli ser Cubiert_ p0r el _ompr_d0r.
GENERAC PORTABLE PRODUCTS OWNER WARRANTY POLICY Effective October I_ 2001 !'Generic P0_ble ProdUctsi LLC Wr!lrepairor replace,l_e 01_ehargei any parc_Or pares Ofthe equipment tha_are d_fcctJye in matori_l or workmansh!p or both; Transportndon charges 0n paressubm!ccedfor _air or rep!acemen¢ underthis Wa_nty must be borne by purch_er. This war_ntY is effective _or the Ume Periodsand subject to the c0nd!c!0nsprovided for in this Pol!cy.