
Manual


A ARNING! Never fill fuel tank completely full.
Provide spacefor fuel expansion.Wipe awayanyfuel
spillagefrom engine and equipment before starting.
• Use fresh, clean unleadedautomotive gasolineand store in
approved, clean, covered containers. Use clean fill
funnels. Never use "stale" gasoline leftover from last
season or gasoline stored for longperiods.
• Clean area around fuel flit cap, remove cap.
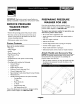
• Slowly add gasoline to fuel tank. Use a funnel to prevent
spillage. Fitl tank to "Fuel Level Mark", as shown in
Figure 7.
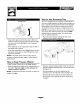
MAXIMUM FUEL LEVEL
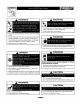
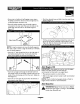
• Attach the high pressure hose to the high pressure outlet
on the pump (Figure 9). Pulldown on the collar of the
quick connect, slide fitting into the pump and let go of
collar. Pull on hose to be sure of a tight connection.
[] !
NOTE: The quick connect is shown connecting the high
pressure hose to the pump. Ifyou choose to use the quick
connect for the gun to hose connection, follow the same
directions to attach quick connect from gun to hose.
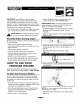
• Attach the other end of the hose to the base of the
spray gun (Figure 10). Tighten by hand.
• Install fuel cap and wipe up any spilled gasoline.
Connect Hose and Water Supply to
Pump
IMPORTANT: You must assemblethe nozzle extension
and attach alt hoses before you start the engine. Starting
engine without alt hoses connected and water supplied will
damagethe pump.
NOTE: Your pressure washer comes with a quick connect
that you can use to attach the high pressure hose to either
the pump or spraygun.
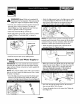
• Uncoil the high pressure hose and attach the femalequick
connect to one end of the hose. Attach the male quick
connect to the high pressurefitting on the pump (Figure 8).
\
\
• Before you connect your garden hose to the water inlet,
inspectthe inlet screen (Figure I I). Clean the screen if it
contains debris, replace it if it isdamaged. DO NOT
RUN THE PRESSUREWASHER IF THE SCREEN IS
DAMAGED. NEVER SIPHON INLET WATER.
• Run water through the garden hose for 30 seconds to
clean out any debris. Turn off water.
• Connect the garden hose to the water inlet. Tighten by
hand (Figure II).
/
7