
Install Manual
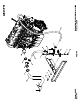

EXPLODED VIEW: EV BLOCK HEATER 1.5L CPL KIT
DRAWING #:0J6420
GROUP H
ITEM PART# QTY. DESCRIPTION
REVISION: J-3645-B Page 2 of 2
DATE: 1/3/12
1 0G2006 1 BLOCK HEATER TEE
2 084918L 1 HEATER BLOCK 1500W 120V
3 0G0015 4 CLAMP HOSE 7/8” OD DOUBLE WIRE
4 047411 2 SCREW HHC M6-1.0 X 16 G8.8
5 022097 4 WASHER LOCK M6-1/4
6 049813 2 NUT HEX M6 X 1.0 G8 YEL CHR
7 022473 4 WASHER FLAT 1/4-M6 ZINC
8 084427A 1 BRACKET HEATER
9 0F4301A 1 HOSE REWORK BLOCK HEATER G1.5L
10 0G4080 REF HOSE LOWER RADIATOR 1.6L
11 099502 2 CLAMP HOSE #24 B1.06-2.00
12 042568 2 SCREW HHC M6-1.0 X 20 G8.8
13 0F4301A 1 HOSE REWORK BLOCK HEATER G1.5L
Block Heater Install Instructions
1.5L G11 1500W, 120V Heater
1. Disconnect battery cables to prevent accidental start-up. Disconnect the negative battery cable first from the battery post
indicated by (-) or NEG.
2. Assemble block heater (084918G, I/N 2) and bracket (084427A, I/N 8) as shown, and attach it to the frame engine mount
support using specified screws (042568, I/N 12), washers (022473, I/N 7) and (022097, I/N 5) and hex nuts (049813, I/N 6).
3. Remove radiator pressure cap. DANGER: Do not remove the radiator pressure cap while the engine is hot. Serious burns to
skin and eyes from boiling liquid or steam could result.
4. Drain all coolant from radiator into a clean drain pan. Coolant will be used to refill the radiator.
5. Drain coolant from engine block by removing lower radiator hose (0G4080, I/N 10) from side of the engine block. Use a funnel
and a second clean drain pan. Coolant will later be used to refill the radiator. Replace lower radiator hose with block heater tee
(0G2006, I/N 1) inserted into it.
6. Install coolant hose (I/N 9) to block heater as shown. Connect other end of hose to block heater tee (0G2006, I/N 1).
7. Install coolant hose (I/N 13) to block heater as shown. Clamp the other end of the hose shut with a soft jaw clamp. Take care
not to damage the hose.
8. Slowly fill the engine with previously drained coolant through the radiator until coolant drips out of the thermostat housing
nipple.
9. Bleed out air from block heater and hoses by releasing clamp pressure from open end of hose (I/N 13) and with open end of
hose held vertically away from the ground and at the same height as the 3/8” NPT barbed fitting (I/N 18). If needed fill the hose
with coolant using a funnel. The entire hose should be full of coolant. Connect the hose onto the thermostat housing nipple.
Note: Block heater failure will occur if the next steps are not done properly.
10. Check that both block heater hoses (I/N 9 & I/N 13) are routed away from exhaust manifolds.
11. Top off the radiator with coolant.
12. Plug block heater into appropriate 120V power source. A 120V line must be run from the existing electrical panel to
the generator and terminate in the appropriate gang box.
13. Reconnect battery cables to battery posts. Connect the positive cable first to the battery post indicated by (+) or POS.
14. Run engine at least 20 min. or until coolant temperature stabilizes to get rid of any air pockets in the coolant lines.
15. Check coolant level after engine fully cools down, use caution when removing radiator pressure cap. Coolant should be just
below the fill cap neck. Top off if needed.
16. Recheck tightness of all hose connections.
17. Clean up all coolant that may have spilled during the installation of the block heater kit.