GoBook MR-1 Page 1 of 90 Please have your equipment serial number available Getting Started ® This online document, GoBook MR-1 Help, contains all the information you need to set up and use your GoBook MR-1. For information on printing, navigating or otherwise using GoBook MR-1 Help, see the How to Use This Help System topics. If you have suggestions for how we may improve this document, please see Documentation Feedback.
GoBook MR-1 Page 2 of 90 Where to Look For Information About Your Computer About Windows Turning Off the Computer Turning off the computer properly is important to maintaining your GoBook MR-1. To Turn off Your Computer Select Start, Turn Off Computer, Turn off and follow the instructions on the screen, or press the power button briefly.
GoBook MR-1 Page 3 of 90 Tips for New Owners z Take responsibility for backup Back up files often. Users who need to manage large amounts of data may wish to use backup devices z Don't leave passwords anywhere on your notebook or carrying case z Be careful when placing your notebook on an airport security conveyor belt In most airports, security conveyor belts are safe for computers. If you are not sure, ask the security staff.
GoBook MR-1 z Do not place this product in a built-in installation unless proper ventilation is provided z Do not store the computer at temperatures above 167°F (75°C) or below -67°F (-55°C) z Do not step on or place anything on the power cord z Do not slam the display lid when you close it z Do not place any object on top of the computer when the display is closed z z z z z Page 4 of 90 If you use the computer with an extension cord, ensure that the total ampere ratings of all the devices s
GoBook MR-1 { Undock the computer if it is in a docking device (such as an office dock or vehicle dock) { Disconnect any attached peripherals { Disconnect any attached network, telephone or telecommunication line { Remove any media in your computer's slots or bays { Remove the battery (See Battery Removal) { Remove the hard drive (See Hard Disk Drive Removal) Page 5 of 90 Battery Pack Safety and Precautions z z WARNING! There is danger of explosion if the battery is incorrectly replaced.
GoBook MR-1 Page 6 of 90 on the on either side of the keyboard (as shown to the right). NOTE Make sure your fingers do not wrap around the back of the unit and cover the fan outlet (1) as the unit may over-heat. Operating the Keyboard and Controls Use one thumb to press the power button at the top center of the keyboard. Once the unit has powered up, use your left thumb to operate the controls on the left side (such as the mouse buttons, direction pad, Escape, Tab, Windows and Zoom keys).
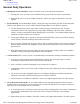
GoBook MR-1 z Page 7 of 90 Troubleshooting General Daily Operations 1. Missing Port Covers and Doors: Inspect for broken, loose or missing parts and fasteners. a. Missing port covers or doors create contaminant entry points which may lead to system failure. b. Replacement port covers are available as field kits. contact your support representative for order requests. 2.
GoBook MR-1 Page 8 of 90 NOTE Available Field Kits and can be ordered through the iCare Servenet Portal, or by contacting the Client Care Center (CCC) at 800-638-9270, option 2. Access to the iCare Servenet Portal requires a Username and Password. Portal access will be setup upon request. 5. Ensure that the computer is stored within its specified temperature range. a. Storage Temperature -67° F to 167° F (-55° C to 75° C) 6. Conserve battery charge when possible to maximize battery life during daily use.
GoBook MR-1 Page 9 of 90 power. Depending on the configuration of the GoBook MR-1 there are specific considerations: a. Basic Configuration – No RF Modems or external device connections. When using a basic configuration unit, there are no special considerations for power management. b. Integrated RF Devices – Disable integrated or user installed RF devices when not in use as they can consume battery power unnecessarily c.
GoBook MR-1 Page 10 of 90 b. Right click on the C: drive and select Properties c. Select the Tools tab d. Select the “Defragment Now...” button. e. Ensure drive C: is selected in the volume display. f. Click the Defragment button. g. When notified that defragmentation is complete, close all applications and restart the computer. Battery Charging 1. Charge the battery at room temperature (approximately 68°F [20°C]) for best results.
GoBook MR-1 Page 11 of 90 c. The GoBook MR-1 and battery should be stored in a cool, dry location. 3. When storing Li-Polymer or Li-Ion battery packs for extended periods, consider these factors a. Fully charged Li-Polymer or Li-Ion battery packs deteriorate faster than partly discharged ones. For ideal storage, charge the packs to 100% and then discharge them to a 40% charge before storage. b. Do not allow stored Li-Polymer or Li-Ion packs to discharge completely, as this may permanently damage them.
GoBook MR-1 Page 12 of 90 a. If coverage is historically good at this location, check the signal strength. Reposition the computer slightly to increase signal strength. Wait approximately five (5) minutes. Determine if there is RF activity. Applications provided with RF devices generally provide diagnostic capability. b. If not resolved, exit all applications, restart the applications, and try RF communications again. c. If not resolved, connect external power and perform a restart. d.
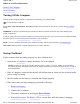
GoBook MR-1 Page 13 of 90 Front View Hover the mouse over each number on the picture to see a description file://C:\Documents and Settings\harwoodm\Local Settings\Temp\~hh96AE.
GoBook MR-1 Page 14 of 90 # 1 2 Feature Display Internal Microphone Description 5.6” WSVGA display (1024 x 600) Integrated, weatherized microphone can be used with various software applications that require audio input 3 4 Touchpad Micro Joystick Use for navigation A thumb-operated joystick for cursor control. Use for navigation like the touchpad or external mouse.
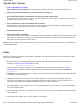
GoBook MR-1 Page 15 of 90 9 Unit Status LEDs LEDs below keyboard: Unit on, AC power present, Battery Charging, HDD activity 10 11 Speaker Power On/Off Direction Pad Mouse Buttons Integrated speaker for audio output Press to power on or start shutdown. Press and hold for power off. 14 Photo Sensor 15 Radio and Wireless Status LEDs The photo sensor is used to adjust the LCD and keyboard backlight brightness in response to changing lighting conditions Radio and Wireless LED Status Indicators: 802.
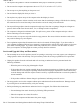
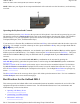
GoBook MR-1 # 1 Page 16 of 90 Feature Battery release latches Description Press in on the latches (1) with your thumbs and slide the battery in the direction of the arrows to remove it from the back of the computer and access the hard drive or (optional) Expansion Module area. Back Edge View Hover the mouse over each number on the picture to see a description # 1 Feature Power Connector Description For use with various optional docks and adapters such as the office or vehicle docks. 2 USB 2.
GoBook MR-1 Page 17 of 90 z Left and Right Mouse buttons z Touchpad z Micro Joystick z Direction pad (D-Pad) z Dedicated Ctrl+Alt+Del key z Thumb operated, back-lighted, 70-key keyboard z Twelve function keys z 2 Application launch buttons (programmable buttons) z Zoom key z Audio controls z Special keys for display brightness and keyboard back-lighting z Radio ON/OFF Hot Key Fn+ z Back-lit keyboard key (option) Primary Keys Key Alt Ctrl Enter Esc Shift Description The Alt (a
GoBook MR-1 Page 18 of 90 press Shift with other keys, the characters on the upper part of the keys appear. For example, pressing Shift+7 displays an ampersand (&). Pressing the Fn+Shift key locks keys A through Z in the UPPER CASE position. Pressing the Fn+Shift key again returns the letters to lower case. While in the upper case mode, pressing the Shift key results in lowercase characters when entered. You still have to use the Shift key to display characters located on the upper portion of the keyboard.
GoBook MR-1 Page 19 of 90 Mouse Buttons The left most buttons on the Navigation section are the left (1) and right (2) mouse buttons. Use these buttons with the Touchpad, or Micro Joystick as you would use the left and right buttons on a desktop mouse. Power Button Use the power button (3) to place the computer in standby mode or turn it off/on.
GoBook MR-1 Page 20 of 90 Delete Key The Delete (Del) key (8) deletes selected words or items. Pressing Fn+Del inserts words or items. Touchpad The built-in capacitive touchpad is a pointing device that senses movement on its surface. This means the cursor responds as you move your thumb over the touchpad. Your computer has a capacitive touchpad. The buttons located on the upper left of the keyboard have the same function as a two-buttoned mouse.
GoBook MR-1 Page 21 of 90 following precautions: z Avoid contact with dirt, liquids or grease z Do not rest heavy objects on the touchpad or the touchpad buttons z Keep your fingers dry and clean when using the touchpad and keep the touchpad dry and clean z The touchpad is sensitive to finger movements. It responds best to light touches.
GoBook MR-1 Page 22 of 90 Fn+Del Insert The Caps Lock LED lights when the keyboard is in Caps Lock mode Inserts text in documents and applications. Special Keys The keyboard has several keys that perform special functions, providing ease of use with the GoBook MR-1's compact keyboard. # 1 Key Windows Logo Key Icon Description Start button. Combinations with this key perform special functions.
GoBook MR-1 Page 23 of 90 Down 6 Display/Monitor Switch 7 C1 & C2 C1 Switches between the GoBook MR-1 LCD display and an external monitor. (An external monitor may be added using the Office Dock Automatically opens a pre-defined application.
GoBook MR-1 Page 24 of 90 4. Click Test to test if the application will run. 5. Click OK to accept the application. NOTE If the application you want to run is not in the drop-down menu: click the Add button next to the Current Selection field to display the "CustomExePrompt" screen. z Click the Browse button to display the Open file screen. z Find the application you wish to call with the Application Launch Button and select it. z Click the Open button.
GoBook MR-1 z Press Page 25 of 90 to decrease display brightness Automatic Dim Feature To save battery power, your computer automatically dims the display when the computer is not attached to external power. NOTE You may still manually adjust display brightness. See Managing Power for more information on power management features. To Enable or Disable Automatic Dim 1. Restart the computer by selecting Start, Turn Off Computer, Restart. 2. Press Enter during boot up to open the Setup Utility. 3.
GoBook MR-1 Page 26 of 90 Once the external display device is attached (using the optional Office Dock or Expansion Unit), simply press the Display/Monitor Switch on the keyboard. FEATURE: When using an external monitor you can extend your desktop. This allows you to open and view one program on the external monitor while viewing a different program on your notebook's display. To set this up: 1. Right click on the desktop. 2. Select Properties to open the Display Properties Dialogue box. 3.
GoBook MR-1 Page 27 of 90 Radio and Wireless Status LEDs Display Hinge LEDs - visible at the bottom of the display indicate active installed radios: 802.11ABG, Bluetooth, GPS, Wireless WAN. # Icon Function LED Description 802.
GoBook MR-1 Page 28 of 90 4 Disk Status (HW) Lit The hard disk drive is being accessed Caps Lock LED on Keyboard Icon 1 Function Caps Lock LED Lit Description The keyboard is in Caps Lock mode Audio Your computer includes a single speaker audio output and an integrated microphone. The speakers are located above the display. The microphone is on the front of the computer to the left. You can also attach external audio devices via the audio headset jack on the right side of the computer. 1.
GoBook MR-1 Page 29 of 90 Passwords protect your computer from unauthorized access. When set, no one can access the computer without entering the correct password.
GoBook MR-1 Page 30 of 90 Ports and Connectors # 1 2 Ports and Connectors Power Bus USB 2.0 Port 3 4 Cooling Fan Outlet Multi I/O Docking Connector DC-in Dock Insert Tab Slots Audio In/out 5 6 * Connection For use with the office or vehicle dock USB Peripherals such as a mouse, printer or optical disk drive None Compatible with the office or vehicle docks Location Back Side Back Side AC Adapter (power) Tab Slots help hold the office dock in position. 2.
GoBook MR-1 NOTE When external power is properly applied, the External Power LED Page 31 of 90 lights. CAUTION This notebook computer is designed to be used with the provided dedicated AC Adapter or Vehicle Adapter only To Attach AC Power: 1. If the computer has a dust cover over the back edge connections, pull it back and rotate it to the side. 2. Connect the AC adapter power cord to the AC adapter. 2. Connect the AC adapter to the DC power port on the back of your computer.
GoBook MR-1 Page 32 of 90 CAUTION The vehicle adapter is not intended to be used continuously. It is intended to provide a convenient, temporary power source for powering and charging this computer while in transit in a vehicle. For permanent installations, it is recommended that the (fused) vehicle charger adapter be wired directly to the vehicle power supply. For additional information regarding permanent installation, contact your sales representative. 3.
GoBook MR-1 Page 33 of 90 # Feature Description 1 2.5mm Audio In/Out Jack Connect a stereo headset or microphone to this jack to listen to multimedia NOTE Separate Audio Input and Output jacks are available with the Office Dock. Wireless Communications Your GoBook MR-1 supports up to three integrated radios and a GPS for superior wireless communication (One radio per category listed below).
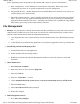
CRMA Express WWAN Page 1 of 2 CRMA Express WWAN (option) GPS Antenna WWAN Antenna If you ordered the CRMA Express module option with your computer, your computer may support one or more of these Wireless Wide Area Network (WWAN) radios: • 1xEV-DO/1xRTT • HSDPA/UMTS/EDGE CRMA Express is upgradeable, and when WWAN radio technology changes, you can change with it. These radios are ideal for the mobile worker.
CRMA Express WWAN Page 2 of 2 secure access to your information and applications. Refer to the installation instructions included with your CRMA Express module(s). After installation, refer to radio help, found on your desktop, for information about setting up and using your radio(s). About 1xEV-DO/1xRTT Network 1xEV-DO Evolution Data Only or Evolution Data Optimized (EV-DO) is a 3G wireless technology with average user download speeds ranging from 400 to 700 Kbps with peak rates up to 2.
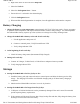
GoBook MR-1 Page 35 of 90 ® Bluetooth (option) About Bluetooth Bluetooth is a short range, wireless technology. Bluetooth systems create a Wireless personal-area network (WPAN). When Bluetooth-capable devices come within range of one another, an electronic conversation automatically takes place to determine whether they have data to share or whether one needs to control the other. Then, the devices hop frequencies in unison so they stay in touch with one another and avoid interference with other devices.
GoBook MR-1 Page 36 of 90 Improving Radio Coverage Wireless connectivity between your computer and wireless network access points is essential. Maintaining this wireless connectivity over a wide area is fundamental to the usefulness of the network. This makes the scope and reliability of radio coverage a primary concern. Therefore, one of the most important features of the wireless network is the degree of radio coverage provided. Coverage can be influenced by terrain, buildings or even a crowded room.
GoBook MR-1 Page 37 of 90 1. Try all sides of a building to see which side provides the strongest radio signal. 2. Move from under trees. Pine needles absorb radio signals more than leaves. 3. Move away from overhead electrical wires. 4. Radio signals reflect off other buildings. Even in the signal shadow, the signal could be reflected back by another building. 5. Try not to hold the unit. If possible, place it in vehicle, on a cabinet or desk. 6.
GoBook MR-1 Page 38 of 90 with FCC RF exposure requirements when using the WAN radio transmitter, a minimum separation distance of 20 cm must be maintained between the external dipole antenna and all users/bystanders. When using the WLAN transmitter, a minimum separation distance of 20 cm must be maintained between the upper right and left edges of the display screen and all users/bystanders.
GoBook MR-1 Page 39 of 90 1. Connect the AC adapter to the computer, then to a power source. 2. Calibrate the battery to set the gas gauge to accurately reflect battery capacity. You only need to do this once with a new battery or with a battery that's been stored without being used for a long time. If the computer is to be stored for more than two weeks, we recommend you remove the battery. Battery and Temperature The battery is most efficient at room temperature.
GoBook MR-1 Page 40 of 90 your computer either turn off completely, or reduce power consumption to a minimum. In a Suspend to RAM, your computer remains active but with the minimum possible power consumption. Return the computer to full power by pressing any key. A fully-charged battery can maintain a Suspend to RAM for many hours.
GoBook MR-1 Page 41 of 90 Monitoring Battery Power To see how much power the battery has left, move the cursor to the Power Saver icon ( or Tray area of the Taskbar. The status will show as a pop-up when you mouse-over the icon. ) in the System Low Battery Alarms How your computer responds to a low battery condition can be set by going to Start, Settings, Control Panel, Power Options, Alarms. Two different power alarms can be enabled or disabled: the Low Battery Alarm, and the Critical Battery Alarm.
GoBook MR-1 Page 42 of 90 Windows Battery Calibration To run the Battery Calibration program a. Plug in the AC adapter. b. Start the computer and boot to Windows. c. Go to Start, All Programs, Mobile Computer Tools. d. Select the Primary battery and click Start to begin the Calibration process. e. The GoBook MR-1 may be used for any tasks but must remain connected to external (AC) power until the calibration cycle has completed. f. Full calibration may take up to 17 hours.
GoBook MR-1 table). 2. Select the desired power profile. Page 43 of 90 The computer is on battery power and set to use the Max Life battery profile. To Configure Power Saver Settings 1. On the System Tray area of the Taskbar, right-click the Power Saver icon. 2. From the menu, select Configure Power Settings. 3. Change settings as desired. To Turn Devices On or Off to Save Power 1. On the System Tray area of the taskbar, right click the Power Saver icon. 2. Check the devices you want to enable (power on).
GoBook MR-1 Page 44 of 90 • The Power Saver utility allows you to specify a period of inactivity before the computer enters standby or hibernate mode. Battery Tips Tip 1. Avoid excessive heat and cold z z z z Your battery will last longer during the day if it is used, charged and stored between 50°F and 86°F (10°C and 30°C) Charge the battery nightly where the temperature will remain around 68°F (20°C).
GoBook MR-1 Page 45 of 90 provides a charged battery for the next day z Avoid allowing the Li-Polymer or Li-Ion battery pack to completely discharge z Use the Power Saver utility to help save power z z z z z When running on battery power, make sure your system suspends automatically after a few minutes of inactivity. Radios, custom applications, or modified system settings may affect this Uunplug peripherals when you are not using them.
GoBook MR-1 Page 46 of 90 necessarily mean that your battery is fully charged. Tip 5. Prevent data loss Follow these guidelines to prevent data loss when removing your battery or storing your computer: z z You will lose data if you remove the battery while the computer is operating or suspended.
GoBook MR-1 Page 47 of 90 3. Slide the battery down until it clicks in place. NOTE When using a battery pack for the first time, it is recommended that you calibrate the battery so the gas gauge accurately displays battery capacity. To Remove the Battery: 1. Hold the computer in both hands and turn it over so you are looking at the bottom with the battery latch at the back of the unit in your right hand. 2. Place your thumbs on the battery latches on the either edge of the battery and press in.
GoBook MR-1 Page 48 of 90 to change your computer’s start-up configuration. For example, you can change your system's security settings. Starting the Setup Utility You can only start the Setup Utility after the computer has been turned on or rebooted. To execute a controlled reboot, select Start, Turn Off Computer, Restart. Shortly after the computer restarts, you will see the following text at the bottom of the screen: "Press Fn+2 for Setup Menu, Fn+0 for Boot Menu.
GoBook MR-1 # 1 Function The Menu Bar Main Advanced TPM State (Not Shown) 2 3 4 Security Boot Exit The Item Specific Help Window Settings and Information fields Navigation Help instructions Page 49 of 90 Description The Setup Utility has six menu options in the Menu Bar at the top of the window. Press the left or right arrow keys to cycle through these menu screens.
GoBook MR-1 Page 50 of 90 The Navigation Help instructions (4) at the bottom of each menu displays the keys used to move through and change the Settings and Information fields (3) on the left side of the menu. z Press the right and left arrow keys on the direction pad to move to each menu item.
GoBook MR-1 Page 51 of 90 Field System Time Setting HH:MM:SS System Date MM/DD/YYYY IDE Channel 0 Master submenu IDE Channel 0 Slave submenu System Memory Extended Memory (none) (none) BIOS Version (none) EC Version Mainboard Version (none) (none) Function Sets the system time in 24 hour format. The value takes effect immediately Sets the system date. The date can be set from January 1, 2000 to December 31, 2099.
GoBook MR-1 Page 52 of 90 Field Total Sectors: Maximum Capacity: Multi-Sector Transfers: LBA Mode Control: 32 Bit I/O: Transfer Mode: Ultra DMA Mode: Setting display only display only display only display only Disabled Enabled display only display only Function Shows the total number of sectors on the hard drive. Shows the drive capacity in Megabytes. Setting is currently disabled Setting is currently disabled This setting enables or disables 32 bit IDE data transfers.
GoBook MR-1 Page 53 of 90 Field Multi-Sector Transfers: LBA Mode Control: 32 Bit I/O: Transfer Mode: Ultra DMA Mode: Setting display only display only Disabled Enabled display only display only Function Setting is currently disabled Setting is currently disabled This setting enables or disables 32 bit IDE data transfers. Setting is currently disabled Setting is currently disabled The Advanced Menu file://C:\Documents and Settings\harwoodm\Local Settings\Temp\~hh96AE.
GoBook MR-1 Page 54 of 90 Field Keyboard Features Setting sub-menu Super IO Configuration sub-menu 2nd Super IO Configuration sub-menu (not shown on above screen) Extended Configuration sub-menu Stealth Mode Configuration sub-menu Auto Brightness Control Video (Intel IGD Control) ICH USB Control High Definition Audio controller sub-menu sub-menu sub-menu Auto Disabled Function Selects keyboard options such as NumLock power on state, Light Sensor, Backlight, and left button.
GoBook MR-1 Page 55 of 90 Disabled - HDA will be unconditionally disabled Set cooling mode: z System Cooling Mode Cool [Cool] – CPU is slowed down to reduce heating. Normal Max Performance [Normal] – CPU runs normally [Max Performance] – CPU runs as fast as necessary NOTE Max Performance will not allow the unit to over-heat. However, over-heating will limit performance and the fan will run. Keyboard Features This screen sets start up configurations for the keyboard.
GoBook MR-1 Page 56 of 90 Threshold value: 0-2047 Keyboard Backlight Time out 0-255 Left Button On Matrix Keyboard Enable Disable Sets the threshold (in Lux.) at which the keyboard backlight activates. Sets the time in seconds until the keyboard backlight turns off due to inactivity. Enables/Disables the left mouse button on the GoBook MR-1 keyboard.
GoBook MR-1 Page 57 of 90 and assign Serial port settings on the Expansion Module. Field COM Port On Expansion Module: Base I/O address: Setting Enabled Disabled 3F8 2F8 3E8 2E8 Function Turns Expansion Module serial port on/off Sets the base I/O address for the Expansion Module serial port. Extended Configuration This configuration option allows you to wake the system at certain times, or in response to incoming data. file://C:\Documents and Settings\harwoodm\Local Settings\Temp\~hh96AE.
GoBook MR-1 Page 58 of 90 Field Intel (R) Virtualization Technology Setting Disabled Enabled Resume On Modem Ring Wake On Radio Off On Disabled Enabled Stay Off After Power Failure Function Intel(r) Virtualization Technology allows a platform to run multiple operating systems and applications in independent partitions. With virtualization, one computer system can function as multiple "virtual" systems. When enabled, the system wakes up when an incoming call is detected by the modem.
GoBook MR-1 Field Stealth Mode Page 59 of 90 Setting Disabled Enabled Function z Enabled -- all LEDs and sound devices will be turned off. Disabled -- the computer functions normally and the options listed below are not accessible. LEDs are disabled LEDs function normally The fan is disabled. Heat management is controlled solely through throttling. The fan functions normally Audio and System beeps are muted Audio and System beeps function as normal Display brightness is set to 0.
GoBook MR-1 Page 60 of 90 Field Auto Brightness Mode Ambient Light Sensor Sensitivity Setting Enabled Disabled Enabled Positive/Negative Disabled Positive Offset Value Negative 1 to 16 Auto Dimming Enabled Disabled Function If Enabled, automatic dimming of the display will be ignored. If Enabled, adjusts how the display brightness changes in response to ambient light changes detected by the photocell. Sets the offset value to Positive (+) or Negative (-).
GoBook MR-1 Field Pre-Allocated Memory Size Total Graphics Memory Page 61 of 90 Setting 1MB 8MB 64MB 128MB Description Select the amount of pre-allocated graphics memory for use by the Internal Graphics Device. Select the amount of Total Graphics Memory = PreAllocated + Fixed + DVMT for use by the Internal Graphics Device. MaxDVMT ICH USB Control Sub-menu file://C:\Documents and Settings\harwoodm\Local Settings\Temp\~hh96AE.
GoBook MR-1 Field All USB Controllers USB Devices for Expansion Module USB 2.0 Controller Legacy USB Support Page 62 of 90 Setting Enabled Disabled Enabled Description Enables/Disables all USB Controller Functions. Enables/Disables all USB Controller Functions for the Expansion Module. Disabled Enabled Enable/Disable USB 2.0 support. Disabled Enabled Enables/Disables support for the Expansion Module Disabled The Security Menu You can set, change or remove passwords in the Security menu.
GoBook MR-1 Page 63 of 90 New Password. Password on Boot Fingerprinter PBA Function Disabled Enabled Disabled Enabled to move though the fields entering a new password, or leaving it blank to remove the password. Enables user password entry on boot. Enabled - Fingerprint scan to replaces boot password. Disabled - Fingerprint scan not required for boot.
GoBook MR-1 Set User Password Page 64 of 90 Enter New Password Set Supervisor Password Password on Boot TPM Support Fingerprint PBA Function Confirm New Password. Enter New Password Confirm New Password. Disabled Enabled Disabled Enabled Disabled Enabled The User Password controls access to the system at boot.
GoBook MR-1 Current TPM State Change TPM State Page 65 of 90 none No Change This is display-only field shows the current state of the TPM device. Changes the TPM state. Enable & Activate Deactivate & Disable z No Change -- TPM remains in its previous state z Enable & Activate -- TPM will be active z Clear z Deactivate & Disable -- TPM will be switched off. This may prevent security applications that rely on the TPM from functioning as expected (possibly including windows login).
GoBook MR-1 Page 66 of 90 Execute If you choose a TPM state such as Deactivate & Disable or Clear additional warning messages such as the one below will display on reboot: After choosing to Execute or Reject the TPM state, the system will reboot once more. You may press the left mouse button again on the Setup screen to display the normal BIOS menu with the TPM State menu item activated. The Boot Menu Use this menu to set the order of priority for devices from which the system will boot.
GoBook MR-1 Page 67 of 90 Field Boot Priority Order Settings SubMenu QuickBoot Mode Disabled Enabled Disabled Enabled Disabled Enabled Disabled Enabled Boot-time Diagnostic Screen Summary Screen PXE ROM Boot Support Function Displays boot drive order. First listed drive is the primary boot drive. Use up and down arrow keys to highlight a drive device. User +/- keys to move the device up or down the list.
GoBook MR-1 Page 68 of 90 7: IDE HDD: TOSHIBA MK4009GAL-(PM) <1 - 4> Loads a default boot sequence. 8: : USB HDD: Excluded from boot order: enables or disables a device. Devices disabled from boot sequence with command .
GoBook MR-1 Page 69 of 90 ensure that the accessory functions properly in your computer before making the purchase. Your system vendor may be able to recommend reliable brands and models. Expansion Module (Option) The Expansion Modules add functionality to the GoBook MR-1. Initially available will be an expansion module that adds a USB 2.0 port, 9-pin Serial port and TPM 1.2 (and it can include an additional 80GB Harddrive to replace the standard 40GB internal drive).
GoBook MR-1 Page 70 of 90 NOTE The hard drive pins in the Expansion Module are recessed and not so easily damaged as those on the basic unit. However, you should always handle the hard drive with care. 2. Slowly slide in the drive until the latch clicks into place. Office Dock file://C:\Documents and Settings\harwoodm\Local Settings\Temp\~hh96AE.
GoBook MR-1 Page 71 of 90 # Feature Description 1 Audio In Port Connect a microphone, or any other sound input (pink port) 2 Audio Out Port Connect headphones, external speakers, or any other output device (green port) 3 9-Pin Serial Port Connect any 9-pin serial device. 4 External VGA Video Out Connector Connect an external monitor or projector to your GoBook MR-1. External devices require a VGA connector.
GoBook MR-1 Page 72 of 90 vehicle adapter, it automatically begins charging the computer’s battery. At moderate temperatures, around 20°C (68ºF), the battery will be fully charged in approximately four to five hours. However, as the battery temperature approaches the ends of its temperature range (5°C/41°F to 50°C/122°F), it will take longer to charge the battery. CAUTION Avoid exposing batteries to extremely hot or cold temperatures for long periods.
GoBook MR-1 Page 73 of 90 The vehicle dock is designed to charge the computer’s battery with voltage from the vehicle battery while you are traveling. Follow the procedure below to charge a battery. To charge a battery installed in the computer 1. Place the computer onto the vehicle dock, making sure it is securely latched. 2. If charging is required it begins automatically. The Battery Power Indicator lights. 3. When the battery is fully charged, the Battery Power Indicator turns off.
GoBook MR-1 Page 74 of 90 Surge Protection A large amount of computer and high technology equipment damage is directly related to AC power and telephone line problems. These problems can include surges, spikes, noise, interference, and weather-related problems, which in turn can cause glitches, hang-ups, crashes, performance slow downs, and down time with computer equipment.
GoBook MR-1 Page 75 of 90 This computer has a keyboard with thumb operated keys. If you feel more comfortable using a desktop keyboard, you can connect a USB external keyboard to the USB port. You can also connect a USB mouse or other pointing device to the USB port. NOTE The Unit only has a single USB port so you cannot install both a keyboard and mouse (unless you have a dock or expansion module).
GoBook MR-1 Page 76 of 90 Ethernet (LAN) With the built-in Ethernet LAN on the Office Dock you can make LAN connections with 10/100 Mbps connection speed. To use the network feature, connect an Ethernet cable from the network outlet on the back side of the Office dock to a network jack or hub on your network. Maintenance and Storage The GoBook MR-1 is ruggedized and weather resistant.
GoBook MR-1 z Do not subject the computer to magnetic fields z Do not intentionally spill liquid on the computer z Do not subject the computer to extreme shock and vibration z Do not place objects on top of the computer z Do not place the computer on uneven surfaces z Page 77 of 90 Periodically inspect the computer and accessories for wear, damage, loose or missing parts.
GoBook MR-1 Page 78 of 90 3. Exit all applications. 4. Select Start, Shut down, OK to turn off the computer. 5. Remove the battery from the unit and store it in a dry place. 6. Store the computer within the recommended temperature ranges of -55°C to +75°C (-67°F to +167°F). Battery Maintenance Taking care of your battery pack z z Read and follow all battery precautions in the Safety section Use only batteries of the same kind as replacements.
GoBook MR-1 Page 79 of 90 z Maintain the environmental seal of the computer by keeping all external access doors closed and latched z Avoid exposing the unit to extreme temperatures or moisture when the doors are open z Periodically backup or archive important files and data. Hard Drive Installation and Removal The GoBook MR-1's internal hard drive is accessible from the back of the unit. To remove the hard drive: 1. Save and backup any work, and shut down the computer 2.
GoBook MR-1 Page 80 of 90 NOTE If a Expansion Module is included, its hard drive is also accessible (See Optional Equipment and Accessories for further instructions). Avoid Unexpected Repair Costs by Understanding Hard Disk Management for Mobile Computers This section provides important information for software developers and IT professionals involved in mobile computer deployments. It describes how your software design and setup can affect the service life of a mobile computer’s hard disk drive (HDD).
GoBook MR-1 Page 81 of 90 Primary characteristics of notebook-class HDDs: z 2.5” or 1.
GoBook MR-1 Page 82 of 90 media as being like an automotive tire – driving conditions vary day-to-day, but under average normal usage the product will last 5 years. If you drive aggressively every day, you will accelerate the wear and significantly shorten the service life. With today’s advances in power management and mobile-optimized software applications, Itronix customers have excellent service life and reliability experience with notebook-class HDDs.
GoBook MR-1 Page 83 of 90 collect route history information. Assuming your disk inactivity timeout is set to 1 minute, logging your GPS coordinates every five minutes will allow the HDD to spin down periodically. This ratio allows the system to not exceed the recommended 20% duty cycle between HDD power-on hours and read/write/seek operations. In Itronix standard factory software load, we pre-configure the Windows “Turn off hard disks” power setting to “After 1 min”.
GoBook MR-1 z z Page 84 of 90 Battery runtime is improved due to lower power consumption of flash vs.
GoBook MR-1 Page 85 of 90 5. Contact your Itronix Technical Assistance Center 1-800-638-9270 or your Client Service Account Manager for additional assistance. Itronix GoBook® rugged computers are equipped with HDDs optimized for the performance requirements of a mobile environment – resistance to shock and vibration, extended temperature range, power management, size/weight, capacity and cost. When used with mobile-optimized software solutions, these HDDs provide excellent service life.
GoBook MR-1 Page 86 of 90 Data Backup There are several methods to backup your data. It is best to regularly use all the methods below to ensure the greatest data integrity, provide the fastest recovery options, and minimize downtime. After you have installed all your applications and have your computer configured as desired, create a backup of drive C: using the Hard Disk Backup and Recovery Utility. Then, use the Windows Backup Utility on a frequent basis to backup your daily data.
GoBook MR-1 Page 87 of 90 Recovery. You will be prompted for additional information. NOTE The Hard Disk Backup and Recovery Utility is only available on computers configured with a Recovery Partition. If it is not available, you will either need to contact your company's help desk about obtaining a Recovery CD or return your unit for service. Troubleshooting This section is designed to help you determine and fix problems you might encounter while operating the GoBook MR-1 computer.
GoBook MR-1 Page 88 of 90 The display appears to have random pixels darkened after scrolling I changed my display resolution, but I see no difference on the screen When I try to use the stylus on my touch screen, nothing happens The touchscreen doesn't respond after a suspend Hard Disk The hard disk will not spin up so the computer can’t boot up Keyboard and Mouse Troubleshooting Something unexpected happens when I press a key Incorrect characters appear on the screen when I press certain keys I have di
GoBook MR-1 Page 89 of 90 How do I change the battery? How long will the battery last? How do I change the display brightness? How do I clean the display? How do I calibrate the optional touchscreen? Service and Support We are committed to providing you world class support services that ensure the lowest total cost of ownership for your hardware investment. The icareServices program will help you maximize end user productivity and decrease overall system operating cost.
GoBook MR-1 Page 90 of 90 For more in-depth information on Client Services http://www.gd-itronix.com/index.cfm?page=Support:Support For details on any of our icareService Programs visit http://www.gd-computing.com/index.cfm?page=Services:Overview To review & purchase accessories please use the link below: http://www.gd-itronix.com/index.cfm?page=Products:accessories Keep this document handy to assist in maximizing the service life and daily use of your GD-Itronix equipment.
Identification GoBook® MR-1 (IX750) Copyright Notice © Copyright 2007 General Dynamics-Itronix Corporation. All rights reserved. No part of this document may be reproduced, transmitted, transcribed, stored in a retrieval system, or translated into any other language or computer language in whole or in part, in any form or by any means, whether it be electronic, mechanical, magnetic, optical, manual, or otherwise, without the prior written consent of General DynamicsItronix Corporation, 12825 E.
Federal Communication Commission Interference Statement This equipment has been tested and found to comply with the limits for a Class B digital device, pursuant to Part 15 of the FCC Rules. These limits are designed to provide reasonable protection against harmful interference in a residential installation. This equipment generates, uses and can radiate radio frequency energy and, if not installed and used in accordance with the instructions, may cause harmful interference to radio communications.
CAUTION Due to the fact that the frequencies used by 802.11a/b/g wireless LAN devices may not yet be harmonized in all countries, 802.11a/b/g products are designed for use only in specific countries, and are not allowed to be operated in countries other than those of designated use.
In the event of problems, you should contact your equipment supplier in the first instance. This product is intended to be supplied by a Listed Power Unit and output rated 12V DC input voltage, 3.0A. Safety Information Enclosed with each GoBook MR-1 Notebook computer is the radio specific safety information. Do not proceed without reviewing the information provided in that document. Do not proceed beyond a WARNING or CAUTION until the indicated conditions are fully understood and met.