
User's Manual

Ports and Connectors
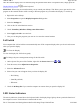
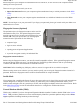
* Audio Jack is on the right side
of the unit.
Making Connections
Your computer is equipped with a full array of ports, and connectors, offering advanced communications
technology. This section describes how to connect peripherals and hardware options that help you maximize your
computer's features. Before connecting peripherals, first read the manual included with the peripheral for connection
and operation instructions. You can purchase most of these and other options directly from authorized dealers.
You may purchase an optional Expansion Module which adds a USB 2.0 port, 9-pin Serial port and an optional
80GB Hard-drive to replace the standard 40GB drive.
The GoBook MR-1 also has docking solutions such as Vehicle Docks and the Office Dock. These docks provide
drop-in convenience, port expansion, and automatic battery recharging, enabling you to leverage your computer's
features without having to attach and reattach cables and connectors when you move your computer from office to
vehicle.
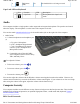
Attaching Power
Your GoBook MR-1 can be powered by battery, by attaching an AC Adapter or Vehicle Adapter to the DC power
p
ort, or by connecting the computer to a powered Vehicle Dock, or Office Dock (using your existing AC Adapter).
This
p
a
g
e ex
p
lains how to attach
p
ower to the DC
p
ower
p
ort.
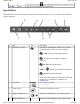
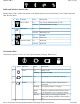
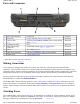
# Ports and Connectors Connection Location
1 Power Bus For use with the office or vehicle dock Back Side
2 USB 2.0 Port USB Peripherals such as a mouse, printer or optical disk
drive
Back Side
3 Cooling Fan Outlet None Back Side
4 Multi I/O Docking
Connector
Compatible with the office or vehicle docks Back Side
5 DC-in AC Adapter (power) Back Side
6 Dock Insert Tab Slots Tab Slots help hold the office dock in position. Back Side
* Audio In/out 2.5 mm Audio in/out Right Side
Pa
g
e 30 of 90GoBook M
R
-1
6/18/2008file://C:\Documents and Settin
g
s\harwoodm\Local Settin
g
s\Tem
p
\~hh96AE.htm