
Use and Care Manual


16
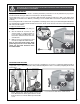
The thrust bearing keeps the blade from moving back and out of position when the saw arm pushes against the
workpiece. The thrust bearing must be very close to the back of the blade A to prevent damage to the blade dur-
ing cutting. To adjust it, proceed as follows:
ADJUSTING THE THRUST BEARINGS
1. Shut off the hydraulic downfeed control valve and
lift the arm into the vertical position. Loosen screw B
on bracket C.
2. Push bracket C as shown D until the thrust bearing
touches the back of the blade A. Repeat for the
other thrust bearing.
Note: The blade guides must remain at least 1/32”
behind the blade teeth to prevent damage to the
blade as shown E
MAKE SURE THE MACHINE HAS BEEN TURNED OFF AND UNPLUGGED FROM THE POWER SOURCE BEFORE PERFORM-
ING ANY MAINTENANCE OR ADJUSTMENTS.
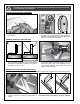
The blade guards should be adjusted based the di-
mensions of the workpiece.
To prevent the blade (which is flexible and which would
not otherwise be supported) from slipping out of po-
sition during cutting, and to reduce risks of injuries, a
minimum amount of blade should be exposed.
For a straight cut and to reduce the risk of twisting, loos-
en lock knobs I & J and position the blade guards G &
H as close as possible to the workpiece, then retighten
the lock knobs.
ADJUSTING THE BLADE GUARDS
CHANGING SPEEDS
1. Lower the arm into the horizontal position and loos-
en the jam nut and bolt K with a 12 mm wrench.
2. Loosen the jam nuts L and bolts M with a 12 mm
wrench until the base of the motor can move.
3. Open the pulley cover and change the speed (re-
fer to the chart in the manual or the sticker inside
the pulley cover).
Note: if there is not enough slack to move the belt,
loosen tension bolts M as needed.
4. Retighten bolts M alternating until the belt tension
is properly adjusted, then secure the motor in posi-
tion by tightening jam nuts L and jam nut and bolt
K. Close the pulley cover.
E
1/32”
A
B
C
D
K
L
M
TIP: CHECK TENSION BY PUSHING THE BELT WITH YOUR FIN-
GER. THE BELT SHOULD NOT MOVE MORE THAN 1/2”.
I
G
J
H
LEFT SIDE
RIGHT SIDE