
Use and Care Manual
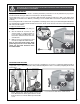


IMMOBILIZING THE MACHINE
Machine vibration during operation may cause the
machine to move, particularly when installed on un-
even surfaces.
The bolt-down tab and anchor bolt A can be used to
help keep the machine immobilized by either lower-
ing the bolt against the floor to act as another point of
contact with the floor, or for permanent installations, by
drilling into the floor and bolting the machine in place.
A
MAKE SURE THE MACHINE HAS BEEN TURNED OFF AND UNPLUGGED FROM THE POWER SOURCE BEFORE PERFORM-
ING ANY MAINTENANCE OR ADJUSTMENTS.
VERIFY ALL CHECK POINTS BEFORE STARTING. FAILURE TO COMPLY CAN RESULT IN SERIOUS INJURIES.
CHECKLIST BEFORE STARTING
1. Make sure you and any assistants are wearing safe and appropriate workshop attire.
2. To reduce the risk of damage to the machine, as well as potential for personal injury, after initial set-up as well
as before each use, make sure that everything is securely installed and that all fasteners and moving parts on
this machine are locked in place before starting the machine.
3. Make sure to have on safety glasses as well as hearing or/and respiratory protection at all times when using the
machine.
4. Check the level of coolant in the tank and fill it as necessary. The level should be between 3 liters (minimum)
and 5 liters (maximum).
5. Use only recommended parts and accessories. The use of parts or accessories NOT recommended by
GENERAL® INTERNATIONAL may result in a risk of injury or damage to the machine.
6.
Be sure that adjusting wrenches, tools, drinks and other clutter are removed from the machine and/or the
table surface before operating.
OPERATING INSTRUCTIONS
BURN DANGER: DO NOT USE BARE HANDS TO TOUCH THE WORKPIECE AT THE CUT LOCATION UNTIL IT HAS COOLED.
OPERATIONS STEP-BY-STEP
For horizontal cuts
1. Raise the saw arm by the handle and lock it in position by shutting off the hydraulic downfeed control valve.
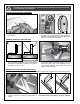
2. Trace the cutting line on your workpiece with a pencil and clamp the material firmly in the vise to ensure a
straight cut through the material. Make sure the workpiece is properly secured in the vise. Refer to the chart
below for proper stock placement in the vise.
Note: Use the work stop to make repeat cuts to the same length.
3. Adjust the blade guards as close as possible to the workpiece.
4. Start the machine.
5. Allow the blade to come to full speed, then begin the cut by opening the hydraulic downfeed control valve
and letting the head down slowly onto the workpiece. Re-adjust the cutting feed rate if needed.
Note: Do not drop or force the head onto the workpiece.
6. Wait for the automatic shutdown of the saw before carefully removing the workpiece from the vise.
NEVER USE THE SAW WITHOUT ALL GUARDS AND COVERS IN PLACE BEFORE STARTING THE SAW. BE SURE THAT THE
BLADE IS NOT ALREADY IN CONTACT WITH THE WORKPIECE.
18