
Use and Care Manual


10
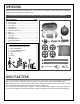
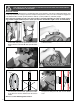
INSTALLING THE PULLEY COVER
1. Slide the pulley cover behind the pulleys A and line
up its mounting holes with the corresponding holes
on the machine B.
2. Attach the cover to the machine using a flat washer
and bolt C with a 10 mm wrench. Then screw the
lock knob in place D to keep the cover door closed
during operations.
C
D
A B
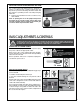
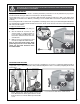
INSTALLING THE WORKPIECE STOP
E
F
G
H
1. Using a 12 mm wrench loosen bolt E without re-
moving it, then slide the stop bar all the way into its
mounting hole F and re-tighten the bolt to secure
the bar in place.
2. Slide the workpiece stop onto the bar as shown G
and tighten the thumbscrew H to secure it in place.
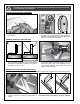
INSTALLING THE TABLE FOR VERTICAL CUTTING
1. To lock the blade arm in the UP position shut off the
hydraulic downfeed control valve I and lift the arm
into the vertical position.
2. Remove the screws on either side of the blade J.
Guide the table slot around the blade and line up
the holes in the table with the holes in the bracket
K. Secure the table to the bracket using the screws
removed in step 1.
J
K
BEFORE ASSEMBLING, MAKE SURE THAT THE SWITCH IS IN THE “OFF” POSITION AND THAT THE POWER CORD IS
UNPLUGGED. DO NOT PLUG IN OR TURN ON THE MACHINE UNTIL YOU HAVE COMPLETED THE ASSEMBLY AND
INSTALLATION STEPS DESCRIBED IN THIS SECTION OF THE MANUAL.
I