
Use and Care Manual


11
BASIC ADJUSTMENTS & CONTROLS
TO REDUCE THE RISK OF SHOCK OR FIRE DO NOT OPERATE THE UNIT WITH A DAMAGED POWER CORD OR PLUG. RE-
PLACE DAMAGED CORD OR PLUG IMMEDIATELY. TO AVOID UNEXPECTED OR UNINTENTIONAL START-UP, MAKE SURE
THE POWER SWITCH IS IN THE OFF POSITION BEFORE CONNECTING TO A POWER SOURCE.
CONNECTING TO A POWER SOURCE
Once the assembly steps have been completed, plug
the power cord into an appropriate outlet.
Refer back to the section entitled “Electrical Require
-
ments” and make sure all requirements and grounding
instructions are followed.
When operations have been completed, unplug the
saw from the power source.
OFF
TO AVOID UNEXPECTED OR UNINTENTIONAL
START-UP, MAKE SURE THAT THE POWER SWITCH
IS IN THE OFF POSITION BEFORE CONNECTING
TO A POWER SOURCE.
SWITCH OFF
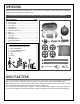
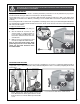
MAIN ON/OFF POWER SWITCH
This machine is equipped with an ON/OFF toggle style
power switch A.
To start the machine flip the switch up 1.
To stop the machine during the cut push the switch
down 2.
End the end of the cut the steel tab B bolted to the head
of the saw is designed to make contact with and turn
off the switch automatically.
If necessary the height of the tab can be adjusted loos-
ing bolt C with a 12 mm wrench and sliding the tab up
or down along its elongated slot. Once the tab is ad-
justed to be able to turn off the machine, retighten bolt
C to secure the tab in place.
A
B
C
ON
OFF
1
2
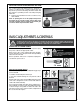
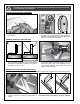
INSTALL THE COOLANT SYSTEM/RECOVERY TRAY FILTER
B
A
The coolant system with built-in pump is designed to
supply a continuous flow of liquid coolant to the cut-
ting area to prevent overheating of both the blade and
the workpiece, providing cleaner cuts and prolonging
blade life.
1. Fit the steel mesh filter A over the coolant recovery
tank drain B.
Note: To prolong the life of the pump and prevent
blockages in the coolant system, remove and clean
the filter regularly using a compressed air blow gun
to remove metal chips and other debris.