1.
2. 1 2 3 4 5 6 7 3.
4.
5. 6.
. 8.
9. 10.
RUS 10 GBR 54 DEU 98 FRA 142 ITA 186 ESP 230
Содержание 10 1. Перед началом эксплуатации 12 1.1 Правила техники безопасности 12 1.2 Комплект поставки 1.3 Передняя панель 1.4 Задняя панель 1.5 Пульт дистанционного управления 14 14 14 15 2. Подключения 17 2.1 Подключение к ТВ 2.1.1 Подключение через выход композитного видео (CVBS) 2.1.2 Подключение через компонентный видеовыход (YPrPb) 2.1.3 Подключение через HDMI 2.2 Подключение аудиосистемы 17 17 17 18 18 3.
Содержание 7.3.3 Настройка позиционера USALS 7.4 Настройка спутников 37 37 7.5 Установка языка 7.6 Настройка HD видео 7.7 Настройка SD видео 7.8 Настройка Аудио 7.9 Прочие настройки 7.10 Организация каналов 7.11 Упорядочить избранное 7.12 Передача данных 7.13 Условный доступ 7.13.1 Слот CI 7.13.2 Смарт-карта 7.14 Заводские установки 38 39 39 39 39 40 41 42 42 42 42 43 8.
1. Перед началом эксплуатации 1.1 Правила техники безопасности Данный ресивер изготовлен с соблюдением международных стандартов безопасности. Пожалуйста, до начала эксплуатации внимательно прочитайте правила техники безопасности. 1. ЭЛЕКТРОПИТАНИЕ От сети переменного тока частотой 50/60 Гц напряжением 110-240В. Подключайте ресивер только к сети электропитания с напряжением, указанным на маркировке. Если Вы не уверены, какой стандарт электропитания в Вашем доме – обратитесь в местную электрическую компанию.
1. Перед началом эксплуатации 1.1 Правила техники безопасности 11. ЗАМЕНА ДЕТАЛЕЙ Когда требуется замена деталей, убедитесь, что устанавливаемая деталь сертифицирована изготовителем и имеет те же характеристики, что и оригинальная. Не сертифицированные детали могут вызвать дополнительные повреждения ресивера. внимание! 1. Следуйте приведенным далее указаниям, чтобы избежать повреждения шнура питания и вилки. Не разбирайте и не пытайтесь ремонтировать шнур питания и вилку самостоятельно.
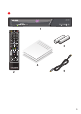
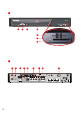
1. Перед началом эксплуатации 1.2 Комплект поставки (см. 1, стр. 3) 1. Ресивер 2. Пульт дистанционного управления 3. Элементы питания ААА, 1,5В для пульта дистанционного управления (2 шт.) 4. Руководство пользователя 5. Соединительный кабель HDMI примечание! Комплект поставки может отличаться в зависимости от региона. 1.3 Передняя панель (см. 2, стр. 4) 1. КНОПКА STANDBY Включение и отключение ресивера. Кнопка предназначена для перевода ресивера из режима ожидания (Stand By) в рабочий и обратно.
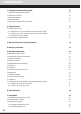
1. Перед началом эксплуатации 1.4 Задняя панель 4. S/PDIF Цифровой оптический аудиовыход. 5. HDMI Разъем для подключения ресивера к Вашему телевизору высокой четкости. 6. COMPONENT VIDEO Видеовыход для подключения к компонентному YPrPb видеовходу Вашего телевизора. 7. VIDEO Выход композитного видео (CVBS). Служит для подачи видеосигнала на видеовход Вашего телевизора. 8. ANALOG AUDIO Два разъема типа «тюльпан» для подключения дополнительных внешних аудио устройств или аудиовхода телевизора.
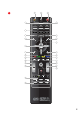
1. Перед началом эксплуатации 1.5 Пульт дистанционного управления 11. КРАСНАЯ кнопка Однократное нажатие при просмотре канала вызывает краткий информационный баннер. Повторное нажатие вызывает расширенный информационный баннер. Имеет дополнительные функции при работе экранного меню. 12. Кнопка Меняет разрешение HD видеовыхода (аналогична Кнопке *). 13. GUIDE Вызывает телегид. 14. CH +/CH Используются для переключения на следующий (CH+) и предыдущий канал (CH-).
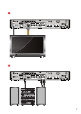
1. Перед началом эксплуатации 1.5 Пульт дистанционного управления 27. TV/RADIO Используется для переключения между режимами приема ТВ и Радиоканалов. примечание! Дизайн пульта дистанционного управления может быть изменен без предварительного уведомления. 2. Подключения 2.1 Подключение к ТВ 2.1.1 Подключение через выход композитного видео (CVBS) (см. 5, стр. 6) • Подключите 2 RCA разъема (красный и белый) кабеля 3RCA/3RCA к соответствующим по цветам выходам аудио на цифровом ресивере.
2. Подключения 2.1 Подключение к ТВ 2.1.3 Подключение через HDMI (см. 7, стр. 7) • Подключите разъем HDMI кабеля к HDMI выходу ресивера, а разъем на другом конце кабеля – к HDMI входу Вашего ТВ. • Подключите коаксиальный кабель от антенны к гнезду LNB IN на ресивере. 2.2 Подключение аудиосистемы (см. 8, стр. 7) Если Ваша аудиосистема имеет цифровой оптический вход S/PDIF, то воспользуйтесь специальным оптическим кабелем для соединения её с ресивером.
4. Мастер установки При первом включении ресивера запускается Мастер установки. Он организован таким образом, что всего за несколько шагов можно ввести необходимые настройки и легко найти все интересующие Вас каналы. внимание! Мастер установки запускается также после сброса ресивера к Заводским установкам (см. п. Заводские установки) и если в памяти ресивера не сохранены каналы. Работу Мастера установки можно прервать на любом шаге, нажав кнопку EXIT [23].
4. Мастер установки Шаг 2 На этом шаге Мастера установки требуется указать настройки HD видеовыхода. Подведите курсор кнопками / [8] к строке необходимой настройки. Выбор требуемой установки производите кнопками / [8] или нажмите OK [24] для выбора из выпадающего списка. Выбор в выпадающем списке производите с помощью кнопок / [8] и подтверждайте нажатием кнопки OK [24]. Для возврата к предыдущему шагу Мастера установки выберите Назад и нажмите кнопку OK [24].
4. Мастер установки Шаг 4 На этом шаге Мастера установки можно выбрать установки антенной системы, указать название спутника и тип поиска каналов. По умолчанию выбраны установки, рекомендованные оператором спутникового ТВ. Подведите курсор кнопками / [8] к строке необходимой настройки. Выбор требуемой установки производите кнопками / [8] или нажмите OK [24] для выбора из выпадающего списка. Выбор в выпадающем списке производите с помощью кнопок / [8] и подтверждайте нажатием кнопки OK [24].
4. Мастер установки Полный поиск - ресивер сканирует весь частотный диапазон с шагом, устанавливаемым в зависимости от минимальной символьной скорости потока (минимальной скорости соответствует наименьший шаг). Значения поляризации и FEC при этом перебираются из всех возможных вариантов. Значение скорости потока перебирается из набора скоростей, начиная с минимальной и заканчивая последней записанной в памяти ресивера. примечание! Если выбран Полный поиск, то активируется пункт Скорости потока.
4. Мастер установки Шаг 6 Это заключительный этап работы Мастера установки. Здесь требуется задать установки времени и даты. Сдвиг UTC Здесь можно задать разницу Вашего часового пояса и всемирного координированного времени. Автоматическое обновление Варианты: Да, Нет. Да - для установки системного времени и даты ресивер будет использовать данные, передаваемые вещателем в составе сигнала. Нет - ресивер будет использовать дату и время, введенные Вами вручную на этом этапе установки.
5. Основные функции 5.2 Регулировка уровня громкости Для регулировки уровня громкости используются кнопки VOL-/VOL+ [18] или / [8]. Кнопки VOL-/VOL+ [18] работают как в режиме во время просмотра канала, так и в режиме экранных меню. Кнопки / [8] не работают в режиме экранных меню (в т.ч. при выводе малого инфобаннера). Чтобы временно выключить звук, нажмите кнопку MUTE [3]. Чтобы снова включить звук, нажмите кнопку MUTE [3] повторно или одну из кнопок VOL+ [18], [8]. 5.
5. Основные функции 5.4 Список каналов Один столбец. Для перемещения курсора по списку используйте кнопки / [8]. Для переключения на канал, на котором стоит курсор, нажмите кнопку OK [24]. «Ползунок» в полосе справа от списка графически указывает место выбранного курсором канала в общем списке. Три столбца. Для перемещения курсора по списку в пределах столбцов используйте кнопки / [8]. Для перехода между столбцами пользуйтесь кнопками / [8].
5. Основные функции 5.4 Список каналов По умолчанию первым языком отображаемого алфавита является текущий язык графического интерфейса пользователя. Некоторые вещатели используют для наименования каналов буквы других алфавитов, совпадающие по начертанию. Поэтому, например, нахождение канала СТС-Москва в списке каналов английской буквы «С» не является ошибкой программного обеспечения ресивера. 5.
5. Основные функции 5.5 Информационные баннеры Если нажать КРАСНУЮ кнопку [11] при отображении краткого информационного баннера, то отобразится расширенный информационный баннер. Он выглядит так: 1 2 3 13:10 4 5 10 9 8 7 В расширенном информационном баннере отображаются: 1. Дата 2. Окно с подробным описанием передачи Для просмотра полного описания можно воспользоваться кнопками 3. Текущее время 4. Полоса прокрутки подробного описания передачи 5. Кодировка 6. Данные о провайдере 7.
5. Основные функции 5.6 Телетекст В ресивере есть встроенный декодер телетекста STB, для его активации нажмите ЖЕЛТУЮ кнопку [22], в появившемся списке выберите Телетекст и нажмите / [8] или OK [24]. В появившемся списке выберите язык телетекста. Управление телетекстом осуществляется с помощью ЦИФРОВЫХ кнопок 0 ~ 9 [5] пульта ДУ. Для выхода из режима телетекста нажмите кнопку EXIT [23]. Приемник также поддерживает прием телетекста в режиме VBI.
5. Основные функции 5.8 Списки избранных каналов Создать эти списки можно в меню: Настройка – Упорядочить избранное. Чтобы вывести на экран перечень списков избранных каналов, нажмите СИНЮЮ кнопку [21] пульта в режиме просмотра программ. Перемещайтесь по списку с помощью кнопок / [8]. Чтобы раскрыть список, нажмите [8] или OK [24]. Нажмите кнопку OK [24] для просмотра выбранного канала.
5. Основные функции 5.11 Экранная клавиатура Для ввода различной текстовой информации (названия каналов, фаворитных списков, провайдеров) используется клавиатура. Для ввода буквы или символа следует переместить курсор кнопками / / / [8] на нужную букву или символ и нажать кнопку OK [24]. Чтобы сохранить введенное название, нажмите ЗЕЛЕНУЮ кнопку [10]. Чтобы стереть один символ, нажмите КРАСНУЮ кнопку [11].
5. Основные функции 5.13 Обновление программного обеспечения (ПО) ресивера 5.13.1 Обновление ПО через спутник При необходимости, оператор спутникового ТВ может запустить сервис обновления программного обеспечения ресивера по сигналу со спутника. Во время переключения каналов оператора появится информационный баннер с сообщением о том, что доступно новое ПО и запросом на подтверждение обновления. Для подтверждения запроса необходимо выбрать Да с помощью кнопок или [8] и нажать кнопку OK [24].
5. Основные функции 5.13 Обновление программного обеспечения (ПО) ресивера 5.13.2 Обновление ПО через USB внимание! Не выключайте питание ресивера во время обновления ПО! Предыдущий сеанс работы с Flash-накопителем USB в персональном компьютере должен быть корректно завершен! Flash-накопитель должен полностью соответствовать спецификации USB 2.0! Порядок действий при обновлении ПО через USB: 1. Вставьте Flash-накопитель USB с обновлением ПО в USB порт включенного ресивера. 2.
6. Главное меню • Пункты меню – для выбора пункта меню используйте кнопки / бора OK [24], для отмены или перехода на уровень выше EXIT [23]. [8], для подтверждения вы- Пункты меню могут быть: 1. Кнопками перехода на следующий уровень меню; 2. Полями ввода. Для ввода используйте ЦИФРОВЫЕ кнопки 0 ~ 9 [5], для подтверждения ввода нажмите кнопку OK [24] или одну из кнопок / / / [8] для отмены - EXIT [23]; 3. Выпадающими списками.
7. Настройка 7.2 Ручной поиск каналов Во время поиска на экране отображаются: шкала прогресса и два списка найденных каналов (ТВ и Радио). Новые каналы отображаются белым цветом, а те, что уже имелись в базе – серым. Если найденный канал уже есть в общем списке, он не будет добавляться повторно. После завершения поиска на экране появится запрос на сохранение найденных каналов с указанием количества новых каналов.
7. Настройка 7.3 Настройка антенны Если Вы выбрали тип LNB универсальный 1, то переключение между частотами гетеродина 9750 и 10600 МГц происходит автоматически при введении значения частоты транспондера в меню поиска каналов. Установка тонового сигнала 22кГц необязательна (деактивирована). Если Вы выбрали тип LNB универсальный 2, то переключение между частотами гетеродина 9750 и 10750 МГц происходит автоматически. Установка тонового сигнала 22кГц необязательна (деактивирована).
7. Настройка 7.3 Настройка антенны 7.3.1 Моторизованная система Для работы с моторизированной антенной системой в этом пункте требуется выбрать её тип управления. Если Вы используете моторизованную систему с поддержкой программы управления DiSEqC1.3, то в этом пункте меню установите значение USALS. Если Вы используете моторизованную систему для управления приводом антенны с протоколом DiSEqC™1.2, то в этом пункте меню установите значение DiSEqC1.2. 7.3.2 Настройка DiSEqC 1.
7. Настройка 7.3 Настройка антенны 7.3.3 Настройка позиционера USALS Чтобы повернуть антенну на спутник: • Выберите спутник, на который необходимо настроить моторизованную систему; • Выберите транспондер. Шкалы силы и качества сигнала этого транспондера будут отображаться в нижней части экрана; • Установите широту и долготу местоположения моторизованной системы. Для этого: • Нажмите кнопку OK [24]; • Введите значение с помощью ЦИФРОВЫХ кнопок 0 ~ 9 [5] в формате xxx.
7. Настройка 7.4 Настройка спутников В списке спутников добавится Новый Спутник. Чтобы изменить его название, нажмите СИНЮЮ кнопку [21]. С помощью клавиатуры введите нужное название. Таким же образом можно изменить название любого спутника. Орбитальная позиция Для ввода требуемой орбитальной позиции необходимо нажать кнопку OK [24]. Набрать с помощью ЦИФРОВЫХ кнопок 0 ~ 9 [5] требуемую позицию спутника в формате xxx.x. Выбрать направления:“W”или“E”. Нажать ЗЕЛЕНУЮ кнопку [10] .
7. Настройка 7.6 Настройка HD видео Этот пункт полностью аналогичен Шагу 2 Мастера установки. 7.7 Настройка SD видео TV Видеовыход Возможные варианты: PAL , SECAM. Соотношение сторон TV Возможные варианты: 16х9 , 4х3. Режим преобразования TV Возможные варианты: Pan-Scan, Конверт, Комбинированный, Как есть. 7.8 Настройка Аудио Этот пункт полностью аналогичен Шагу 3 Мастера установки. 7.
7. Настройка 7.9 Прочие настройки Эксперт – этот режим открывает возможность редактирования PID и транспондеров. Возможен полный просмотр информации о канале в расширенном информационном баннере. 7.
7. Настройка 7.10 Организация каналов Выберите новое положение канала с помощью кнопок / [8]. Повторно нажмите ЗЕЛЕНУЮ кнопку [10]. Чтобы вернуть канал на его исходное положение, нажмите кнопку EXIT [23]. Блокировка Выберите канал или группу каналов, которые Вы хотите блокировать и нажмите ЖЕЛТУЮ кнопку [22]. Рядом с номером канала появится специальный символ блокировки в виде стилизованного замка. Для просмотра блокированных каналов необходимо ввести PIN код.
7. Настройка 7.12 Передача данных Реализована возможность передачи данных (ПО и/или базы каналов) с ресивера на Flash-накопитель через USB интерфейс. Последовательность действий: 1. Включите ресивер. 2. Вставьте FLASH-накопитель в порт USB. 3. Войдите в меню. 4. Нажмите СИНЮЮ кнопку [21]. Появится сообщение Подождите, пожалуйста, начнется передача данных. 5. После окончания передачи ПО ресивер выйдет в меню Настройка. 7.13 Условный доступ 7.13.
7. Настройка 7.14 Заводские установки В этом пункте меню можно восстановить все значения установок по умолчанию. При сбросе на заводские установки информация о настроенных каналах, антеннах, списках избранных каналов будет утеряна. Чтобы загрузить заводские установки нажмите КРАСНУЮ кнопку [11] пульта ДУ. Подтвердите сброс на заводские установки, нажав Да в окне запроса. После сброса ресивер перейдет в режим ожидания (Stand By). 8.
9.Таймер 9.2 Установка таймера В этом меню можно установить таймер на включение или выключение ресивера по расписанию. С помощью ЖЕЛТОЙ кнопки [22] можно установить таймер на включение или переключение ресивера на определенную программу. В окне установки таймера доступны следующие опции: номер канала, время начала/конца передачи, повторение (один раз, раз в день, раз в неделю). Чтобы удалить таймер, нажмите КРАСНУЮ кнопку [11]. Чтобы редактировать параметры установленного таймера нажмите СИНЮЮ кнопку [21].
12. Устранение неисправностей Неисправность / проблема Возможное решение Длительное отсутствие реакции ресивера на нажатие кнопок передней панели или пульта. Перезапустите ресивер (выключите и затем снова включите питание). Отсутствие питания ресивера. Убедитесь в том, что ресивер не находится в режиме ожидания (Stand By). Проверьте шнур питания, убедитесь в том, что он подключен к подходящей сети питания. Отсутствие изображения. Убедитесь в том, что ресивер включен (см. выше).
13. Спецификация Основные потребительские характеристики Максимальное число каналов Фаворитные группы Телетекст Субтитры Графический интерфейс Электронный гид Поддержка дополнительных сервисов Не менее 4000 10 по макс.
13. Спецификация Видеодекодер Декодируемые видеоформаты Скорость входного элементарного видеопотока Разрешение декодируемого видеопотока Формат сигнала ТВ изображения MPEG-2, MP@ML и MP@HL H.264: HP@L4.
13. Спецификация Органы управления/контроля передней панели/ДУ Кнопки управления Индикация дисплей Управление от ПДУ Standby, TV/Radio, P+, P1 LED(2 цвета, 3 цвета индикации) 7 сегментный четырехразрядный, цвет – синий.
14.
15. Гарантийные обязательства УВАЖАЕМЫЙ ПОКУПАТЕЛЬ! Корпорация «Дженерал Сателайт» выражает Вам огромную признательность за Ваш выбор. Мы уверены, что данное изделие будет удовлетворять всем Вашим запросам, а качество будет соответствовать лучшим мировым образцам. Если у Вас возникнут какие-либо проблемы с изделиями, приобретенными в Корпорации «Дженерал Сателайт», рекомендуем Вам обращаться только к уполномоченным сервисным центрам (УСЦ), адреса которых Вы можете узнать у нас или у наших дилеров.
15. Гарантийные обязательства 6. Гарантия не распространяется на следующие неисправности: • Механические повреждения; • Повреждения, связанные с использованием не оригинальных карт доступа; • Повреждения, вызванные попаданием внутрь изделия посторонних предметов, веществ, жидкостей, насекомых; • Повреждения, вызванные форс-мажорными обстоятельствами; • Повреждения, вызванные несоответствием Государственным стандартам параметров, телекоммуникационных, кабельных сетей и других подобных внешних факторов.
GBR 54 DEU 98 FRA 142 ITA 186 ESP 230
Table of contents 54 1. Prior to starting the operation 56 1.1 Safety rules 56 1.2 Complete set of delivery 1.3 Front panel 1.4 Rear Panel 1.5 Remote control 58 58 58 59 2. Connections 61 2.1 Connection to TV 2.1.1 Connection through output of composite video (CVBS) 2.1.2 Connection through component video output (YPrPb) 2.1.3 Connection through HDMI 2.2 Connection of audio system 61 61 61 62 62 3.
Table of contents 7.3.3 Setup of USALS positioner 7.4 Satellite Setup 81 81 7.5 Language setup 7.6 HD video output setup 7.7 SD video output setup 7.8 Audio output setup 7.9 Other settings 7.10 Organize Channels 7.11 Organize Favorites 7.12 Data Transfer 7.13 Conditional access 7.13.1 Common Interface 7.13.2 Smart card 7.14 Default Settings 82 82 83 83 83 84 85 86 86 86 86 87 8.
1. Prior to starting the operation 1.1 Safety rules This Receiver has been manufactured subject to the observance of international standards of safety. Prior to starting operation of the Receiver, please, read carefully and comprehend the rules of industrial safety. 1. ELECTRIC POWER SUPPLY Power supply is to be provided using an AC mains operating at a frequency of 50/60 Hz, at a voltage of 110-240 Volts.
1. Prior to starting the operation 1.1 Safety rules 10. FOREIGN OBJECTS Never place foreign objects in the apertures available in the casing of the Receiver; this could result in damage to individual parts thereof, or electric shock. 11. REPLACEMENT OF COMPONENTS In case where replacement of components is required, please, make sure that the part you use to install has been certified by the manufacturer and has the same characteristics as the original component.
1. Prior to starting the operation 1.2 Complete set of delivery (see 1, pg. 3) 1. Receiver 2. Remote control 3. Power cells ААА, 1.5 V for remote control (2 pieces) 4. User Manual 5. HDMI connecting cable note! Complete set of delivery can vary depending on the region. 1.3 Front panel (see 2, pg. 4) 1. STANDBY BUTTON Switching-on and switching-off of the Receiver. The button is intended for switching of the Receiver from standby mode (Stand By) into operating mode and vice versa.
1. Prior to starting the operation 1.4 Rear Panel 5. HDMI Connector for connection of the Receiver to your high definition TV set. 6. COMPONENT VIDEO Video output for connection to component YPrPb video-input of your TV set. 7. VIDEO Output of composite video (CVBS). It is used for transmission of video signal to video input of your TV set. 8. ANALOGUE AUDIO Two connectors of “tulip” type for connection of additional external audio devices or audio input of the TV set.
1. Prior to starting the operation 1.5 Remote control 11. RED button Single depressing while watching a channel would call a brief information banner. Repeated depressing would call a broadened information banner. It also offers additional functions when manipulating the screen menu. 12. Button Varies the resolution of the HD video output (similar to *Button). 13. GUIDE Calls the television guide. 14. CH +/CH These are used for switching to the next (CH+) and previous channel (CH-).
1. Prior to starting the operation 1.5 Remote control 27. TV/RADIO The button is used for switching between the modes of receiving of TV programmes and radio channels. note! Design of the remote control can be changed without a prior notification. 2. Connections 2.1 Connection to TV 2.1.1 Connection through output of composite video (CVBS) (see 5, pg. 6) • Connect 2 RCA connectors (red and white) of the cable 3RCA/3RCA to the respectively coloured output connectors of the audio on the digital Receiver.
2. Connections 2.1 Connection to TV 2.1.3 Connection through HDMI (see 7, pg. 7) • Connect the HDMI connector of the cable to the HDMI output of the Receiver, and the connector at the other end of the cable – to HDMI input of your TV set. • Connect coaxial cable of the aerial to the LNB IN connector on the Receiver. 2.2 Connection of audio system (see 8, pg. 7) If your audio system has S/PDIF digital optical input, please, use a special optical cable for connecting the same to the Receiver.
4. Installation wizard When the Receiver is switched-on for the first time, the Installation wizard would be started. It is so organised, in order that even several steps could allow you to set all the necessary settings, and easily find all the channels of interest for you. note! Installation wizard would also start up after setting the Receiver to Factory default settings (see the Factory settings article) and in case where there are no channels stored in the memory of the Receiver.
4. Installation wizard Step 2 At this step of the Installation wizard one should specify the settings of HD video output. Move the cursor using the buttons / [8] to the line of the required settings. Select the required setting using the buttons / [8] or depress OK [24] to select from the dropdown list. To select from the drop-down list, use the buttons / [8] and acknowledge by depressing the button OK [24].
4. Installation wizard Move the cursor, using the buttons line of the required setting. / [8], to the Selection of the required setting is made with the help of the buttons / [8], or otherwise, depress OK [24] to select from the drop-down list. Select from the drop-down list using the buttons / [8], and acknowledge by depressing the button OK [24]. To return to the previous step of the Installation wizard select Back and depress the OK [24] button.
4. Installation wizard looked through the number of rates, starting from the minimal one, and finishing with the last one stored in the memory of the Receiver. note! In case where Full search, has been selected, then the item of Rates of the stream would be activated. In that item one could select the rate depending on which the increment of scanning of the frequency range would be selected. The range of rates can be edited or added manually.
4. Installation wizard Automated updating Options: Yes, No. Yes - the Receiver would use the data transmitted by the broadcaster in the composition of the signal for setting of the system time and date. No - the Receiver would use the date and time entered by you manually at this stage of setup. Year, Month, Day Using NUMERICAL buttons 0 ~ 9 [5], enter the time and date. Local time Current system time is displayed here, in compliance with your settings.
5. The main functions 5.2 Volume control For volume control please use the VOL-/VOL+ [18] or / [8] buttons. The VOL-/VOL+ [18] buttons are active in the mode of channel watching as well as in the mode of on-screen menus. The buttons / [8] are inactive in the mode of on-screen menus (as well as in the mode of displaying of the minor information banner). To temporarily switch off the sound, depress the MUTE [3] button.
5. The main functions 5.4 List of channels Single column. To move the cursor through the list, use the buttons / [8]. To switch to the channel selected with the cursor depress the OK [24] button. «Slider» located in the bar to the right of the list graphically indicates the location of the channel selected with the cursor in the common list. Three columns. To move the cursor through the list within the limits of the columns use the buttons / [8]. For transition between the columns use the buttons / [8].
5. The main functions 5.4 List of channels By default the first language of the displayed alphabet is the current language of the graphical user interface. Some broadcasters use letters of other alphabets having similar graphical image for designation of their channels. Therefore, presence of the СТС-Moscow channel in the list of channels beginning from the Latin «С» would not be an error of the software of the Receiver. 5.
5. The main functions 5.5 Information banners If you depress the RED button [11] during displaying of the brief information banner then an expanded information banner would be displayed. It looks as follows: 1 2 3 13:10 Tuesday 12/11/2008 4 Satellite: Eurobird 9 Provider: Platforma HD TR 11/11 11957 MHz (V) 26400K 2/3 QPSK DVB-S2 Video PID: 0163� Audio PID: 0163� DRE PCR PID: 0168 Signal strength: 10 9 8 7 5 6 The expanded information banner displays: 1. Date 2.
5. The main functions 5.6 Teletext The Receiver has a built-in teletext STB decoder, which is activated by depressing the YELLOW button [22] ; in the displayed list select Teletext and depress [8] or OK [24]. In the displayed list select language for the teletext. Control of the teletext is made with the help of numerical buttons of the remote control. To exit the mode of teletext depress the EXIT [23] button. The Receiver also supports reception of teletext in the mode of VBI.
5. The main functions 5.8 Lists of selected channels These lists can be created in the menu: Setup – Organize the selected. To display the list of selected channels on the screen depress the BLUE button [21] of the remote control in the mode of viewing the programmes. Move through the list with the help of the buttons / [8]. To open the list depress [8] or OK [24]. Depress the button OK [24] to watch the selected channel.
5. The main functions 5.11 Keyboard display For the purpose of entry of the various textual information (names of channels, favourite lists, providers), a keyboard is used. To perform entry of a letter or a symbol, one should place the cursor, using the buttons / / / [8] onto the required letter or symbol and depress the OK [24] button. To save the entered name depress the GREEN button [10]. To delete a single symbol depress the RED button [11].
5. The main functions 5.13 Updating of the software (SW) of the Receiver 5.13.1 SW upgrading via satellite In case where necessary, the operator of satellite TV can start the service of updating of the Receiver’s software by a signal from satellite. During switching between the operator’s channels an information banner would appear with a message about new available SW, and a request for acknowledgement of the update.
5. The main functions 5.13 Updating of the software (SW) of the Receiver 5.13.2 SW update via USB note! Never switch off the power supply of the Receiver during updating of SW! The previous session of working with USB flash-store in the personal computer shall be correctly completed! The flash-store shall comply entirely with the USB 2.0 specification! Operating procedure when updating the SW via USB: 1. Insert the USB flash-store with SW update into the USB port of switched-on Receiver. 2.
6. The Main Menu The items of the Menu can include: 1. Buttons for moving to the next level of the Menu; 2. Entry fields. For entry of values, use NUMERICAL buttons 0 ~ 9 [5], to acknowledge the entry depress the OK [24] button, or one of the buttons / / / [8]; to cancel depress EXIT [23]; 3. Drop-down lists. To open the list depress OK [24], to move through the list use / [8].
7. Installation 7.2 Manual search of channels On completion of the search a request would be displayed on the screen about saving the newly detected channels with indication of the number of new channels. Depressing of the EXIT [23] button during the search of channels would stop the search; however, the channels detected by Receiver could be saved.
7. Installation 7.3 Antenna Setup If you select the type of LNB universal 1, then switching between the frequencies of heterodyne 9750 and 10600 MHz would be made automatically with entry of the value of transponder's frequency in the menu of search of channels. Setting of 22 kHz tone signal would not be required (can be disabled). If you select the type of LNB universal 2, then switching between the frequencies of heterodyne 9750 and 10750 MHz would be made automatically.
7. Installation 7.3 Antenna setup 7.3.1 Motorised system To operate a motorised aerial system, one should select the type of control thereof in this item. If you use motorised system with support of the programme of control of the DiSEqC1.3, set the value to USALS in this item of the Menu. If you use motorised system for control of the aerial drive using the protocol DiSEqC™1.2, set the value to DiSEqC1.2 in this item of the Menu. 7.3.2 Setup of DiSEqC 1.
7. Installation 7.3 Antenna setup 7.3.3 Setup of USALS positioner To direct the aerial towards a satellite: • Select the satellite to which the motorised system is required to be adjusted; • Select the transponder. The scales of level and quality of signal from that transponder will be displayed in the bottom part of the screen; • Set the latitude and longitude of the location of the motorised system.
7. Installation 7.4 Satellite Setup Orbital position To enter the required orbital position, it would be necessary to depress the OK [24] button. Using the NUMERICAL buttons 0 ~ 9 [5] enter the required position of the satellite in the format of xxx.x. Select the directions: “W” or “E”. Depress the GREEN button [10]. Transponder This item contains the list of transponders of the selected satellite. Each transponder has such parameters like: frequency, polarisation, rate of stream, FEC, modulation type.
7. Installation 7.7 SD video output setup TV Video output Available options: PAL, SECAM. TV Aspect Ratio Available options: 16х9, 4х3. TV Conversion Mode Available options: Pan-Scan, Letter box, Combined, As is. 7.8 Audio output setup This item is completely similar to Step 3 of the Installation wizard. 7.9 Other settings Transparency Setting of the degree of transparency of the image of information banner the window for the list of channels, time indication, etc.
7. Installation 7.
7. Installation 7.10 Organize Channels Interlocking Select a channel or a group of channels which you are going to interlock, and depress the YELLOW button [22] . A special symbol of interlock appears near the number of the channel, having the appearance of a conventionalized lock. It would be necessary to enter the PIN-code to view the interlocked channels. Renaming To rename a selected channel depress the BLUE button [21]. Using the on-screen keyboard enter new name of channel. 7.
7. Installation 7.12 Data Transfer A possibility is realised, of data transfer (SW and/or channels database) from the Receiver to Flash-store, via USB interface. The sequence of operations: 1. Switch the Receiver ON. 2. Insert the FLASH-store into the USB port. 3. Enter the menu Installation -> Data Transfer. 4. Depress the BLUE button [21]. A message would be displayed: Please, wait data transfer would start. 5.
7. Installation 7.14 Default Settings In this item of the Menu it is possible to restore all values of default settings. With resetting to default settings, the information about the tuned channels, aerials, lists of favourite channels would be lost. To load the default settings, depress the RED button [11] of the remote control. Acknowledge resetting to the default settings by depressing Yes in the screen window. After resetting the Receiver will be switched into Standby mode. 8.
9. Timer 9.2 Timer setup This item of the Menu enables setting the timer to switching-on or switching-off of the Receiver according to a schedule. Using the YELLOW button [22] one can set the timer to switching-on or switching of the Receiver to a certain programme. In the timer setting window, the following options are available: the number of channel, the time of beginning/end of the broadcast, repeat (once, once a day, once a week). To delete the timer setting depress the RED button [11].
12. Trouble-shooting Malfunction / problem Possible solution A lengthy absence of reaction of the Receiver to depressing of the buttons on the front panel or remote control. Restart the Receiver (switch off and switch on power supply anew). Absence of power supply of the Receiver. Make sure the Receiver is not in Standby mode. Check the power cord, make sure the same is connected to suitable electric power mains. Absence of picture. Make sure the Receiver is switched ON (see above).
13. Specification General consumer characteristics Maximum number of channels Favourite groups Teletext Subtitles Graphical interface Electronic guide Support of additional services Not less than 4000 10, with max.
13. Specification Video decoder Decoded video formats MPEG-2, MP@ML and MP@HL H.264: HP@L4.1, MP@L4 Rate of input elementary video stream Resolution of decoded video stream Format of the signal of TV picture Max.
13.
14.
15. Warranty DEAR CUSTOMER! The «General Satellite» Corporation expresses great thankfulness for your choice. We are sure that this product will meet all your requirements, and the quality will comply with the best world standards. Should you have any problems with the products purchased from the «General Satellite» Corporation, we recommend you to only address authorized service centres (ASC) whose addresses you can learn from us or our dealers.
15. Warranty • Damages caused by ingress, inside the product, of extraneous objects, substances, liquids, insects; • Damages caused due to force-majeure circumstances; • Damages caused due to non-compliance with the State standards, of the parameters of telecommunication, cable networks and other similar external factors. The warranty shall not cover consumable materials. Setup of the product, the procedure of which is described in the User Manual, shall not be covered by warranty service.
DEU 98 FRA 142 ITA 186 ESP 230
Inhaltsverzeichnis 98 1. Inbetriebnahme 100 1.1 Sicherheitshinweise 100 1.2 Lieferumfang 1.3 Frontseite 1.4 Rückseite 1.4 Rückseite 1.5 Fernbedienung 102 102 102 103 103 2. Installation 105 2.1 Anschluss an Fernseher 2.1.1 Anschluss über Composite-Video-Ausgang (CVBS) 2.1.2 Anschluss über Komponentenausgang (YPrPb) 2.1.3 Anschluss über HDMI-Ausgang 2.2 Anschluss des Audiosystems 105 105 105 106 106 3.
Inhaltsverzeichnis 7.3.3 Einstellungen der Positioniervorrichtung USALS 7.4 Satelliteneinstellung 125 125 7.5 Spracheinstellungen 7.6 Einstellung HD-Video 7.7 Einstellung SD-Video 7.8 Audioeinstellung 7.9 Sonstige Einstellungen 7.10 Programmanordnung 7.11 Favoriten anordnen 7.12 Datenübertragung 7.13 Bedingter Zugang 7.13.1 Slot CI 7.13.2 Smartkarte 7.
1. Inbetriebnahme 1.1 Sicherheitshinweise Dieses Gerät wurde unter Einhaltung internationaler Sicherheitsnormen hergestellt. Lesen Sie bitte die Sicherheitshinweise sorgfältig durch, bevor Sie den Receiver in Betrieb nehmen. 1. STROMVERSORGUNG Die Stromversorgung erfolgt von dem Wechselstromnetz mit der Frequenz von 50/60 Hz und Spannung von 110 – 240 V. Schließen Sie den Receiver nur an das Stromnetz mit der Spannung an, die mit der am Gerät markierten übereinstimmt.
1. Inbetriebnahme 1.1 Sicherheitshinweise 10. FREMDKÖRPER Stecken Sie keine Fremdkörper durch die Lüftungsschlitze ins Receivergehäuse, dies kann die Beschädigungen einzelner Geräteteile oder einen elektrischen Stromschlag zur Folge haben. 11. ERSATZTEILE Sollte ein oder mehrere Teile ausgewechselt werden, überzeugen Sie sich, dass der Ersatzteil von dem Hersteller zertifiziert ist und die gleichen Parameter wie der Originalteil hat.
1. Inbetriebnahme 1.2 Lieferumfang (1/3) 1. Receiver 2. Fernbedienung 3. Batterien ААА, 1,5 V für Fernbedienung (2 st.) 4. Bedienungsanleitung 5. Verbindungskabel HDMI Anmerkung! Der Lieferumfang kann regional vom hier aufgeführten abweichen. 1.3 Frontseite (2/4) 1. TASTE STANDBY Ein- und Ausschalten des Receivers. Die Taste dient zum Umschalten zwischen dem Bereitschaftszustand (STANDBY) und Normalbetrieb. Anzeige des STANDBY-Betriebes (rot), Normalbetriebes (gelb), „Signal vorhanden“ (grün). 2.
1. Inbetriebnahme 1.4 Rückseite 4. S/PDIF Digitaler Audioausgang für optisches Kabel. 5. HDMI Ausgangsbuchse zum Anschließen eines HDMI-Fernsehers. 6. COMPONENT VIDEO Videoausgang zum Anschluss an YPrPb Komponentenvideoeingang des Fernsehens. 7. VIDEO Composite Video Ausgang (CVBS). Dient zur Übertragung des Videosignals zum Videoeingang des Fernsehers. 8. ANALOG AUDIO Zwei „Tulpe“-Buchsen zum Anschließen zusätzlicher externer Audiogeräte oder TV-Audioeinganges. Analoger Stereoausgang.
1. Inbetriebnahme 1.5 Fernbedienung 10. GRÜNE TASTE zum Aufrufen von in diesem Kanal vorhandenen Tonspuren. Im Bildschirmmenü-Modus hat sie zusätzliche Funktionen. 11. ROTE TASTE beim einmaligen Drücken während des Programmanschauens ruft das kurze Informationsbanner auf. Wiederholtes Drücken öffnet das detaillierte Informationsfenster. Im Bildschirmmenü-Modus hat sie zusätzliche Funktionen. 12. Taste zum Wechseln des HD-Formats des Videoausganges (entspricht Die Taste*). 13.
1. Inbetriebnahme 1.5 Fernbedienung 26. # Taste zum Wechseln der HD-Konvertierung des Videoausganges. 27. TV/RADIO Umschalttaste zum Empfang der TV- und Radioprogramme. Anmerkung! Das Design der Fernbedienung kann ohne vorherige Ankündigung geändert werden. 2. Installation 2.1 Anschluss an Fernseher 2.1.1 Anschluss über Composite-Video-Ausgang (CVBS) (5/6) • Schließen Sie 2 RCA Cinch Stecker (rot und weiß) des Kabels 3RCA/3RCA zu gleichfarbigen Audioausgängen des Digitalreceivers an.
2. Installation 2.1 Anschluss an Fernseher 2.1.3 Anschluss über HDMI-Ausgang (7/7) • Schließen Sie den Stecker des HDMI-Kabels zum Ausgang des Receivers und den Stecker am anderen Endes des Kabels zu HDMI-Eingang Ihres Fernsehens an. • Schließen Sie das Koaxialantennenkabel an die Buchse LNB IN am Receiver an. 2.2 Anschluss des Audiosystems (8/7) Sollte Ihr Audiosystem einen digitalen optischen Eingang S/PDIF besitzen, so können Sie ein Lichtleitkabel für dessen Verbindung mit dem Receiver verwenden.
4. Einstellmaster Der Einstellmaster wird beim ersten Einschalten des Receivers gestartet. Er ist derart programmiert, dass alle erforderlichen Einstellungen in wenigen Schritten durchgeführt werden können und alle für Sie interessante Programme leicht zu finden sind. Anmerkung! Der Einstellmaster startet auch nach dem Wechsel zu Werkeinstellungen (s. P. Werkeinstellungen) oder wenn die Programme im Receiver nicht gespeichert wurden.
4. Einstellmaster Schritt 2 In diesem Schritt des Einstellmasters sind die HDEinstellungen des Videoausganges vorzunehmen. Führen Sie den Kursor mithilfe von Tasten / [8] zur erforderlichen Einstellzeile. Die Wahl der nötigen Einstellung erfolgt mithilfe von Tasten / [8] oder durch Drücken der OK [24] Taste zur Wahl aus der zu öffnenden Liste. Die Wahl aus der geöffneten Liste erfolgt mithilfe von Tasten / [8] und ist durch Drücken der Taste OK [24] zu bestätigen.
4. Einstellmaster Die Wahl der nötigen Einstellung erfolgt mithilfe von Tasten / [8] oder durch Drücken der OK [24] Taste zur Wahl aus der zu öffnenden Liste. Die Wahl aus der geöffneten Liste erfolgt mithilfe von Tasten / [8] und ist durch Drücken der Taste OK [24] zu bestätigen. Um zum vorherigen Schritt des Einstellmasters zurückzukehren, wählen Sie Zurück und drücken die Taste OK [24]. Um zum nächsten Schritt des Einstellmasters zu wechseln, wählen Sie Weiter und drücken die Taste OK [24].
4. Einstellmaster Anmerkung! Ist der Modus vollständige Suche gewählt worden, so wird die Funktion Eingangsdatenrate aktiviert. In diesem Punkt kann die Symbolrate gewählt werden, aufgrund deren die Schrittgröße festgelegt wird. Der Symbolratensatz kann manuell korrigiert bzw. ergänzt werden. Um eine neue Eingangsdatenrate hinzufügen, wählen Sie die Schaltfläche Neu, drücken die GELBE Taste [22] und geben den Wert ein.
4. Einstellmaster Nein - im Receiver werden von Ihnen manuell bei der Einstellung eingegebene Datum und Uhrzeit verwendet. Jahr, Monat, Tag Mithilfe von ZIFFERNTASTEN 0 ~ 9 [5] geben Sie Datum und Uhrzeit ein. Ortszeit In diesem Feld wird die aktuelle Uhrzeit entsprechend Ihren Einstellungen angezeigt. Um zum vorherigen Schritt des Einstellmasters zurückzukehren, wählen Sie Zurück und drücken die Taste OK [24].
5. Grundfunktionen 5.2 Lautstärkeregelung Zur Lautstärkeregelung dienen die Tasten VOL-/ VOL+ [18] oder / [8]. Die Tasten VOL-/VOL+ [18] sind sowohl während des Programmanschauens als auch im Menümodus funktionsfähig. Die Tasten / [8] sind im Menümodus (auch beim Aufrufen des Infofensters) außer Funktion. Um den Ton stumm zu schalten, drücken Sie die Taste MUTE [3]. Um den Ton wieder einzuschalten, drücken Sie die Taste MUTE [3] erneut oder eine der Tasten VOL+ [18], [8]. 5.
5. Grundfunktionen 5.4 Programmübersicht Eine Spalte. Zur Kursorbewegung in der Liste verwenden Sie die Tasten / [8]. Um zum mit dem Kursor markierten Programm zu wechseln, drücken Sie die Taste OK [24]. Der rechts von der Programmliste dargestellte „Schieber“ zeigt das mit dem Kursor in der Liste gewählte Programm. Drei Spalten. Zur Kursorbewegung in der Liste innerhalb der Spalten dienen die Tasten / [8]. Zum Wechsel zwischen den Spalten verwenden Sie die Tasten / [8].
5. Grundfunktionen 5.4 Programmübersicht In der Standardeinstellung wird als erste Sprache die Arbeitssprache graphischer Benutzerschnittstelle angezeigt. Einige Sender verwenden zur Programmbenennung die Buchstaben anderer Alphabete, die jedoch gleich aussehen. Deshalb ist z. B. die Suche des russischen Kanals STS-Moskau in der Liste mit englischem Buchstaben „С“ ist kein Programmfehler des Receivers. 5.
5. Grundfunktionen 5.5 Informationsfenster Wenn die ROTE Taste [11] während der Anzeige des kleinen Fensters gedrückt wird, dann wird das erweiterte Infofenster eingeblendet. Es sieht wie folgt aus: 1 2 3 13:10 Mardi 12/11/2008 4 Satellit: Eurobird 9 Provider: Platforma HD TR 11/11 11957 MHz (V) 26400K 2/3 QPSK DVB-S2 Vidéo PID: 0163� DRE Audio PID: 0163� Synchro PID: 0168 Sygnalstärke: 10 9 8 7 5 6 1. Datum 2.
5. Grundfunktionen 5.6 Teletext Im Receiver ist ein Teletextdecoder STB eingebaut, zu dessen Aktivierung drücken Sie die GELBE Taste [22], in der eingeblendeten Liste wählen Sie Teletext und betätigen die Taste [8] oder OK [24]. In der angezeigten Liste wählen Sie die Teletextssprache aus. Der Teletext wird mithilfe von Zifferntasten der Fernbedienung verwaltet. Zum Verlassen des Teletext-Modus drücken Sie die Taste EXIT [23]. Der Receiver unterstützt auch den Empfang von Teletext im VBI-Betrieb.
5. Grundfunktionen 5.8 Favoritenlisten Die Favoritenlisten können im Menü Einstellungen – gewählte Programme anordnen. Um auf den Bildschirm das Verzeichnis der Favoritenlisten aufzurufen, drücken Sie während des Programmanschauens die BLAUE Taste [21] der Fernbedienung. Mithilfe von Tasten / [8] können Sie sich in der Liste bewegen. Um die Liste zu öffnen, drücken Sie die Taste [8] oder OK [24]. Zum Anzeigen des gewählten Kanals drücken Sie die Taste OK [24].
5. Grundfunktionen 5.11 Bildschirmtastatur Die Tastatur dient zur Eingabe verschiedener Textinformationen (Sender, Favoriten, Provider etc.). Zur Eingabe von Buchstaben oder Symbolen ist der Kursor mithilfe von Tasten / / / [8] zum gewünschten Buchstaben oder Symbol zu führen und die Taste OK [24] zu drücken. Um den eingegebenen Text zu speichern, drücken Sie die GRÜNE Taste [10]. Um ein Symbol zu löschen, drücken Sie die ROTE Taste [11].
5. Grundfunktionen 5.13 Softwareaktualisierung des Receivers 5.13.1 Softwareaktualisierung über den Satellit Bei Bedarf kann vom SatTV-Benutzer die Software des Receivers mittels Satellitsignale aktualisieren. Während des Kanalumschaltens erscheint das Infofenster mit der Meldung, dass die neue Software verfügbar ist und Bestätigungsanfrage. Zur Bestätigung ist mithilfe von Tasten oder [8] JA zu wählen und die Taste OK [24] zu drücken.
5. Grundfunktionen 5.13 Softwareaktualisierung des Receivers 5.13.2 Softwareaktualisierung über den USB-Anschluss Anmerkung! Während des Softwareupgrades darf die Stromversorgung nicht unterbrochen werden! Der vorherige Vorgang mit der USB-Flash-Speicher am PC ist ordnungsgemäß zu beenden! Flash-Speicher muss der Spezifikation USB 2.0 entsprechen! Vorgangsbeschreibung der Softwareaktualisierung über USB-Anschluss: 1. Stecken Sie den USB-Flash-Speicher in den USBPort des eingeschalteten Receivers. 2.
6. Hauptmenü Menüpunkte dienen als: 1. Tasten zum Gelangen der höheren Menüebene; 2. Eingabefelder. Zur Eingabe drücken Sie ZIFFERNTASTEN 0 ~ 9 [5], zur Eingabebestätigung drücken Sie die Taste OK [24] oder eine der Tasten / / / [8] zum Abbrechen dient die Taste EXIT [23]; 3. Tasten zum Einblenden der Listen.
7. Einstellungen 7.2 Manuelle Suchlauf Während der Suche wird auf dem Bildschirm den Suchlauf und zwei Listen der gefundenen Kanäle (TV und Radio) dargestellt. Die neu gefundene Programme werden weiß und die bereits gespeicherte grau angezeigt. Ist ein gefundenes Programm in der Liste bereits vorhanden, wird es wiederholt nicht eingetragen. Wenn die Suche beendet ist, wird auf dem Bildschirm die Anfrage über die Speicherung der gefundenen Kanäle mit Angabe deren Zahl angezeigt.
7. Einstellungen 7.3 Antenneneinrichtung LNB Typ (Konverter) Wählen Sie Ihren Konvertertyp (LNB): Universal 1, Universal 2, Einzel, Doppel. Haben Sie den LNB Typ Universal 1 gewählt, dann erfolgt die Umschaltung der Lokaloszillatorfrequenzen zwischen 9750 und 10600 MHz automatisch. Die Aktivierung des Einzel 22 KHz ist nicht nötig (bleibt deaktiviert).
7. Einstellungen 7.3 Antenneneinrichtung 7.3.1 Motorisiertes System Zum Antrieb der motorisierten Antenne ist in diesem Menüpunkt deren Steuerart zu wählen. Wenn Ihr System vom Steuerprogramm DiSEqC1.3 unterstützt ist, dann geben Sie in diesem Menüpunkt USALS ein. Wenn Sie ein System mit der Antriebsteuerung des eingebauten Antennenmotors mit Protokoll DiSEqC™1.2 haben, dann ist in diesem Menüpunkt DiSEqC1.2 einzugeben. 7.3.2 Einstellung DiSEqC 1.
7. Einstellungen 7.3.3 Einstellungen der Positioniervorrichtung USALS Um die Antenne auf den Satellit zu richten: • Ist den Satellit zu wählen, wonach das motorisierte System ausgerichtet wird; • Ist den Transponder zu wählen. Die Leisten der Signalstärke und –Qualität werden in unterem Bildschirmteil eingeblendet; • Geben Sie Breiten- und Langengrad der Position des motorisierten Systems ein. Dazu: • Drücken Sie die Taste OK [24]; • Geben Sie den Wert mithilfe von ZIFFERNTASTEN 0 ~ 9 [5] in Format xxx.
7. Einstellungen 7.4 Satelliteneinstellung Orbitalposition Zur Eingabe der erforderlichen Orbitalposition drücken Sie die Taste OK [24]. Mithilfe von ZIFFERNTASTEN 0 ~ 9 [5] geben Sie die gewünschte Satellitenposition in Format xxx.x ein. Wählen Sie die nötige Richtung „W“ oder „E“. Zur Bestätigung drücken Sie die GRÜNE Taste [10]. Transponder Dieser Menüpunkt beinhaltet die Transponderliste des gewählten Satelliten.
7. Einstellungen 7.7 Einstellung SD-Video TV Output Mögliche Varianten: PAL, SECAM Fernsehaspekt – Verhaltnis Mögliche Varianten: 16х9, 4х3 Fernsehumwandlungsweise Mögliche Varianten: Pan-Scan, Letter box, Kombiniert, Wie ublich 7.8 Audioeinstellung Dieser Menüpunkt ist gleich wie Schritt 3 des Einstellmasters. 7.9 Sonstige Einstellungen Transparenz Die Einstellung des Transparenzgrades des Infofensters, der Uhrzeitanzeige etc. Der Wert ist im Bereich 0 – 70% mit dem Schritt von 10% einstellbar.
7. Einstellungen 7.
7. Einstellungen 7.10 Programmanordnung Programmsperre Wählen Sie ein Programm oder Programmgruppe aus, die Sie sperren möchten und drücken Sie dann die GELBE Taste [22]. Neben der Programmnummer das Spezialzeichen in Form eines Schlosses. Zum Anschauen der gesperrten Programme muss die PIN-Code eingegeben werden. Umbenennung Zum Umbenennen des gewählten Programms drücken Sie die BLAUE Taste [21]. Mithilfe von Bildschirmtastatur geben Sie den neuen Programmnamen ein. 7.
7. Einstellungen 7.12 Datenübertragung Diese Funktion dient zur Datenübertragung (Software und/oder Kanalparameter) vom Receiver zum Flash-Speicher über die USB-Schnittstelle. Vorgangsbeschreibung: 1. Schalten Sie den Receiver ein. 2. Stecken Sie den USB-Flash-Speicher in den USB-Port. 3. Wechseln Sie zum Menü Einstellungen -> Datenübertragung. 4. drücken Sie die BLAUE Taste [21]. Die Meldung Bitte warten erscheint und die Datenübertragung beginnt. 5.
7. Einstellungen 7.14 Werkeinstellungen In diesem Menüpunkt sind die werkseitig gespeicherten Einstellungen wiederherzustellen. Dabei gehen alle Informationen über Kanaldaten, Antennen, Favoritenlisten verloren. Um die Werkeinstellungen zu laden, drücken Sie die ROTE Taste [11] auf der Fernbedienung. Bestätigen Sie die Wahl der Werkeinstellungen durch Drücken der Schaltfläche Ja. Nach der Einstellung wechselt der Receiver zum Bereitschaftszustand (Stand By). 8.
9. Timer 9.2 Timereinstellung In diesem Menü kann der Timer für das Ein- oder Ausschalten des Receivers nach bestimmtem Zeitplan vorprogrammiert werden. Mithilfe der GELBEN Taste [22] kann der Timer für das Einoder Umschalten des bestimmten Programms eingestellt werden. Im Fenster der Timereinstellung sind folgende Optionen verfügbar: Kanalnummer, Uhrzeit des Sendebeginns/-Endes,Wiederholbarkeit (einmalig, einmal pro Tag, einmal pro Monat).
12. Fehlerbehebung Störung / Problem Mögliche Maßnahme Keine Receiverreaktion bei Betätigung der Frontseite- oder Fernbedienungstasten. Starten Sie den Receiver neu (schalten Sie die Stromversorgung aus und dann wieder ein). Stromversorgung fehlt. Vergewissern Sie sich, dass der Receiver im Bereitschaftsmodus (Stand By) ist. Prüfen Sie das Netzkabel, Vergewissern Sie sich, dass es am Versorgungsnetz angeschlossen ist. Kein Bild. Vergewissern Sie sich, dass der Receiver eingeschaltet ist (s. oben).
13. Spezifikation Anwendungstechnische Daten Max. Kanalzahl Favoritenlisten Teletext Untertitel Graphikschnittstelle Elektronischer Programmführer Unterstützung zusätzlicher Kommunikationsdienste Min. 4000 10 je max.
13. Spezifikation Videodecoder Dekodierende Videoformate MPEG-2, MP@ML und MP@HL H.264: HP@L4.1, MP@L4 Eingangsgeschwindigkeit Videoauflösung Format TV-Signal max.
13. Spezifikation Steuer-/Kontrollelemente der Frontseite und Fernbedienung Steuertasten Anzeige Display Fernbedienung Standby, TV/Radio, P+, P1 LED (2 Farben, 3 Anzeigefarben ) 7-Segment-, Viertaktdisplay, Farbe: blau Steuerung im Winkelsektor ±45°: unterbrochenes Drücken von min. 7 m; ständiges Drücken von min. 5 m Steuer-/Kontrollelemente an der Rückseite Netzschnittstelle Ethernet Stromversorgung Stromnetz Leistungsaufnahme Wechselstrom, Frequenz 50/60 Hz, Spannung 110240 V max.
14.
15. Garantieverpflichtungen SEHR GEEHRTE KÄUFERIN, SEHR GEEHRTER KÄUFER! Die Firma «General Satellite» dankt Ihnen für Ihre Wahl. Wir sind überzeugt, dass dieser Artikel allen Ihren Ansprüchen gerecht ist und dessen Qualität dem höchsten Weltniveau entspricht. Sollten Sie eventuelle Probleme mit den Geräten der Fa. «General Satellite» haben, empfählen wir Ihnen, sich nur an autorisierte Kundendienstzentren (KDZ) zu wenden, deren Adressen Sie bei uns oder unseren Vetrtragshändlern erfahren können.
15. Garantieverpflichtungen • durch Gelangen von Fremdkörpern, Stoffen, Flüssigkeiten, Insekten ins Geräteinneren bedingten Schäden; • durch das Eintreten der Umstände höher Gewalt verursachte Schäden; • durch Nichtübereinstimmung der Parameter von Stromversorgungs-, TK-, und Leitungsnetzen mit den staatlichen Normen oder durch andere Außeneinwirkungen bedingten Schäden. Die Garantie gilt nicht für Verbrauchsmaterialien.
FRA 142 ITA 186 ESP 230
Sommaire 142 1. Avant de démarrer 144 1.1 Consignes de sécurité 144 1.2 Configuration de livraison 1.3 Face avant 1.4 Face arrière 1.5 Télécommande 146 146 146 147 2. Raccordements 149 2.1 Raccordement à un téléviseur 2.1.1 Raccordement via la sortie vidéo composite (CVBS) 2.1.2 Raccordement via la sortie vidéo Composante (YPrPb) 2.1.3 Raccordement via HDMI 2.2 Raccordement du système audio 149 149 149 150 150 3.
Sommaire 7.3.3 Installation du positionneur USALS 7.4 Réglage des satellites 169 169 7.5 Sélection de la langue 7.6 Installation HD vidéo 7.7 Installation SD vidéo 7.8 Installation Audio 7.9 Autres installations 7.10 Organisation des chaînes 7.11 Ranger le sélectionné 7.12 Transfert de données 7.13 Accès conditionnel 7.13.1 Slot CI 7.13.2 Carte à puce 7.
1. Avant de démarrer 1.1 Consignes de sécurité Votre récepteur est fabriqué dans le respect des normes de sécurité internationales. Veuillez lire attentivement toutes les indications concernant les règles de sécurité. 1. ALIMENTATION ÉLECTRIQUE A partir du réseau à courant alternatif aux fréquences 50/60 Hz avec une tension 110-240 V. Reliez le récepteur uniquement à une source de courant à la tension indiquée par le marquage.
1. Avant de démarrer 1.1 Consignes de sécurité 11. REMPLACEMENT DES PIÈCES Si un remplacement des pièces est nécessaire, assurez-vous que la pièce à installer est autorisée par le producteur et a les mêmes caractéristiques que celle d’origine. Les pièces non-autorisées peuvent provoquer les dommages supplémentaires du récepteur. ATTENTION! 1. Suivez attentivement toutes les indications ci-après pour éviter un endommagement du cordon secteur et de la fiche.
1. Avant de démarrer 1.2 Configuration de livraison (1/3) 1. Récepteur 2. Télécommande 3. Piles d’alimentation ААА, 1,5 V pour la télécommande (2 pcs.) 4. Notice d’utilisation 5. Câble de branchement HDMI note! La configuration de livraison peut varier en fonction de la région. 1.3 Face avant (2/4) 1. TOUCHE STANDBY Mise en marche et arrêt du récepteur. La touche est destinée à allumer et à mettre en veille (Stand By) votre récepteur.
1. Avant de démarrer 1.4 Face arrière 4. S/PDIF Sortie audio numérique optique. 5. HDMI Sortie dédiée au raccordement de votre téléviseur de haute définition. 6. COMPONENT VIDEO Sortie vidéo à relier à la sortie vidéo composante YPrPb votre téléviseur. 7. VIDEO Sortie Vidéo composite (CVBS). Assure la transmission du signal vidéo à l’entrée vidéo de votre téléviseur. 8.
1. Avant de démarrer 1.5 Télécommande 10. Touche VERTE Permet d’accéder à la liste des pistes audio disponibles pour la chaîne visionnée. La touche a d’autres fonctions supplémentaires lorsque le menu de l’écran est affiché. 11. Touche ROUGE La pression unique sur la touche lors du visionnage d’une chaîne provoque l’affichage de la bannière d’information sommaire. La pression réitérative provoque l’affichage de la bannière d’information détaillée.
1. Avant de démarrer 1.5 Télécommande 26. Touche # Change le mode de conversion de la sortie vidéo HD. 27. TV/RADIO Assure la commutation entre réception TV et réception radio. note! Le design de la télécommande peut être changé sans préavis. 2. Raccordements 2.1 Raccordement à un téléviseur 2.1.1 Raccordement via la sortie vidéo composite (CVBS) (5/6) • Branchez 2 extrémités RCA (rouge et blanche) du câble 3RCA/3RCA respectivement sur les sorties audio du récepteur numérique.
2. Raccordements 2.1 Raccordement à un téléviseur 2.1.3 Raccordement via HDMI (7/7) • Branchez une extrémité HDMI du cable sur la sortie HDMI du récepteur, et l’autre extrémité du câble – sur la sortie HDMI de votre téléviseur. • Raccordez le câble coaxial de l’antenne à l’entrée LNB IN du récepteur. 2.2 Raccordement du système audio (8/7) Si votre système dispose d’une entrée numérique optique S/PDIF, utilisez le câble optique spécial pour raccorder le système à votre récepteur.
4. Maître d’installation Lorsque le récepteur est mis sous tension pour la première fois le Maître d’installation s’affiche. Il est organisé de façon à vous permettre d’effectuer le paramétrage et la recherche de toutes les chaînes voulues en quelques étapes seulement. note! Le Maître d’installation s’affiche aussi après la restauration des Paramètres d’usine (v. p. Paramètres d’usine) et lorsque les chaînes ne sont pas mémorisées par le récepteur.
4. Maître d’installation Etape 2 A cette étape le Maître d’installation sélectionnez les paramètres de la sortie HD vidéo. Utilisez les touches / [8] pour déplacer le curseur sur la ligne du paramètre choisi. Sélectionnez une option à l’aide des touches / [8] ou appuyez sur OK [24] pour faire la sélection parmi la liste déroulante. La sélection dans la liste déroulante est à effectuer à l’aide des touches / [8] et à confirmer par la pression sur OK [24].
4. Maître d’installation La sélection dans la liste déroulante est à effectuer à l’aide des touches / [8] et à confirmer par la pression sur OK [24]. Pour revenir à l’étape précédente du Maître d’installation sélectionnez Précédent et appuyez sur la touche OK [24]. Pour passer à l’étape suivante du Maître d’installation sélectionnez Suivant et appuyez sur la touche OK [24]. Antenne Cet item permet de sélectonner le numéro de l’antenne.
4. Maître d’installation note! Lorsque vous sélectionnez Recherche complète l’item Vitesse du flux sera activé. Cet item permet la sélection de la vitesse en fonction de laquelle sera fixé le pas de balayage de la gamme de fréquences. La gamme de vitesses peut être éditée ou complétée manuellement. Pour ajouter une nouvelle vitesse sélectionnez Nouvelle, appuyez sur la touche JAUNE [22] et entrez la valeur. Pour modifier la valeur déjà introduite entrez une nouvelle valeur remplaçant l’ancienne.
4. Maître d’installation Oui - pour le paramétrage de la date et de l’heure du système le récepteur utilisera les données incorporées dans le signal transmis par le diffuseur. Non - le récepteur utilisera la date et l’heure introduites par vous de façon manuelle à cette étape d’installation. Année, Mois, Jour Saisissez l’heure et la date à l’aide des touches NUMERIQUES 0 ~ 9 [5]. Heure locale Affichage de l’heure du système courante en fonctions des paramètres que vous avez sélectionnés.
5. Opérations principales 5.2 Réglage du volume du son Pour régler le volume du son utilisez les touches VOL-/ VOL+ [18] ou / [8]. Les touches VOL-/VOL+ [18] sont opérationnelles aussi bien durant le visionnage qu’en mode de menus de paramétrage. Les touches / [8] ne fonctionnent pas en mode de menus de paramétrage (y compris lors de la visualisation de la Bannière d’information sommaire). Pour supprimer temporairement le son appuyez sur la touche MUTE [3].
5. Opérations principales 5.4 Liste des chaînes Une colonne. Pour naviguer dans la liste utilisez les touches / [8]. Pour zapper sur la chaîne marquée par le curseur appuyez sur la touche OK [24]. «L’indicateur» situé au sein de la bande dans la partie droite de la liste montre la place de la chaîne sélectionnée dans la liste générale. Trois colonnes. Pour déplacer le curseur dans une colonne de la liste utilisez les touches / [8]. Pour passer d’une colonne à l’autre utilisez les touches / [8].
5. Opérations principales 5.4 Liste des chaînes La première langue affichée est la langue actuelle de l’interface graphique de l’utilisateur, par défaut. Certains diffuseurs utilisent pour les noms des chaînes les caractères existant dans de différentes langues. De ce fait, la présence, par exemple, de la chaîne SТS-MOSCOU (CTC-Moscou) dans la liste des chaînes commençant par la lettre de l’alphabet anglais « C » n’est pas une erreur du programme du récepteur. 5.
5. Opérations principales 5.5 Bannières d’information La pression sur la touche ROUGE [11] lors de l’affichage de la bannière d’information sommaire provoque l’affichage de la bannière d’information détaillée. Voir la photo : 1 2 3 13:10 Mardi 12/11/2008 4 Satellite: Eurobird 9 Provider: Platforma HD TR 11/11 11957 MHz (V) 26400K 2/3 QPSK DVB-S2 Vidéo PID: 0163� DRE Audio PID: 0163� Synchro PID: 0168 Force du signal: 10 9 8 7 5 6 1. Date 2.
5. Opérations principales 5.6 Télétexte Le récepteur est équipé d’un décodeur du télétexte intégré STB. Pour son activation appuyez sur la touche JAUNE [22], sélectionnez Télétexte dans la liste apparue et appuyez sur [8] ou OK [24]. Dans la liste affichée choisissez la langue du télétexte. Le pilotage du télétexte est assuré par les touches numériques de la Télécommande. Pour quitter le mode télétexte appuyez sur la touche EXIT [23]. Le récepteur supporte aussi la réception du télétexte en mode VBI.
5. Opérations principales 5.8 Listes favorites Pour créer les listes accédez au menu: Installation – Ranger le sélectionné. Pour visualiser le répertoire des listes Favorites appuyez sur la touche BLEUE [21] de la Télécommande en mode de visionnage des chaînes. Déplacez-vous dans la liste en appuyant sur les touches / [8]. Pour ouvrir une liste appuyez sur [8] ou sur OK [24]. Appuyez sur la touche OK [24] pour le visionnage de la chaîne sélectionnée.
5. Opérations principales 5.11 Clavier sur écran Pour saisir les données format texte (noms de chaînes, des listes favorites, des providers) utilisez le clavier. Pour entrer une lettre ou un symbole déplacez le curseur à l’aide des touches / / / [8] sur la lettre voulue ou sur le symbole et appuyez sur la touche OK [24]. Pour sauvegarder le nom introduit appuyez sur la touche VERTE [10]. Pour effacer un symbole appuyez sur la touche ROUGE [11].
5. Opérations principales 5.13 Mise à jours des logiciels (SW) du récepteur 5.13.1 Mise à jour du logiciel (SW) depuis le satellite Si nécessaire l’opérateur de la télévision par satellite peut lancer son service de mise à jour du logiciel depuis le satellte. Lors du changement de chaîne de l’oprérateur une bannière d’information s’affichera.
5. Opérations principales 5.13 Mise à jours des logiciels (SW) du récepteur 5.13.2 Mise à jour du logiciel (SW) via USB note! Veillez à ne pas débrancher votre récepteur durant la mise à jour du logiciel (SW)! La séance précédente du travail avec la carte de stockage Flash USB dans l’ordinateur personnel doit être correctement terminé! La carte de stockage Flash doit complétement correspondre à la spécification du USB 2.0! Procédure de mise à jour du logiciel (SW) via USB : 1.
6. Menu principal • Items du menu – pour sélectionner un item du menu utilisez les touches / choix – OK [24], pour l’annulation ou le passage au niveau supérieur EXIT [23]. [8], pour valider le Le menu peut avoir des items suivants : 1. Les touches de passage d’un niveau du menu à un niveau supérieur ; 2. Les Champs de saisie. Pour l’entrée utilisez les touches NUMÉRIQUES 0 ~ 9 [5], pour la validation de l’entrée appuyez sur la touche OK [24] ou l’une des touches , [8] pour l’annulation – EXIT [23]; 3.
7. Installation 7.2 Recherche des chaînes manuelle De nouvelles chaînes s’affichent en couleur blanche, les chaînes déjà existant dans la liste de base – en couleur grise. Si la chaîne trouvée est déjà inscrite sur la liste générale elle ne sera pas y ajoutée. Une fois la recherche terminée un message avec la demande de confirmer la sauvegarde des chaînes détectées et avec indication du nombre de nouvelles chaînes s’affichera.
7. Installation 7.3 Ajustage de l’antenne Sélectionnez le type du convertisseur (LNB): universel 1, universel 2, simple, double. Si vous avez sélectionné le type universel 1 du LNB, la commutation entre les fréquences 9750 et 10600 MHz d’hétérodyne s’effectuera automatiquement au moment de l’introduction de la valeur de fréquence du transpondeur dans le menu de recherche des chaînes. L’installation du signal tonal de 22 KHz est facultative (désactivée).
7. Installation 7.3 Ajustage de l’antenne 7.3.1 Système motorisé Pour travailler avec un système d’antenne motorisé sélectionnez dans cet item le type de son pilotage. Si vous utilisez le système motorisé avec le support du programme de commande DiSEqC1.3, sélectionnez dans cet item du menu l’option USALS. Si vous utilisez un système motorisé pour le pilotage du moteur de l’antenne avec le protocole DiSEqC™1.2, sélectionnez dans cet item l’option DiSEqC 1.2. 7.3.2 Installation du DiSEqC 1.
7. Installation 7.3 Ajustage de l’antenne 7.3.3 Installation du positionneur USALS Pour orienter l’antenne vers le satellite : • Sélectionnez le satellite vers leuqel vous souhaitez orienter le système motorisé ; • Sélectionnez le transpondeur.
7. Installation 7.4 Réglage des satellites Si le satellite nécessaire n’est pas présent dans la liste, choisissez l’item Nouveau (la dernière ligne dans la liste des satellites) et appuyez sur la touche JAUNE [22]. Un Nouveau Satellite sera ajouté à la liste. Pour modifier son nom appuyez sur la touche BLEUE [21]. A l’aide du clavier saisissez le nom voulu. De cette façon vous pouvez modifier le nom de chaque satellite.
7. Installation 7.7 Installation SD vidéo Sortie vidéo TV Options : PAL, SECAM. Proportion d’aspect TV Options : 16х9, 4х3. Mode de conversion TV Options: Pan-Scan, Letterbox, Combiné, Ignore. 7.8 Installation Audio Cet item correspond totalement à l’Etape 3 du Maître d’installation. 7.9 Autres installations Transparence Sélection du degré de transparence de la bannière d’information, de la fenêtre Liste de chaînes, de l’afficheur de l’heure, etc.
7. Installation 7.
7. Installation 7.10 Organisation des chaînes Sélectionnez une nouvelle position de la chaîne à l’aide des touches / [8]. Appuyez de nouveau sur la touche VERTE [10]. Pour remettre la chaîne en état initial appuyez sur la touche EXIT [23]. Verrouillage Sélectionnez la chaîne ou le groupe de chaînes que vous souhaitez verrouiller et appuyez sur la touche JAUNE [22]. A côté du numéro de la chaîne le symbol spécial de verrouillage en chateau stylisé s’affichera.
7. Installation 7.12 Transfert de données Vous pouvez transférer les données (Logiciel SW et/ou la base des chaînes) depuis le récepteur vers la carte de stockage Flash via interface USB. Séquence des opérations : 1. Mettez en marche votre récepteur. 2. Insérez la carte de stockage FLASH dans le port USB. 3. Entrez dans le menu Installation -> Transfert de données. 4. Appuyez sur la touche BLEUE [21]. Le message Attendez s.v.p. s’affichera et le transfert de données sera lancé. 5.
7. Installation 7.14 Paramètres d’usine Cet item de menu permet de restaurer toutes les valeurs de configuration par défaut. La remise à zéro pour le retour aux paramètres d’usine supprimera votre programmation : les chaînes existantes, la configuration des antennes et les listes Favorites. Pour charger les paramètres d’usine appuyez sur la touche ROUGE [11] de la Télécommande. Confirmez la remise à zéro pour le retour aux paramètres d’usine en appuyant sur Oui dans la fenêtre avec la demande.
9.Minuterie 9.2 Programmation de la minuterie Dans ce menu vous pouvez programmer la mise en marche ou l’arrêt du récepteur à l’heure désirée. Utilisez la touche JAUNE [22] pour programmer la mise en marche du récepteur ou la commutation automatique sur la chaîne désirée. Dans la fenêtre de la programmation de la minuterie les options suivantes sont disponibles : le numéro de la chaîne, heure du début/de fin de l’émission, la répétition (une fois, une fois par semaine, une fois par semaine).
12. Elimination des défauts Défuat / difficulté Solution possible Le récepteur ne réagit pas de la façon persistante à la pression sur les touches de la face avant ou de la Télécommande. Redémarrez votre récepteur (débranchez l’appareil du secteur et rebranchez – le). L’alimentation du récepteur est absente. Pas d’image. Assurez –vous que le récepteur est en mode veille (Stand By). Contrôlez votre cordon d’alimentation, assurez-vous qu’il est correctement branché sur la prise secteur convenable.
13. Caractéristiques techniques Qualités d’utilisation principales Nombre de chaînes maximum Groupes favoris Télétexte Sous-titrage Interface graphique Guide électronique Support de services supplémentaires 4000, au minimum 10 groupes de 100 chaînes max.
13. Caractéristiques techniques Décodeur Vidéo Niveau de décodage MPEG-2, MP@ML et MP@HL H.264 : HP@L4.
13.
14.
15. Garantie CHER CLIENT! La Corporation «General Satellite» vous est très reconnaissante de votre choix. Nous sommes persuadés que notre article correspondant aux plus hauts standards de qualité dans le monde répondra à tous vos besoins. Si vous deviez rencontrer les problèmes en utilisant les appareils achetés chez la corporation «General Satellite» nous vous conseillons de faire appel uniquement aux services après vente agréés (SAV).
15. Garantie • Les détériorations provoquées par l’introduction dans le produits des objets étrangers, matières, fluides ou insectes ; • Les détériorations dues à la force majeure ; • Les déteriorations dues à la non-conformité des paramètres, des réseux de télécommunication, des réseaux câblés et d’autres éléments externes aux Standard d’Etat . La garantie ne couvre pas les consommables.
ITA 186 ESP 230
Indice 186 1. Prima dell'uso 188 1.1 Norme di sicurezza 188 1.2 Kit di fornitura 1.3 Pannello anteriore 1.4 Pannello posteriore 1.5 Telecomando 190 190 190 191 2. Collegamenti 193 2.1 Collegamento al televisore 2.1.1 Collegamento tramite l'uscita video composita (CVBS) 2.1.2 Collegamento tramite l'uscita video componente (YPrPb) 2.1.3 Collegamento tramite HDMI 2.2 Collegamento del sistema audio 193 193 193 194 194 3.
Indice 7.3.3 Regolazione del posizionatore USALS 7.4 Regolazione dei satelliti 213 213 7.5 Impostazione della lingua 7.6 Regolazione del HD video 7.7 Regolazione del SD video 7.8 Regolazione Аudio 7.9 Altre regolazioni 7.10 Organizzazione dei canali 7.11 Organizzare i canali preferiti 7.12 Trasmissione dati 7.13 Accesso condizionato 7.13.1 Slot CI 7.13.2 Smart card 7.
1. Prima dell'uso 1.1 Norme di sicurezza Il presente ricevitore e’ fabbricato secondo gli Standard Internazionali di sicurezza. Si prega di leggere con attenzione le norme di sicurezza prima dell’uso. 1. ALIMENTAZIONE ELETTRICA Dalla rete di corrente alternata di frequenza 50/60 Hz, tensione di 110-240 V. Collegare il ricevitore solo alla rete di alimentazione elettrica di tensione indicata sulla targhetta.
1. Prima dell'uso 1.1 Norme di sicurezza 11. SOSTITUZIONE Di COMPONENTI Quando occorre la sostituzione di componenti, assicuratevi che il componente da installare sia stato omologato dal produttore e possiede le stesse caratteristiche tecniche del componente originale. I componenti non omologati possono causare un ulteriore danneggiamento del ricevitore. ATTENZIONE! 1. Seguire le istruzioni citate sotto per evitare il danneggiamento del cavo di alimentazione e della spina.
1. Prima dell'uso 1.2 Kit di fornitura (1/3) 1. Ricevitore 2. Telecomando 3. Batterie a secco ААА, 1,5 V per il telecomando (2 unita'.) 4. Manuale d'istruzioni 5. Cavo di collegamento HDMI Nota! Il kit di fornitura puo' variare a seconda della zona. 1.3 Pannello anteriore (2/4) 1. TASTO STANDBY Accensione e spegnimento del ricevitore. Il tasto e' destinato a passare il ricevitore dalla modalita' di attesa (Stand By) nella modalita' operativa e indietro.
1. Prima dell'uso 1.3 Pannello anteriore 5. HDMI Connettore per il collegamento del ricevitore al Vostro televisore ad alta definizione. 6. COMPONENT VIDEO Uscita video per il collegamento all’uscita video componente YPrPb del Vostro televisore. 7. VIDEO Uscita video composita (CVBS). Serve per la trasmissione del segnale video all’ingresso video del Vostro televisore. 8.
1. Prima dell'uso 11. Tasto ROSSO Pressione singola alla visione del canale visualizza un breve banner informativo. La seconda pressione visualizza il banner informativo esteso. Ha delle funzioni supplementari al funzionamento del menu di schermo. 12. Tasto Cambia la risoluzione HD dell'uscita video. (è simile a fare Tasto*). 13. GUIDE Visualizza il teleguida. 14. CH +/CH Si usano per passare al canale successivo (CH+) o al canale precedente (CH-).
1. Prima dell'uso 26. Tasto # Cambia la modalita' di trasformazione dell'uscita video HD. 27. TV/RADIO Si usa per la commutazione tra i regimi di ricezione del segnale televisivo ed i canali radio. Nota! Il disegno del telecomando puo' essere modificato senza un preavviso. 2. Collegamenti 2.1 Collegamento al televisore 2.1.
2. Collegamenti 2.1 Collegamento al televisore 2.1.3 Collegamento tramite HDMI (7/7) • Collegate il connettore HDMI del cavo HDMI all’uscita del ricevitore, e il connettore dall’altra parte del cavo – all’ingresso HDMI del Vostro televisore. • Collegate l’antenna alla presa del ricevitore LNB IN tramite il cavo coassiale. 2.2 Collegamento del sistema audio (8/7) Qualora il Vostro sistema audio abbia l'ingresso ottico digitale S/PDIF, usate il cavo ottico speciale per il collegamento di esso al ricevitore.
4. Wizard d'installazione Quando il ricevitore si accende per la prima volta, bisogna avviare il wizard (la procedura guidata) d'installazione. Esso e' organizzato in modo tale da poter avviare le modalita' necessarie avendo fatto solo alcuni passi e poter trovare facilmente tutti i canali che Vi interessano. Nota! Il Wizard d'installazione si avvia anche dopo il ripristino del ricevitore alle impostazioni di fabbrica (vedi p.
4. Wizard d'installazione Passo 2 In questo passo del Wizard d’installazione bisogna indicare le modalita’ HD dell’uscita video. Spostate il cursore premendo i tasti / [8] sulla riga della modalita’ richiesta. Effettuare la selezione della modalita’ richiesta con i tasti / [8] oppure premere OK [24] per selezionarla dal menu a discesa. La selezione nel menu a discesa va effettuata con i tasti / [8] e confermata premendo il tasto OK [24].
4. Wizard d'installazione Spostate il cursore con i tasti d'impostazione richiesta. / [8] sulla riga La selezione dell'impostazione richiesta: effettuarla con i tasti / [8] oppure premere OK [24] per selezionarla dal menu a discesa. La selezione dal menu a discesa: effettuarla con i tasti / [8] e confermare premendo il tasto OK [24] . Per tornare al passo presedente del Wizard d'installazione selezionare Indietro e premere il tasto OK [24].
4. Wizard d'installazione Nota! Qualora sia stata selezionata la ricerca completa, si attiva il punto di Velocita' del flusso. In questo punto si puo' scegliere la velocita' in funzione alla quale sara' stabilito il passo di scansione della banda di frequenze. L'elenco delle velocita' puo' essere modificato o completato a mano. Per aggiungere una nuova velocita' bisogna scegliere Nuova, premere il tasto GIALLO [22] e inserire un valore.
4. Wizard d'installazione Si - per l’impostazione dell’ora del sistema e della data, il ricevitore utilizzera’ i dati trasmessi dall’emittente nel segnale. No - Il ricevitore utilizzera’ la data e l’ora, selezionati a mano in questa fase d’installazione. Anno, mese, giorno Con i tasti NUMERICI 0 ~ 9 [5] eseguite le impostazioni della data e dell’ora. Ora locale Qui viene visualizzata l’ora di sistema in conformita’ alle Vostre impostazioni.
5. Funzioni principali 5.3 Colonna sonora Se avete bisogno di modificare la lingua di accompagnamento audio del canale corrente, premete il tasto . Nella parte sinistra superiore dello schermo viene visualizzato il menu. La scelta della colonna sonora si effettua con i tasti / [8]. Si puo' modificare il tipo di output audio premendo i tasti / [8]. Per uscire dal menu, premere la seconda volta il tasto VERDE [10] oppure EXIT [23].
5. Funzioni principali 5.4 Elenco dei canali graficamente la posizione del canale selezionato dal cursore nell'elenco generale. Scelta veloce dell'elenco canali Nel corso di visione dell'elenco dei canali (in una colonna o in tre colonne) c'e' la possibilita' di visualizzazione dei canali nell'elenco a seconda delle lettere iniziali dei loro nomi. Per far cio', bisogna visualizzare l'elenco dei canali sullo schermo e premere il tasto VERDE [10].
5. Funzioni principali 5.5 Banner informativi Le caratteristiche del canale e del programma vengono visualizzate automaticamente nel breve banner informativo nella parte inferiore dell'immagine televisiva dopo aver premuto il tasto ROSSO [11] oppure al passaggio da un canale all'altro. 1 2 3 4 5 6 7 8 9 10 11 Tutta TV 25 _______ Qualita’ segnale: 12:00 15 14:00 14 13 12 Nel breve banner informativo vengono visualizzati: 1. Il numero del canale nell’elenco 2.
5. Funzioni principali 5.5 Banner informativi Premendo il tasto ROSSO [11] alla visualizzazione del banner informativo breve, viene visualizzato il banner ampliato. Esso viene visualizzato in modo seguente: 1 2 3 13:10 Lunedi 12/11/2008 4 Satélite: Eurobird 9 Provider: Platforma HD TR 11/11 11957 MHz (V) 26400K 2/3 QPSK DVB-S2 Video PID: 0163� Audio PID: 0163� DRE PCR PID: 0168 Forza del segnale: 10 9 8 7 5 6 1. Data 2.
5. Funzioni principali 5.6 Teletesto Nel ricevitore c'e' un decoder incorporato del teletesto STB; per attivarlo, premete: tasto GIALLO [22], nell'elenco visualizzato scegliete Teletesto e premete [8] oppure OK [24]. Nell'elenco visualizzato scegliete la lingua del teletesto. Gestione del teletesto si effettua con i tasti numerici del telecomando. Per uscire dalla modalita' di teletesto premete il tasto EXIT [23]. Il ricevitore puo' anche ricevere il teletesto nella modalita' VBI.
5. Funzioni principali 5.8 Elenchi dei canali preferiti Questi elenchi possono essere creati nel menu: Regolazione – Sistemare i canali preferiti. Per far visualizzare sullo schermo l'elenco dei canali preferiti, premete il tasto BLU [21] del telecomando nel regime di visione dei programmi. Fare i spostamenti nell'elenco con i tasti / [8]. Per aprire l'elenco premete il tasto [8] oppure OK [24]. Premete il tasto OK [24] per visione del canale scelto.
5. Funzioni principali 5.11 Tastiera dello schermo Per immissione di informazione testo di diversi tipi (nome canali, elenchi canali preferiti, providers) si usa la tastiera. Per impostare le lettere oppure i simboli, spostare il cursore con i tasti / / / [8] sulla lettera o sul simbolo occorrente e premere il tasto OK [24]. Per memorizzare il nome impostato, premere il tasto VERDE [10]. Per eliminare un simbolo, premere il tasto ROSSO [11].
5. Funzioni principali 5.13 Aggiornamento del Software del ricevitore 5.13.1 Aggiornamento del Software tramite il satellite Qualora necessita, l’operatore della televisione satellitare puo’ avviare il servizio di aggiornamento software del ricevitore secondo il segnale ricevuto dal satellite. Nel corso di commutazione dei canali dell’operatore viene visualizzato il banner informativo con la comunicazione sulla disponibilita’ del nuovo Software e con la richiesta di confermare l’aggiornamento.
5. Funzioni principali 5.13 Aggiornamento del Software del ricevitore 5.13.2 Aggiornamento del Software tramite USB Nota! Non disattivare l'alimentazione del ricevitore durante l'aggiornamento del Software! La sessione precedente con USB Memoria Flash nel PC deve essere terminata correttamente! La Memoria∙Flash deve essere pienamente conforme alle specifiche USB 2.0! Ordine delle azioni all'aggiornamento del Software tramite USB: 1.
6. Menu principale • Voci del menu: per selezionare una voce del menu, usate i tasti / [8], per confermare la selezione premete OK [24], per annullare o passare al livello piu’ alto, premete EXIT [23]. Le voci del menu possono essere: 1.Tasti di passaggio al seguente livello del menu; 2. Campi di inserimento. Per l’inserimento usate i tasti NUMERICI 0 ~ 9 [5], per confermare l’immissione – usate il tasto OK [24] oppure uno dei tasti / / / [8] per annullare – EXIT [23]; 3. Elenchi a discesa.
7. Regolazione 7.2 Ricerca manuale dei canali Durante la ricerca sullo schermo vengono visualizzati: scala progressiva e due elenchi dei canali trovati (TV e Radio). I nuovi canali vengono visualizzati in colore bianco e quelli che c'erano gia' nella base – in color griggio. Se il canale trovato e' gia' presente nell'elenco generale, non viene aggiunto all'elenco per la seconda volta.
7. Regolazione 7.3 Regolazione dell'antenna Selezionate un tipo del convertitore (LNB): universale 1, universale 2, singolo, doppio. Se avete scelto il tipo di LNB universale 1, la commutazione tra le frequenze eterodina 9750 e 10600 MHz si effettua automaticamente all'inserimento del valore della frequenza del transponder nel menu di ricerca dei canali. Impostazione del segnale di toni 22 kHz non e' obbligatoria (disattivata).
7. Regolazione 7.3 Regolazione dell'antenna 7.3.1 Sistema motorizzato Per lavorare con il sistema di antenna motorizzato, in questa voce bisogna scegliere il tipo di sua gestione. Se usate il sistema motorizzato con il supporto del programma di gestione DiSEqC1.3, allora in questa voce di menu bisogna impostare il modo USALS. Se usate, invece, il sistema motorizzato per gestire l’attenuatore dell’antenna con il protocollo DiSEqC™1.2, in questa voce di menu bisogna impostare il modo DiSEqC1.2. 7.3.
7. Regolazione 7.3 Regolazione dell'antenna 7.3.3 Regolazione del posizionatore USALS Per girare l'antenna verso il satellite: • Scegliete il satellite al quale e' necessario indirizzare il sistema motorizzato; • Scegliete un transponder.
7. Regolazione 7.4 Regolazione dei satelliti Per modificare il suo nome premete il tasto BLU [21]. Con la tastiera inserite il nome occorrente. Nello stesso modo si puo’ modificare il nome di qualsiasi satellite. Posizione orbitale Per l‘immissione della posizione orbitale e’ necessario premere il tasto OK [24]. Selezionare con i tasti NUMERICI 0 ~ 9 [5] la posizione richiesta del satellite nel formato xxx.x. Scegliere le direzioni:”W” o “E”. Premere il tasto VERDE [10].
7. Regolazione 7.7 Regolazione del SD video TV uscita video Opzioni possibili: PAL, SECAM. Rapporto fra i lati TV Opzioni possibili: 16х9, 4х3. Regime di trasformazione TV Opzioni possibili: Pan-Scan, Pacchetto, Combinato, Com'e'. 7.8 Regolazione Аudio Questa voce e' assolutamente identica al Passo 3 del Wizard d'installazione. 7.9 Altre regolazioni Trasparenza Impostazione del grado di trasparenza dell'immagine del banner informativo, delle finestre dell'elenco di canali, dell'indicatore dell'ora, ecc.
7. Regolazione 7.
7. Regolazione 7.10 Organizzazione dei canali Blocco Scegliere un canale o un gruppo dei canali che si vuole bloccare e premere il tasto GIALLO [22]. Davanti al numero del canale viene visualizzato un simbolo speciale in forma del lucchetto stilizzato. Per visione dei canali bloccati e' necessario immettere il codice PIN. Cambiamento nome Per cambiare nome del canale scelto premere il tasto BLU [21]. Con la tastiera dello schermo immettere un nome nuovo del canale. 7.
7. Regolazione 7.12 Trasmissione dati E' stata realizzata la possibilita' di trasmissione dati (Software e/o base canali) dal ricevitore sulla Memoria Flash tramite l'interfaccia USB. Sequenza delle azioni: 1. Accendere il ricevitore. 2. Inserire la memoria FLASH nella porta USB. 3. Entrare nel menu Regolazione -> Trasmissione dati. 4. Premere il tasto BLU [21]. Viene visualizzata il messaggio Si prega di attendere, inizia la trasmissione dati. 5.
7. Regolazione 7.14 Impostazioni di fabbrica In questo punto del menu si puo’ ripristinare tutti i valori delle impostazioni default. Al rientro alle impostazioni di fabbrica, l’informazione sui canali trovati, sulle antenne, sugli elenchi dei canali preferiti verra’ persa. Per caricare le impostazioni di fabbrica premere il tasto ROSSO [11] del telecomando. Confermare il rientro alle impostazioni di fabbrica premendo Si nella finestra di richiesta.
9.Timer 9.2 Impostazione del timer In questo sottomenu potete impostare il timer per l’accensione/spegnimento del ricevitore secondo un orario. Сon il tasto GIALLO [22] si puo’ impostare il timer per l’accensione o sintonizzazione del ricevitore per un programma prestabilito. Nella finestra di impostazione del timer sono disponibili le seguenti opzioni: numero del canale, ora di inizio/fine della trasmissione, ripetizione (una volta, una volta al giorno, una volta alla settimana).
12. Eliminazione dei guasti Guasto / problema Eventuale soluzione Mancanza di lunga durata della reazione del ricevitore alla pressione dei tasti della parte anteriore o del telecomando. Riaccendere il ricevitore (spegnere l'apparecchio e poi collegarlo di nuovo alla rete di alimentazione). Assenza di alimentazione del ricevitore. Nessuna immagine. Qualita' scarsa dell'immagine. Audio assente. Accertarsi che il ricevitore non sia in modalita' di attesa (Stand By).
13. Specificazione Caratteristiche di utilizzo principali Numero massimo di canali Gruppi preferiti Teletesto Sottotitoli Interfaccia grafica Guida elettronica Supporto dei servizi supplementari Non meno di 4000 10 da n.
13. Specificazione Videodecoder Formati video decodificabili Velocita' del flusso video elementare di ingresso Risoluzione del flusso video decodificabile Formato del segnale dell'immagine TV MPEG-2, MP@ML e MP@HL H.264: HP@L4.
13. Specificazione Organi di comando/controllo del pannello anteriore/telecomando Tasti di comando Indicazione Display Gestione dal telecomando Standby, TV/Radio, P+, P1 LED (2 colori, 3 colori di indicazione) A 7 segmenti, a quattro linee, colore – blu.
14.
15. Garanzia GENTILE CLIENTE! La corporazione «General Satellite» esprime un grande apprezzamento per la vostra scelta. Siamo convinti che questo prodotto e’ in grado di soddisfare tutte le vostre esigenze e la qualita’ corrispondera’ ai migliori campioni internazionali. Se Vi sorgono dei problemi con i prodotti acquistati dalla «General Satelite», vi invitiamo a rivolgervi solo nei centri di assistenza tecnica autorizzati, di cui gli indirizzi Voi potete apprendere da noi o dai nostri dealer.
15. Garanzia • Danni causati dall’uso delle carte d’accesso non originali; • Danni causati dalla penetrazione all’interno del prodotto degli oggetti estranei, sostanze, liquidi, insetti; • Danni causati dalle circostanze di forza maggiore; • Danni causati dalla non conformita’ agli standard statali dei parametri delle reti di telecomunicazione, reti via cavo o altri fattori esterni simili. La garanzia non si estende sui materiali di consumo.
ESP 230
Contenido 230 1. Antes de poner en operación 232 1.1 Reglamento de seguridad 232 1.2 Accesorios 1.3 Panel delantero 1.4 Panel trasero 1.5 Pupitre de telemando 234 234 234 235 2. Conexiones 237 2.1 Conexión al TV 2.1.1 Conexión por medio de la salida de video composite (CVBS) 2.1.2 Conexión a través de la salida de video por componentes (YPrPb) 2.1.3 Conexión a través de HDMI 2.
Contenido 7.3.3 Ajuste del posicionador USALS 7.4 Ajuste de los satélites 257 257 7.5 Selección del idioma 7.6 Ajuste del video HD 7.7 Ajuste del video SD 7.8 Ajuste del Audio 7.9 Otros ajustes 7.10 Organización de los canales 7.11 Ordenar 7.12 Transferencia de los datos 7.13 Acceso condicional 7.13.1 Slot CI 7.13.2 Tarjeta inteligente 7.
1. Antes de poner en operación 1.1 Reglamento de seguridad Este receptor está fabricado con arreglo a los estandares internacionales de seguridad. Antes de usar este producto léase cuidadosamente instrucciones de seguridad. 1. ALIMENTACIÓN ELECTRICA El receptor se alimenta del sistema de corriente alterna, con la frecuencia de 50/60 Hz y el voltaje de 110-240 V. El receptor debe snchufarse solamente a la red de alimentación electrica que tiene el voltaje indicado en su marcado.
1. Antes de poner en operación 1.1 Reglamento de seguridad 11. CAMBIO DE PIEZAS Cambiando piezas, asegúrese de que la pieza que se monta está certificada por el fabricante y tiene las características iguales que las de la pieza original. Las piezas no certificadas pueden causar un deterioro adicional del receptor. ATENCIÓN! 1. Para evitar el deterioro del cable de alimentación y el enchufe, siga las instrucciones presentadas más adelante.
1. Antes de poner en operación 1.2 Accesorios (1/3) 1. Receptor 2. Pupitre de telemando 3. Pilos tipo AAA 1,5 V para el pupitre de telemando (2 unidades) 4. Manual del usuario 5. Cable de conexión HDMI Nota! Accesorios pueden variarse según la región. 1.3 Panel delantero (2/4) 1. EL BOTON STANDBY El encender y apagar del receptor. El boton está designado para poner el receptor del modo de espera (Stand By) al modo de funcionamiento, y por la inversa.
1. Antes de poner en operación 1.3 Panel delantero 5. HDMI Es un conector para conectar el receptor a su televisor de alta definición. 6. COMPONENT VIDEO Es la salida video para conectar a la entrada de video componente (YPrPb) de su televisor. 7. VIDEO La salida de video compuesto (CVBS). Sirve para enviar la señal video a la entrada video de su televisor. 8. ANALOG AUDIO Dos conectores RCA para conectar aparatos de audio externos complementarios o la entrada de audio del televisor.
1. Antes de poner en operación 1.5 Pupitre de telemando 11. Botón ROJO Al presionarlo una vez mientras se visiona algún canal, aparece un banner informativo breve. Al presionarlo una vez más aparecerá un banner informativo ampliado. El botón tiene funciones adicionales mientras el menú en pantalla está activo. 12. El boton Cambia el poder resolvente de la salida de video HD (es similar a hacer clic en El boton*). 13. GUIDE Sirve para activar la teleguía. 14.
1. Antes de poner en operación 1.5 Pupitre de telemando 26. El boton # Cambia el modo de transformación de la salida de video HD. 27. TV/RADIO El boton se utiliza para cambiar los modos de la recepción de canales de radio y televisión. Nota! El diseño del pupitre de telemando puede ser cambiado sin avisar previamente. 2. Conexiones 2.1 Conexión al TV 2.1.
2. Conexiones 2.1 Conexión al TV 2.1.3 Conexión a través de HDMI (7/7) • Conecte el conector HDMI del cable a la salida HDMI del receptor, y el conector en el otro lado del cable a la entrada HDMI de su televisor. • Conecte el cable coaxil de la antena a la entrada LNB IN en el receptor. 2.2 Conexión del audiosistema (8/7) Si su audiosistema tiene la entrada digital S/PDIF óptica, para conectarlo al receptor utilice un cable óptico especial.
4. Asistente de instalación Encendiendo el receptor por primera vez, el Asistente de Instalacion se inicia automaticamente. El Asistente de Instalacion está organizado de tal manera que solamente en unos pasos sea posible introducir todos los ajustes necesarios y encontrar con facilidad todos los canales que le interesen a Ud. Nota! El Asistente de Instalacion se inicia tambien después de la vuelta del receptor a los valores de Ajustes de fábrica (véase p.
4. Asistente de instalación Paso 2 En este paso del Asistente de Instalacion es necesario indicar los ajustes de la salida de video HD. Con los botones / [8] acerque el cursor a la línea del ajuste necesario. Seleccione el ajuste necesario con los botones / [8], o presione el botón OK [24] para seleccionarlo de la lista desplegable. Haga la elección en la lista desplegable usando los botones / [8], y confírmela presionando el botón OK [24].
4. Asistente de instalación Usando los botones / [8] acerque el cursor a la línea del ajuste necesario. Seleccione el ajuste necesario usando los botones / [8], o presione el botón OK [24] para seleccionar el ajuste de la lista desplegable. En la lista desplegable, haga la selección usando los botones / [8], y confírmela presionando el botón OK [24]. Para volver al paso previo del Asistente de Instalación seleccione la opción Atrás y presione el botón OK [24].
4. Asistente de instalación Nota! Seleccionando La búsqueda completa, se hace activada la opción Las velocidades del flujo. Usando esta opcíon puede seleccionar la velocidad según la cual se determinará el paso del escáneo del diapasón de frecuencia. El surtido de velocidades puede ser modificado o aumentado a mano. Para añadir una velocidad nueva, escoja la opción Nueva, presione el botón AMARILLO [22] y entra el valor. Para corregir el valor ya entrado, entra un valor nuevo por un viejo.
4. Asistente de instalación No - el receptor utilizará la hora y fecha entradas a mano en esta etapa del ajuste. Año, Mes, Día Usando los botones NUMÉRICOS 0 ~ 9 [5], introduzca los ajustes de la hora y fecha. Hora local Aquí se muestra la hora actual del sistema según sus ajustes. Para volver al paso previo del Asistente de Instalación seleccione la opción Atrás y presione el botón OK [24].
5. Funciones principales 5.3 Pista de sonido Si necesita Ud. cambiar el idioma del acompañamiento acústico en el canal corriente, presione el botón VERDE [10]. En la parte superior izquierda de la pantalla aparecerá le menú. Elija una audiopista utilizando los botones / [8]. Ud. puede cambiar el tipo de la salida de audio presionando los botones / [8]. Para salir de este menú presione una vez más el botón VERDE [10], o EXIT [23].
5. Funciones principales 5.4 Lista de canales Clasificación rápida la lista de canales Repasando la lista de canales (en una columna o en tres columnas), se tiene la posibilidad de mostrar los canales en la lista según las letras iniciales de sus nombres. Para hacerlo, despliegue la lista de canales en la pantalla y presione el botón VERDE [10]. En la parte izquierda del tablero con la lista de canales en la pantalla aparecerá una barra vertical con las letras en órden alfabético.
5. Funciones principales 5.5 Banneres informativos Las características del canal y del programa aparecerán automáticamente en el breve banner invormativo en la parte inferior de la imagen televisiva después de presionar el botón ROJO [11], o al pasar de un canal a otro. 1 2 3 4 5 6 7 8 9 10 11 Todos TV 25 _______ Cualidad de la senal: 12:00 15 14:00 14 13 12 En el breve banner informativo se muestra lo siguiente: 1. Número del canal en la lista 2.
5. Funciones principales 5.5 Banneres informativos Si presionar el botón ROJO [11] durante la representación del breve banner informativo, aparecerá un banner invormativo ampliado. Tiene el aspecto siguiente: 1 2 3 13:10 Martes 12/11/2008 4 Satélite: Eurobird 9 Provider: Platforma HD TR 11/11 11957 MHz (V) 26400K 2/3 QPSK DVB-S2 Video PID: 0163� Audio PID: 0163� DRE PCR PID: 0168 Fuerza de la senal: 10 9 8 7 5 6 1. Fecha 2.
5. Funciones principales 5.6 Teletexto El receptor tiene un incorporado decodificador (STB) del teletexto. Para activarlo presione: el botón AMARILLO [22], seleccione la opción Teletexto en la lista que aparecerá, y presione [8], o OK [24]. En la lista aparecida seleccione el idioma para el teletexto. El teletexto se manda con los botones numéricos en el pupitre de telemando. Para salir del modo del teletexto presione el botón EXIT [23]. Tambien, el receptor soporta el teletexto VBI.
5. Funciones principales 5.8 Listas de canales elegidos Puede crear estas listas en el menú: Ajuste – Poner en orden lo elegido. Para hacer aparecer en la pantalla la enumeración de las listas con los canales elegidos, presione el botón AZUL [21] en el pupitre de telemando durante el visionado de los programas. Navigue por la lista usando los botones / [8]. Para abrir la lista, presione el botón [8], o el botón OK [24]. Para ver el canal seleccionado presione el botón OK [24].
5. Funciones principales 5.11 Teclado en pantalla Para entrar diferente información textual (nombres de canales, listas favoritas, proveedores) se utiliza el teclado. Para entrar una letra o símbolo mueva el cursor a la letra o símbolo elegido usando los botones / / / [8], y presione el botón OK [24]. Para guardar el nombre entrado, presione el botón VERDE [10]. Para borrar un símbolo, presione el botón ROJO [11].
5. Funciones principales 5.13 Actualización del software del receptor 5.13.1 Actualización del software a través del satélite Si sea necesario, el operador de la TV satelital puede iniciar el servicio de la actualización del software del receptor por señal del satélite. Durante el cambio de los canales del operador, aparecerá el banner informativo con el mensaje sobre un software nuevo accesible y pedirá confirmar la actualización.
5. Funciones principales 5.13 Actualización del software del receptor 5.13.2 Actualización del software a través de USB Nota! No desenchufe el receptor durante la actualización del software! La sesión precendente del trabajo con una memoria-Flash-USB en la computadora personal debe ser terminada de una manera correcta! La memoria-Flash debe corresponder completamente a la especificación USB 2.0! Orden de operaciones durante la actualización del software mediante USB: 1.
6. Menú principal Los ítems de menú pueden servir de: 1. Botones para pasar al nivel siguiente del menú; 2. Campos de introducción. Para introducir utilice los botones NUMÉRICOS 0 ~ 9 [5], para confirmar lo introducido presione el botón OK [24], o uno de los botones / / / [8], para cancelar la operación presione EXIT [23]; 3. Listas desplegables.
7. Ajuste 7.2 Búsqueda de los canales a mano Durante la búsqueda en su pantalla aparece: la escala del progreso y dos listas de canales encontrados (TV y Radio). Los canales nuevos se marcarán con color blanco, y los que ya están en la base, con color gris. Si algún canal encontrado ya se tiene en la lista, éste no se agregará una vez más. Al terminarse la búsqueda en su pantalla aparecerá la solicitación de guardar los canales encontrados con la indicación de la cantidad de los canales nuevos.
7. Ajuste 7.3 Ajuste de la antena Seleccione el tipo de convertidor (LNB): universal 1, universal 2, individual, doble. Al seleccionar el tipo de LNB universal 1 las frecuencias 9750 y 10600 MHz del heterodino cambiarán automáticamente después de introducir el valor de la frecuencia del transpondedor en el menú de búsqueda de canales. El ajuste de la señal tonal de 22 kHz no es obligatorio (desactivado).
7. Ajuste 7.3 Ajuste de la antena 7.3.1 Sistema de control motorizado Para trabajar con el sistema de control motorizado de antena se debe seleccionar el tipo de su control. Si usa Ud. el sistema motorizado controlado por DiSEqC1.3, en este punto del menú instale el valor USALS. Si Ud. usa el sistema motorizadocontrolado por DiSEqC™1.2, en este punto del menú instale el valor DiSEqC1.2. 7.3.2 El ajuste de DiSEqC 1.
7. Ajuste 7.3 Ajuste de la antena 7.3.3 Ajuste del posicionador USALS Para mover la antena hacia el satélite: • Seleccione el satélite deseado; • Seleccione el transpodedor. Las escalas de intensidad y calidad de la señal del transpondedor se mostrarán en la parte inferior de su pantalla; • Entre la latitud y longitud de la posición del sistema motorizado; Para hacerlo: • Presione el botón OK [24]; • Entre el valor usando los botones NUMÉRICOS 0 ~ 9 [5] en formato xxx.
7. Ajuste 7.4 Ajuste de los satélites Posición orbital Para entrar la posición orbital necesaria presione el botón OK [24]. Pulsando los botones NUMÉRICOS 0 ~ 9 [5] marque la posición deseada del satélite en formato xxx.x. Seleccione la dirección: «W» o «E». Presione el botón VERDE [10]. Transpondedor El ítem contiene la lista de los transpondedores del satélite seleccionado. A cada transpondedor corresponden los parámetros siguientes: frecuencia, polarización, velocidad del flujo, FEC, tipo de modulación.
7. Ajuste 7.7 Ajuste del video SD Salida de video TV Las variantes disponibles: PAL , SECAM. La correlacion de los lados del TV Las variantes disponibles: 16х9, 4х3. Modo de transformacion del TV Las variantes disponibles: Pan-Scan, Convert, Combinada, Así como está. 7.8 Ajuste del Audio Este punto es por completo analógico al Paso 3 del Asistente de Instalación. 7.
7. Ajuste 7.
7. Ajuste 7.10 Organización de los canales Bloqueo Seleccione el canal o grupo de canales que desea bloquear y presione el botón AMARILLO [22]. Al lado de número del canal aparecerá un símbolo de bloqueo especial a modo de un candado estilizado. Para ver los canales bloqueados hace falta entrar la clave PIN. Renombrar canales Para renombrar el canal seleccionado, presione el botón AZUL [21]. Utilizando el teclado en pantalla, introduzca el nombre nuevo del canal. 7.
7. Ajuste 7.12 Transferencia de los datos Existe la posibilidad de transferir los datos (del Software y/o de la base de canales) del receptor a la unidad Flash viá la interfaz USB. La secuencia de operaciones: 1. Encienda el receptor. 2. Insierte la memoria Flash en el puerto USB. 3. Entre en el menú Ajuste -> Transferencia de los datos. 4. Presione el botón AZUL [21]. Aparecerá el mensaje Espere por favor, y empezará la transferencia de los datos. 5.
7. Ajuste 7.14 Ajustes de fábrica En este punto del menú puede restaurar todos los valores de ajustes por omisíon. Al reposicionar los ajustes a los valores fijados en fábrica, la información de los canales, antenas ajustados, y de las listas de canales seleccionados se borrará. Para reposicionar a los ajustes de fábrica presione el botón ROJO [11] en su pupitre de telemando. Confirme la vuelta a los ajustes de fábrica presionando Sí en el recuadro de solicitación.
9. Temporizador 9.2 Ajuste del Temporizador En este menú puede ajustar el temporizador para que el receptor se encienda y se apague según el horario. Con el botón AMARILLO [22] puede ajustar el temporizador para que el receptor se encienda o pase al programa determinado. En la ventana del ajuste del temporizador están disponibles las opciones siguientes: número del canal, hora del comienzo/final del programa, repetición del programa (una vez, una vez al día, una vez a la semana).
12. Arreglo Defectuosidad/problema Qué hacer? El receptor no responde a la presión de los botones en el panel delantero o en el pupitre de telemando. Reinície el receptor (desenchufe y enchufe de nuevo). No hay alimentación eléctrica del receptor. No hay imagen. La imagen es de baja calidad No hay sonido. Asegúrese de que el receptor no esté en el modo de espera (Stand By). Revise el cable de alimentación; asegúrese de que este esté conectado a la red eléctrica conveniente.
13.
13. Especificaciones Decodificador video Formatos de video decodificables MPEG-2, MP@ML и MP@HL H.264: HP@L4.
13.
14.
15. Obligaciones de garantía ESTIMADO COMPRADOR! La Corporación «General Satellite» le agradece mucho a Ud. por elegir nuestro producto. Estamos seguros de que el producto satisfazca todos Sus requerimentos, y su calidad corresponda a los mejores espécimenes mundiales. Si tenga algunos problemas con los productos comprados en la Corporación «General Satellite», le recomendamos a Ud.
15. Obligaciones de garantía • Lesiones causadas por penetrar adentro del producto objetos ajenos, sustancias, líquidos, insectos; • Lesiones causadas por condiciones de fuerza mayor; • Lesiones causadas por desconformidad a los Estándares Estatales de parámetros, de redes de cables, de telecomunicación, y otros factores externos parecidos. La garantía no cubre los consumibles.