GENESIS ® LP Gas Grill Owners Guide YOU MUST READ THIS OWNERS GUIDE # BEFORE OPERATING YOUR GAS GRILL 55274 DANGER If you smell gas: 1. Shut off gas to the appliance. 2. Extinguish any open flames. 3. Open lid 4. If odor continues, keep away from the appliance and immediately call your gas supplier or your fire department. Leaking gas may cause a fire or explosion which can cause serious bodily injury or death, or damage to property. WARNING 1.
Dangers & Warnings DANGER Failure to follow the Dangers, Warnings and Cautions contained in this Owner’s Manual may result in serious bodily injury or death, or in a fire or an explosion causing damage to property. WARNINGS Do not store a spare or disconnected liquid propane cylinder under or near this barbecue. Improper assembly may be dangerous. Please carefully follow the assembly instructions in this manual.
Contents Danger & Warnings ..................................................................................A-2 Warranty ..................................................................................................A-4 Storage and Nonuse .................................................................................A-5 Cooking ...................................................................................................A-6 Cleaning ...............................................................
Warranty Weber-Stephen Products Co. (Weber) hereby warrants to the ORIGINAL PURCHASER of this Weber® gas grill that it will be free of defects in material and workmanship from the date of purchase as follows: There are no other express warrants except as set forth herein and any applicable implied warranties of merchantability and fitness are limited in duration to the period of coverage of this express written Limited Warranty.
General Instructions Your Weber® gas barbecue is a portable outdoor cooking appliance. With the Weber® gas barbecue you can grill, barbecue, roast and bake with results that are difficult to duplicate with indoor kitchen appliances. The closed lid and Flavorizer® Bars produce that “outdoor” flavor in the food. The Weber® gas barbecue is portable so you can easily change its location in your yard or on your patio. Portability means you can take your Weber® gas barbecue with, if you move.
General Instructions Cooking Cleaning WARNING: Do not move the Weber® gas barbecue when operating or while barbecue is hot. You can adjust the FRONT and BACK burners as desired. The control settings: High (H), Medium (M), Low (L), or Off (O) are described in your Weber® cookbook. The cookbook uses these notations to describe the settings of the FRONT and BACK burners. For example, to sear steaks, you would set all burners at H (high). Then to complete cooking, you would set FRONT and BACK at M (medium).
Cast Iron Cooking Grates Care Instructions WARNING: Follow all safety instructions provided with your barbecue. Do not drop cast iron grates, they will break. Maintenance - Brush debris off with a steel bristled wire brush. Reseasoning - After each use the grates may be reseasoned by coating with a solid vegetable shortening, closing the lid and leaving the cast iron grates in grill until it is cool.
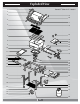
Exploded View 1 Genesis® Silver-A LP 100301 2 3 25 26 4 27 5 28 6 29 7 30 31 32 33 34 8 9 10 35 11 36 12 13 14 15 37 38 39 40 16 17 41 42 43 31 18 44 19 20 45 21 46 22 47 23 24 48 A-8
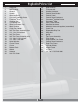
Exploded View List 1. 2. 3. 4. 5. 6. 7. 8. 9. 10. 11. 12. 13. 14. 15. 16. 17. 18. 19. 20. 21. 22. 23. 24. 25. 26. 27. 28. 29. 30. 31. 32. 33. 34. 35. 36. 37. 38. 39. 40. 41. 42. 43. 31. 44. 45. 46. 47. 48.
Parts List Cooking Box Assembly - 1 Flavorizer® Bars - 5 Warming Rack - 1 Cast Iron Cooking Grates - 2 Bottom Tray - 1 Caster Frame - 1 Catch-Pan Holder - 1 Catch-Pan - 1 Wheel Frame - 1 Disposable Drip Pans - 2 Thermometer - 1 1 inch Bolts (1/4 x 20 x 1 inch Bolt) - 6 Bottom Rack - 1 Nylon Washer - 6 Left Trim Assembly - 1 Wrench - 1 Side Table - 1 7/16’Inch Wrench - 1 Right Trim Piece - 1 LP Tank - 1 A-10
Unpacking 1 3 2 4 A-11
• Arrow sticker to the front. 1 b a • Push down firmly until Bottom Rack Lock, "locks" under the rail. c Ba201.
2 a b • Push down firmly on both sides to ensure bottom rack is locked under the rails.
3 • Install bolts at indicated locations. Use supplied tool to tighten. Finish tightening bolt with metal wrench provided or a 7/16” wrench.
4 5 B200_LP.
6 7 a b B-2
8 10 9 11 B-3
B-4
Gas Instructions Fill liquid propane cylinder Note - The liquid propane cylinder manufacturer is responsible for the materials, workmanship and performance of the cylinder. If the cylinder has a defect, malfunctions, or you have a question regarding the cylinder, call the cylinder manufacturer’s customer service center. The phone number is on the warning decal, which is permanently attached to the cylinder.
Gas Instructions We utilize various LP tank manufacturers. Some of the tanks have differing top collar assembles. (The top collar is the metal protective ring around the valve.) One series of tanks mount with the valve facing front. The other tanks mount with the valve facing away from the fuel scale. These types of tanks are illustrated below. You will need: LP cylinder, a soap and water solution and a rag or brush to apply it.
Gas Instructions Check for gas leaks After a period of nonuse, we recommend that you perform the following maintenance procedures for your safety. WARNING: Check the hose before each use of the barbecue for nicks, cracking, abrasions or cuts. If the hose is found to be damaged in any way, do not use the barbecue. Replace using only Weber authorized replacement hose. Contact the Customer Service Representative in your region using the contact information sheet provided with your manual.
Gas Instructions Check: 1) Hose-to-manifold connection. 2) Regulator-to-Cylinder connection. WARNING: If there is a leak at connection (1), retighten the fitting with a wrench and recheck for leaks with soap and water solution. If a leak persists after retightening the fitting, turn OFF the gas. DO NOT OPERATE THE GRILL. Contact the Customer Service Representative in your region using the contact information sheet provided with your manual. Check: 3) Valves-to-manifold connections.
Gas Instructions Liquid Propane (LP) Cylinder(s) Safe handling tips for Liquid Propane Gas Cylinders ■ The joint where the hose connects to the LP cylinder must be leak tested each time the LP cylinder is reconnected. For example, test each time the LP cylinder is refilled. ■ Be sure the regulator is mounted with the small vent hole pointed downward so that it will not collect water. This vent should be free of dirt, grease, bugs etc.
Operating Instructions 1) Open the lid. 2) Make sure all burner control knobs are turned OFF. (Push control knob down and turn clockwise to ensure that it is in the OFF position.) WARNING: The burner control knobs must be in the OFF position before turning on the liquid propane cylinder tank valve. If they are not in the OFF position, when you turn on the LP cylinder valve, the “excess gas flow control” feature will activate, limiting the flow of gas from the LP cylinder.
Operating Instructions Manual Lighting 3) Turn the cylinder on by turning the cylinder valve counterclockwise. 4) Strike a match and put the flame into the matchlight hole in the front of the cooking box. WARNING: Do not lean over open barbecue. Keep your face and body at least one foot away from the matchlight hole when lighting the barbecue. 5) Push Front burner control knob down and turn to START/HI.
Troubleshooting Problem Check Cure Burners burn with a yellow or orange flame, in conjunction with the smell of gas. Inspect Weber® Insect / Spider screens for possible instructions. (Blockage of holes.) Clean Weber® Insect / Spider screens. (See Section “Annual Maintenance”) Burners do not light. -or- Burners have a small flickering flame in the HIGH position. -orBarbecue temperature only reaches 250˚ to 300˚ in the HIGH position.
Maintenance Weber® Spider /Insect screens ® Your Weber gas barbecue, as well as any outdoor gas appliance, is a target for spiders and other insects. They can nest in the venturi section(1) of the burner tubes. This blocks the normal gas flow, and can cause the gas to flow back out of the air shutter. This could result in a fire in and around the air shutters, under the control panel, causing serious damage to your barbecue. Lightly tap the burner to get debris and dirt out of the burner tube.
Maintenance CAUTION: The burner openings(1) must be positioned properly over the valve orifices(2). Check proper assembly before fastening manifold in place. Replacing Main Burners ® 1) Your Weber gas barbecue must be OFF and cool. 2) Turn gas OFF at source. 3) To remove control panel: take off the burner control knobs. Remove the screws holding the control panel in place. Lift off the control panel.