
Installation Guide

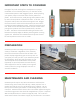

Surfaces must be clean, frost-free, and free of oil, grease, or any other contaminants. Avoid contact with alcohol
and solvent cleaners while curing. For the best results, apply a thin bead of caulking, not to exceed 1/2” in
thickness, to the posive shiplap edge and behind each of the nger tabs. Fill screw holes with GenStone Color
Matched Caulking. Some stones will be a dierent color than the ller. Use GenStone Color Matched Touch-
Up Paint to blend the area to the correct color. Recommended installaon temperatures are 40° - 100° F. The
curing process can take up to 2 weeks.
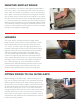
GenStone Trim or J-channel is recommended around all openings. Secure panel deep enough to protect edge
and cover exposed edges with GenStone Color Matched Touch-Up Paint.
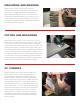
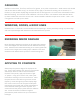
Minor damage to GenStone products can be repaired by painng
over the damaged area with GenStone Color Matched Touch Up
Paint. GenStone Color Matched Caulking or an exterior grade ller
can be used on larger areas needing repair. Blend the area with
GenStone Color Match Touch-Up Paint to match exisng color.
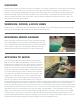
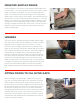
This method of applicaons would be used over plywood,
OSB, or any other wood siding product. GenStone must be
installed onto a surface that is at. Aer applying a moisture
barrier (per manufacturer’s’ instrucons) use 2.5” exterior
grade non-corrosive deck screws to aach the panels. Longer
screws are needed for installing ledgers. To begin the layout,
use a level and chalk line to mark a line across the substrate
at or above the top edge of your boom row of panels. This
will give you a reference as you run your panels and allow
you to keep your project framing square. Repeang these
steps as you progress up the wall will allow you to make any
necessary adjustments and maintain an accurate installaon. Begin your installaon in the lower le corner and
proceed to the right down the wall in a single row. If you are using GenStone 90° Corners, start by ng the
corner rst and then the panel next to it for your rst row. It is crical that the rst row be as level and square as
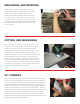
possible because all other panels build from this row. Shoot non-corrosive deck screws into the posive shiplap
edge about every 8”, countersinking them up to 1/8” deep. Starng about 1” from the boom of the panel,
shoot 3 or 4 screws evenly and at an upward angle through the face of the panel. Place screws in the shadows
of the panel near a grout line. Fill screw holes with GenStone Color Matched Caulking when complete. Use
GenStone Color Matched Touch-Up Paint to blend any area where the caulking is noceable. Apply a 1/4” bead
of GenStone Color Match Caulking to all posive edges to ensure a waterght barrier.
CAULKING
WINDOWS, DOORS, & ROOF LINES
REPAIRING MINOR DAMAGE
APPLYING TO WOOD