
Installation Sheet

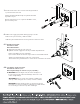

B. Solder the copper tube (O.D. 5/8") into the valve inlet port.
Suelde el tubo de cobre (diámetro exterior 5/8”) a las bocas de salida de la válvula.
Souder le tuyau de cuivre (D.E. 5/8 po - 15,9 mm) à l’orifice d’entrée du robinet.
Maintenance Your new faucet is designed for years of trouble-free performance. Keep it looking new by cleaning it periodically
with a soft cloth. Avoid abrasive cleaners, steel wool and harsh chemicals as these will dull the finish and void your warranty.
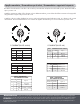
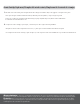
C. After all the pipes are soldered to the valve, place the ceramic valve cartridge
into the shower diverter valve body, positioning the locating pin on the bottom
of the cartridge into the locating hole in the valve body.
Después de soldar todos los tubos a la válvula, vuelva a colocar el cartucho
haciendo que las dos puntas sobresalientes coincidan con las dos aberturas
en la válvula.
Lorsque tous les tuyaux sont soudés au robinet, replacer la cartouche de
céramique dans le corps du robinet d’inverseur de douche en plaçant les deux
broches d’alignement situées au bas de la cartouche dans les deux trous
d’alignement du corps du robinet.
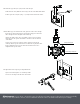
D.
Tighten the bonnet nut by using an adjustable wrench.
Ajuste la tuerca del capuchón con una llave ajustable.
Visser l’écrou de chapeau à l’aide d’une clé à molette.
Valve Housing Locating Hole
Cartridge Locating Pins