
User manual

10
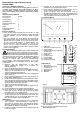
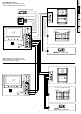
Cable connection
1. Connect the monitor to the camera with the cables
according to the wiring diagram.
2. Carefully insert the wires to the terminal by pressing
down the terminal flap with any small tool taking care that
the 2 bare wires do not touch.
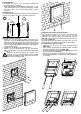
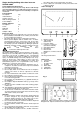
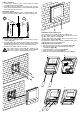
Installation height
Recommended installation height is approximately 140 –
150 cm for indoor unit and 150 – 155 cm for outdoor unit.
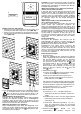
Installation of the indoor monitor
1. Fix the wall mounting bracket at the wall by using 4
screws and plugs.
2. Carefully place the indoor monitor against the bracket
and gently push down the monitor so that the pins on the
bracket engage in the slots on the rear of the monitor.
3. Secure the assembly with the 2 screws.
Only after having connected the outdoor unit,
connect the 230 V~ power supply to the adaptor.
Make sure the power supply polarity is correct.
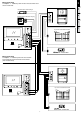
Installation of the outdoor unit
Two settings are accessible inside the outdoor unit:
On the upper left side, setting of the sound level for the
speaker of the outdoor unit. (fig. 3A)
On the upper right side, setting of the sound level for the
speaker of the monitor. (fig. 3B)
To change the settings, use a small screwdriver and turn it
carefully without force to the abutments.
Add the name to the nameplate
1. Remove the front cover with a screwdriver (fig. A-B)
2. Remove the holder of the name plate with a small
screwdriver. (fig. C-D )
3. The name plate is now accessible (fig. E)
4. Mark your name on the plate (fig. E)
5. Place the name plate holder back to the panel (fig. F)
SOPHIA
SOPHIA
SOPHIA
SOPHIA
SOPHIA
SOPHIA
SOPHIA
SOPHIA
A B
C D
140 cm
150 cm
40°
70°