Giada Mini PC User Manual
Head Page Gratitude Dear Users, Thank you for choosing Giada product. In such an epoch of PC development, we launched Giada Mini PC which is characterized by the mini shape, vogue and ultra-thin structure, environment friendly, powerful graphic processing ability and lower power consumption. Giada provided with multiple functions, including serving as exclusive downloader, small server, internet access for office work and higher mobility when compared with traditional PCs.
Copyright and Trademark Shenzhen JIEHE Technology development Co., Ltd will try our best to ensure the accuracy and intactness of this manual. However, as our products are being upgraded all the time, we can’t guarantee that this Manual is flawless and shall bear no responsibility if it is misunderstood by the user. The User’s Manual is subject to change without prior notice. Giada and the related mark are trademarks owned by Shenzhen JIEHE Technology development Co., Ltd.
I. Introduction to the Manual 1. Precautions In order to prevent the PC from being damaged, extend its service time, and ensure your normal use and personal safety, please carefully read the whole User’s Manual and the related safety information and strictly follow the requirements in it. You should also keep the Manual well. ◎Please read the documents attached to the product first. The page exclusively inserted should be read firstly. ◎Please observe all alarm information and marks on safety.
a. The power cord or plug was damaged. b. Conductive liquid went into the product. c. The product was dropped onto the ground or its shell was damaged. d. When unidentified errors occurred or the product’s performance is obviously deteriorated, please cut off power immediately and contact professional technicians. 2. Accessories Your Giada consists of the accessories described in Quick Installation Guide. Please refer to it carefully.
II. About the product 1. Appearance The Giada Mini PC is slim design, but it offers all the features and power of much larger PCs, as well as stylish modern design with the graceful outline and fashion colors. To display more details about your ideal choosing, make a deep impression to your Giada, Quick Installation Guide will be the best teacher to let you know it. 2. Features A.Slim appearance and High mobility The small size and light weight Giada mini PC, easy to be carried anywhere.
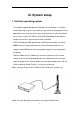
. III. System setup 1. Install an operating system This product supports Windows XP, Windows Vista, Windows 7 and other normal operating systems. If you want to install a new or change your current operating system, you can consult your local distributor, or you can connect the PC to an external CD-ROM or DVD-ROM (Depending on the different models and versions) and use the disk for installation. NOTE: According to USB specification, USB interface provides maximum 600MA current.
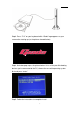
Step3. Press “F12” on your keyboard while “Giada” logo appears on your screen after starting up (as the picture showed below). Step4. A window pops up as the picture below. It lists all the possible booting devices you’ve connected to the PC, choose the one with operating system disk and press “enter”. Step5. Follow the instructions to complete install.
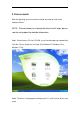
2. Drivers install After the operating system has been installed, we need to install some hardware drivers. NOTE:Pictures below just showing the driver install steps; please see the real product for detailed information. Step1. Put the drivers CD into CD-ROM, a user interface pops up automatically. Click the “Drivers” button for next step. (For Windows XP, Windows Vista, Windows 7 OS) Step2. The driver install program will detect your PC, and list all the drivers you need.
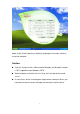
Step3. Install all the listed drivers follow by the program instruction, and than restart the computer. Caution: If you are using a wireless LAN card with Bluetooth, the Bluetooth function is NOT supported under Windows VISTA. Some hardware have driver for Linux, they are in the document named “Linux”. In some cases, driver install program maybe doesn’t detect all drivers you need, please check in device manager and manually install the driver.
IV. Equipment expansion 1. Card Reader The card reader of Giada mini PC can support SD, MMC, MS, MS PRO, SDHC and other mobile memory cards(depending on different model). It also supports PNP and hot swapping. Insert the mobile memory card into PC through the card reader port on it and pay attention to the card’s sides. Never use excessive force when inserting the card. Otherwise the memory card or the slot may be damaged.
2. USB device The USB interfaces can support various types of USB devices, including USB CD-ROM, USB mobile device, USB mouse and USB TV card. 3. Audio device You can connect the external microphone (or other audio input equipment) to audio input, and connect the earphone or speaker to the output port. For better sound quality, you can connect audio output device with digital decoder inside to S/PDIF-out port (or via adapter).
4. Network device The WIFI device embedded in the product can help you set up a network, either cabled or wireless. Make sure you have installed the hub or switch before you set up the network. To construct a LAN or other network, please refer to following photos. Note: Before setting up the network, please make sure you have properly installed the drivers for the network interface card and WIFI. A.
Internet through the access point. Note: To form a small-scale LAN for home use or office work, you need both the wireless network device embedded in the product and a wireless router. Start your wireless router, and make proper configurations for it in accordance with the operating instructions or instructions from the carrier. Start the WIFI device through the operating system of the host.
V. Power supply and maintenance 1. Adapter In order to avoid personal injury and ensure the normal operation of the product, please make sure the AC power you provide conforms to the specifications described on the sign at the back of the adapter. Use three-core receptacle and reliable grounding. In addition, you should also make sure the voltage from your local power matches the respective rated value of the monitor and other external equipment. It is recommended the attached adapter be used.
of used batteries according to the instructions. Body Please do not remove the protective film on the surface before using, and prevent sharp objects from scratching on it. Make sure the power supply to the host is cut off before cleaning the body. Never use wet cloth for cleaning. Otherwise, water drops or other conductive liquid may go into the host. To clean the base of the host, you should first remove the host.
VI. Troubleshooting Giada Mini PC was designed with the latest technologies and strictly tested before delivery. It can provide long continuous working period and few failures might occur. You may encounter some simple problems on setup, operation or system compatibility at times you use the product. In this part, we will present the information on how to identify the cause of a failure and how to solve the problems.
is any part inside the host, especially whether the hard disk and memory are properly installed. Note: The shell of the host should be opened only with the assistance of professionals from Giada. 5. When the system is started, it seems the set parameters of the host have been changed. It is possible the BIOS setup made at the time the system exited last time was not saved. 6. PC stops responding Press to terminate the program whose response is stopped.
9. Sound disappeared abruptly. Check whether the connection between power amplifier and speaker are reliable, and double click the volume icon to see whether the audio part is set as “mute”. 10. Can’t access to Internet. Check whether the network system is properly connected, or the wireless router runs normally. Check whether the driver for the network equipment is properly installed and the related parameters are correctly set. Finally, make sure the ISP service is still valid. 11.
Clone mode after enter the operating system.
However, there is no guarantee that interference will not occur in a particular installation. If this equipment does cause harmful interference to radio or television reception, which can be determined by turning the equipment off and on, the user is encouraged to try to correct the interference by one or more of the following measures: -- Reorient or relocate the receiving antenna. -- Increase the separation between the equipment and receiver.