
Instructions / Assembly


Step 2: Sponge on Minerals
Recommended: Practice the Mineral application on the Kit’s Black Practice
Sheet (or regular black construction paper to mimic black primer) before
beginning to paint on your counters.
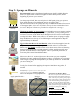
Cut the sponge in half, then cut each piece in half again giving you 4 pieces.
Pour small amounts of each Mineral onto its own paper plate.
Dip the textured side of the sponge into Step 2A Mineral and dab off excess on
a clean paper plate. (Cans are not filled to the top because standardized cans
are used. Adequate volumes are provided to complete the coverage.)
Working in small 2’x2’ foot sections tap 2A lightly onto your counter creating
a nice imprint of the sponge. (If you get a “paint blob” you are pushing down
too hard.) Let some of the black show through but be sure to have each imprint
overlap each other. While 2A is still wet, use another piece of sponge to apply
Step 2B Mineral over the top of 2A following the same application. Repeat
again with Step 2C Mineral.
Tip for Chocolate Brown kit and Slate kit: After 2C has been applied, use the
4
th
piece of sponge and to dry sponge and blend the colors. For Chocolate
Brown, tap very lightly over the section to cut down some of the red showing
through in the brown and to slightly blend. For Slate, push down with more
pressure to blend all three colors together. This is a personal preference, as
some may like it more blended than others.
Move on to the 2’x2’ section right next to the section you just completed
following the same application technique as above, overlapping as you sponge.
Don’t forget to sponge the backsplash as you finish up each 2’x2’ section that
you are working on.
Let dry for 4 hours before applying the topcoat. Sand down any peaks, if
needed.
Countertop
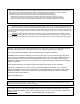
TIP!
Apply paint like this…
Not this…
Special Note for Bombay Black:
Be sure to stir your Pearl Mica and Bronze
Minerals because their metallic flecks may
settle. You may use a plastic grocery bag in
place of the sponge to apply the minerals to
create natural looking veins that appear in
granite. You may also like to apply Black
Onyx after Pearl has dried to create a deeper
black granite look. Apply the Bronze color
sparingly as a little goes a long way.
Be sure to watch all of our
application videos for each kit at:
www.gianigranite.com
Backsplash Tip: To get into the crevice, attach a piece of the
sponge to the end of a pencil. Watch the application
video for the backsplash at www.gianigranite.com