
Instructions / Assembly


ROOF MOUNTED POWER ATTIC VENTILATOR
INST
ALLATION INSTRUCTIONS
NOTE: Air intake openings are necessary for proper
exhaust operation. Best results will be obtained if these
openings are located around the eaves. Undereave soffit
grills or continuous soffit vents are suggested.
Sq. Ft. of
Air Intake
Model Opening Needed
ASR-HP 5.0
TOOLS NEEDED: Electric drill, tape measure, hammer &
nails, utility knife and pencil, jig or sabre saw, roofing
nails, phillips screw driver, adjustable wrench, wire cutter,
work gloves and safety glasses.
VENTILADOR DE PODER DEL ÁTICO
MONTADO EN EL TECHO
INSTRUCCIÓNES PARA LA INSTALACIÓN
NOTA: Aberturas para la toma de aire son necesarias
para una apropiada operación. Se obtendrán mejores
resultados si estas aberturas están localizadas alrededor
de los aleros. Se sugiere el uso de rejiillas de sofito bajo
alero o ventilas continuas de sofito.
Pies cuadrados (metros cuadrados) de abertura
Modelo
para toma de aire abertura necesaria.
ASR-HP 5.0
HERRAMIENTAS REQUERIDAS PARA INSTALACION:
Taladro, eléctrico, cinta de medir o regla, martillo, clavos
para techo, navaja, lapiz, serrucho, destornillador con
punto estrella, llave crescent, tijeras para alambre, lentes
de seguridad y guantes de trabajo.
1. POSITIONING THE POWER ATTIC VENTILATOR ON
THE ROOF: Set the unit approximately in the center of
the roof close to the ridgeline. Position the ventilator so
that the unit can only be seen from one side of the house.
1. ACOMODANDO EL VENTILADOR DE PODER EN EL
TECHO: Acomode la unidad aproximadamente en el cen-
tro del techo cerca del madero horizontal superior.
Acomode la unidad de tal manera que solo se pueda ver
de un lado de la casa.
2.
DRILL THE GUIDE HOLE: Measure the distance to
the ridgeline and to one end of the roof. Transfer these
exterior dimensions to inside the attic. Next locate a cen-
ter position between two rafters (inside the attic) as near
as possible to the outside measurements. Drill a guide
hole through the roof from inside that is equal distance
from the two rafters. Place a marker through the roof for
quick identification while on the roof.
2. HAGA EL AGUJERO-GUÍA: Mida la distancia del
madero horizontal superior hasta el punto final del techo.
Traslade las medidas exteriores a la parte interna del
ático. Despues localice una posición centrada entre 2
vigas (dentro del ático) lo mas cerca posible de las
dimensiónes exteriores. Haga un agujero guía en el
techo. Ponga una marca en el techo para una identifi-
cación más rapida mientras esté en el techo.
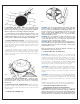
3. CUTTING THE HOLE: Draw a circle 14
1
/2´´ in diame-
ter using the guide hole as the center
. A template is pro-
vided on the back of the carton for drawing the circle.
3. PARA HACER EL AGUJERO: Dibuje un círculo de 14
1/2 pulgadas de di·metro usando el agujero-guía como el
centro. El patrón viene incluido en la parte trasera de la
caja de carton, para dibujar el círculo.
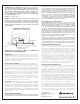
4.
CUTTING
THE HOLE
IN
THE ROOF
. Using a sabre
saw
, cut and remove all roof shingles (and deck) inside
the 14 1/2´´ diameter circle. Next cut an extra 1 inch off
the top half of the hole (shingles only) to allow room for
placing and positioning the flange.
Do not cut through any rafters. Cutting a rafter may cause
your roof to sag.
4.
P
ARA
COR
TAR EL AGUJERO EN EL TECHO:
Usando una sierra caladora, corte y remueva las tejas (y
la madera) que este adentro del círculo de 14 1/2 pul
-
gadas de diámetro. Después corte 1 pulgada más en la
parte de arriba del agujero (solo la teja) para dar espacio
y acomodar la corona.
No corte ningúna viga. El cortar una viga puede causar
que su techo se hunda.
1.)
2.)
3.)