
Instructions / Assembly

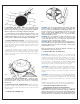

5. SECURING THE BASE: Make sure the base flange
parallels the ridgeline of the roof. The embossed arrow
and word UP should be pointing towards the ridgeline.
Slip the upper half of the flange under the shingles.
Center unit over the hole. Attach flange securely to roof
using roofing nails around the perimeter of the unit
(Underneath shingles at the top).
A nonhardening caulk
can be used to seal between the flange and shingles.
5. PARA ASEGURAR LA BASE: Cerciórese de que la
base de la corona esté paralela con la del madero hori-
zontal superior del techo. Las flechas realizadas y la pal-
abra “UP” deben estar apuntado hacia el madero hori-
zontal superior. Deslice la parte superior de la corona
debajo de las tejas.
Centre la unidad sobre el agujero. Junte la corona
seguramente al techo usando clavos para techo alrede-
dor del perímetro de la unidad (debajo de las tejas supe-
riores). Una goma suave puede ser usada para sellar la
corona con la teja.
6.
INST
ALLING
THE
THERMOST
AT: Inside the attic,
separate the thermostat cover from the mounting plate.
Secure the plate to a rafter
. See step 7 to connect the
thermostat.
6. PARA INSTALAR EL TERMOSTATO: Dentro del ático,
separe la cubierta del termostato de la base de montaje.
Asegure la base a una viga. Vea el paso 7 para conectar
el termostato.
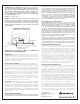
7. WIRING THE THERMOSTAT:
DANGER: The electrical installation and wiring of this fan
must be done by a qualified electrician in accordance with
all local codes and standards, including fire-rated con-
struction. Failure to do the installation properly can result
in fire or even death. NOTE:
A few hours of operation
without apparent problems does not necessarily imply
that the installation is safe.
D
ANGER:
Do not substitute a solid state speed control
for the thermostatically controlled on-off switch that
comes with this fan. Use of a solid state speed control
can result in a fire causing injury or death.
DANGER: Make sure the circuit breaker powering the cir-
cuit on which the fan will operate is turned OFF before
wiring the thermostat. You can be shocked or electrocuted
if the breaker is not off.
Wire the thermostat as shown in diagram 7. Attach your
ground wire to the thermostat box.
7.
ALAMBRANDO DEL TERMOSTATO:
PELIGRO: La instalación electrica y el alambrado de
este ventilador debera ser hecho por una electricista
cualificado de acuerdo con todos códigos y las normas
locales, incluyendo normas de fuego para la construc-
ción. El caso omiso de una instalación apropiada puede
provocar fuego o inclusive hasta la muerte. NOT
A: Unas
pocas horas con el ventilador operando sin problemas
aparentes no significa que la instalación sea segura.
PELIGRO: No substituya el control termostático del inter
-
ruptor que controla el encendido y apagado que viene
con este ventilador. El uso de cualquier otro control
puede provocar fuego causando heridas o hasta la
muerte.
P
ELIGRO:
Cerciórese de que el circuito de poder que va
alimentar el circuito del ventilador este APAGADO antes
de conectar el termostato. Podría recibir una descarga
electrica o resultar electrocutado si la corriente no está
apagada.
Alambre el termostato como muestra en el diagrama 7.
Junte su alambre de la tierra con la caja del termostato.
8. CONTROLLER OPERATION FOR THE
COMBINATION HUMIDISTAT/THERMOSTAT.
THERMOSTAT: The thermostat operates on a “fan-off”
temperature setting. Recommended setting is 100-105
degrees fahrenheit.
The fan will start automatically when
the attic temperature rises above the setting and will shut
off when the attic is cooled down to the thermostat setting.
5.)
6.)
4.)