
Installation Guide


Tools For Assembly
Phillips Head
Screwdriver
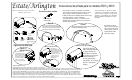
Assembly Instructions For Models ES15 and AR15
Customers are required to contact the local post office before
installing the mailbox to ensure its correct placement and height at
the street. Generally, mailboxes are installed at a height of 41 - 45
in. from the road surface to the inside floor of the mailbox or point
of mail entry (locked designs) and are set back 6-8 in. from the
front face of the curb or the road edge to the mailbox door.
Estate/Arlington
Warning: Check for underground cables
or pipes before digging.
90 DAY LIMITED WARRANTY
The manufacturer warrants this product against defects in materials and workmanship.
Gibraltar Mailboxes warrants to the original consumer purchaser of this mailbox product for 90 days on which it is originally purchased that it is sold free of latent defects in materials, parts
and workmanship. This warranty is limited to repair or replacement of the defective mailbox product. At the discretion of Gibraltar Mailboxes, defective products must be returned freight
prepaid to Gibraltar Mailboxes' factory, The Solar Group. If the unit is determined to be defective, it will be repaired or replaced free of charge at Gibraltar Mailboxes' option. Please contact
customer service first before mailing the product. This warranty does not include repair or replacement due to defects caused by abuse, misuse, fire, vandalism, substandard or
nonconforming installation, contact with brick mortar or destructive weather conditions (includes salt air, road salt or other corrosive materials). This warranty does not cover the labor or
any other cost of removal, reinstallation or replacement of, or as a consequence of, the defective mailbox product. This warranty does not cover field expenses or the cost of any items
other than the defective mailbox product. Consequential damages to property are excluded.
Customer Service: Customers should not contact their
place of purchase. For customer service regarding
warranty and assembly of products please call
1-800-647-7063 for immediate service.
#359
Mailbox with Door and
side rails attached
Flag
Door Handle
Flag Bracket
(4) Screw
Cap Cover
Flag Keeper Flag Washer
(2) Door Handle Screw
(actual Size)
Note: The roller catch is adjustable
to desired pull for the door to open
and close. When re-tightening
screws do not over tighten or use
power tools.
Mounting Options:
Insert flag bracket through the Flag, Flag Washer
and mailbox holes. Attach the Flag Keeper to the
Flag Bracket to secure the Flag Assembly.
Step #1
Attach the Door Handle using (2) Door Handle Screws by hand
(Do not use power tools).
Step #2
Option #1:
Bottom Mounting
Attach the mailbox to the
mounting board using the holes
located on the bottom of the
mailbox. (Mounting hardware
not included. Generally,
mounting hardware is included
with your post or mounting
plate purchase.)
Option #2: Side Mounting
Part A:
Using a Phillips head
screwdriver, punch the 2 tabs
out of each of the side rails.
Once the tabs are punched out,
holes will be exposed. Use
these holes for side mounting
the mailbox.
Part B:
Attach the mailbox to the
mounting board using the side
holes that were exposed in Part
A. (Mounting hardware not
included. Generally, mounting
hardware is included with your
post or mounting plate
purchase.)
Option #2: Side Mounting
Part B:
Attach the mailbox to the
mounting board using the side
holes that were exposed in Part
A. (Mounting hardware not
included. Generally, mounting
hardware is included with your
post or mounting plate
purchase.)
Option #2: Side Mounting