
Manual


EFB-Quad Adjustment:
Adjusting an EFB movement is part skill and part art. Unfortunately it must be done to taste, so there
are no set rules about making these adjustments. The following procedure will usually yield satisfactory
results
3
:
1) When you first turn on a EFB circuit to start testing it, you should first turn the Proportional (Gain)
controls all the way down (counter-clockwise) and the velocity control all the way out (counter-
clockwise).
2) Turn the Proportional (Gain) control clockwise as you apply a varying command voltage to the
movement to sweep it back and forth. As the gain comes up, you will start to see the valve
indicator LEDs start to glow green/red as the valve opens and the actuator starts to follow the
position commands . Continue turning the Proportional (Gain) up until the movement starts to
show signs of oscillation.
3) Turn velocity control clockwise to stop the oscillation. Now turn it back down (counter-clockwise)
until you find the point just above where the movement can be made oscillate by applying fast
moving command voltages.
At this point the movement should be adjusted reasonably well. Depending on the nature of the
movement, you may want to continue to tweak it to taste.
PID-Quad Adjustment:
Before adjusting a PID-Quad, you should first set all of the controls for the channel fully counter
clockwise. Then adjust the Null control for zero voltage output measured on the valve outputs. This
should be somewhere near the center of the range of this potentiometer. You should then null the valve
mechanically or electronically, as needed.
The basic adjustment is performed pretty much as on the EFB-Quad. If when the Proportional gain is
first turned up the movement tends to slam to one end or the other, then there is probably a phase
reversal problem. This can be corrected by either reversing the two wires that lead to the valve, or
switching the wire that runs to one end of the feedback pot to the other end of the feedback pot. Do
not move the wire on the wiper of the pot or just reverse the two wires that run to the feedback card, as
this will have no effect.
After the basic adjustment is made, you can then start cranking in some Integral and Derivative. As
these are added, you may find that the Proportional and Velocity Limit controls may need to be adjusted
higher or lower.
If you are using a compliance input, you will need to start by adjusting in some of the Compliance
Gain and Compliance Depth. If the compliance input needs to be reversed, you will find that the
movement will start oscillating or fight you as you press against the movement (if you are using a strain
gauge for the compliance feedback). Normally when you press against a compliant movement that
uses a strain gauge, it will momentarily move in the same direction you are pushing on it. As the
Compliance Depth times out, only then will it begin fighting to get back to the commanded position.
GILDERFLUKE & CO. • 205 SOUTH FLOWER ST. • BURBANK, CALIF. 91502-2102 • 818/840-9484 • FAX818/840-9485
10 of 12
3
If this is the first time the circuit has been turned on, you may find that the movement turns the
valve on hard in one direction and just wants to stay there. This means that there is something crossed in
the EFB's hookup. To correct this problem you will need to reverse the connections at one and only one
of the following points:
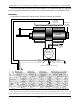
1) Switch the wiring on the transducer. One of the two wires to the transducer is attached to the
wiper. Leave this one alone. The other wire is attached to one end of the resistor. Move this wire
to the opposite end of the resistor (this would be the connection marked 'N/C' on the
illustration).
2) Switch the two wires on the valve. If the valve is opening in the wrong direction, reversing the
two wires to the valve will reverse the direction the valve opens.
3) Switch the plumbing between the valve and the cylinder. Just cross the two hoses at either the
valve or cylinder end of the hookup.