
Installation Guide

5 HOMEDEPOT.COM/GLACIERBAY
Please contact 1-855-HD-GLACIER for further assistance.
Undermount-Installation
NOTICE:
It is strongly suggested that you contact a professional
countertop fabricator when installing the sink as an undermount.
1
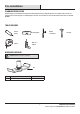
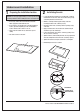
Preparing the installation location
□ If necessary, remove the old sink and disconnect the
water supply lines underneath the sink.
□ If your sink does not already have an existing installation
location, place the template (A) on the sink installation
location and trace the locations to cut out.
□ Check inside the cabinet for any obstructions prior to
cutting.
□ Cut out the location for the sink.
A
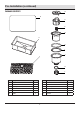
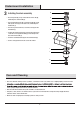
2
Installating the sink
□
Locate and drill the mounting holes, following the countertop
manufacturer’s instructions. Holes should allow even spacing
of mounting brackets around the sink.
With the countertop inverted (upside down), fasten the
mounting brackets to the countertop loosely.
Clean the bottom of the countertop and the top ange (or lip)
of the sink.
Apply a narrow bead of silicone adhesive sealant evenly all
around the top of the sink anges.
Position and align the sink over the countertop opening. Press
silicone onto the countertop.
Tighten fasteners until mounting brackets are snug against the
sink. Check alignment of the sink to the countertop opening.
Tighten the fasteners evenly. Be careful not to over-tighten.
Immediately remove excess sealant.
□
□
□
□
□
□
□
B
Recommended
Clip Placement
COUNTERTOP
B
SILICONE CAULK
(NOT FURNISHED)
AA