Model# 67551-0001 67551-0006 67551-0008D2 67551-0027H2 SKU# 724627 715883 715955 724626 INSTALLATION AND CARE GUIDE PULL-DOWN KITCHEN FAUCET Questions, problems, missing parts? Before returning to the store, call Glacier Bay Customer Service 8 a.m. - 7 p.m., EST, Monday - Friday 9 a.m. - 6 p.m., EST, Saturday 1-855-HD-GLACIER (1-855-434-5224) HOMEDEPOT.COM THANK YOU We appreciate the trust and confidence you have placed in Glacier Bay through the purchase of this kitchen faucet.
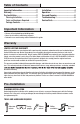
Table of Contents Important Information ..............................2 Warranty ...................................................2 Pre-Installation .........................................2 Planning Installation ..............................2 Tools and Hardware Required ...............2 Package Contents ..................................3 Installation ................................................4 Operation...................................................7 Care and Cleaning ......................
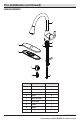
Pre-Installation (continued) PACKAGE CONTENTS A B F C D G H I Part A E Description Quantity Faucet assembly 1 B Washer 1 C Nut 1 D Screw 2 E Quick connector 1 F Escutcheon 1 G Gasket 1 H Weight 1 I Weight clip 1 3 HOMEDEPOT.COM Please contact 1-855-HD-GLACIER for further assistance.
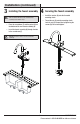
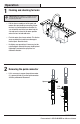
Installation 1 Preparing for installation 2 Installing the faucet assembly CAUTION: Always turn off the water supply before removing an existing faucet or replacing any part of a faucet. Open the faucet handle to relieve water pressure and ensure that the water is completely shut off. □ Shut off the water supply. □ Unscrew the nut (C), and remove the washer (B). NOTE: This step is for no escutcheon installation (optional).
Installation (continued) 3 Installing the faucet assembly 4 Securing the faucet assembly NOTE: This step is for escutcheon installation (optional). If the escutcheon will not be used, install the faucet assembly as described in step 2. □ Place the escutcheon (F) and the gasket (G) on the bottom of the new faucet assembly (A). □ Insert the faucet assembly (A) through the hole in the escutcheon (F). □ Install the washer (B) onto the threaded mounting shank.
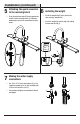
Installation (continued) the quick connector 5 Attaching 6 Installing the weight to the receiving block □ Push the quick connector (E) firmly upward and attach it to the receiving block (1). Pull down moderately to ensure the connection has been made. □ Install the weight clip (I) at the point of the hose marking “weight here”. □ Insert the weight (H) onto the clip (I) by sliding it down onto the clip (I). Weight here 1 H E H I Weight here I the water supply 7 Making connections □ Use 1/2 in.
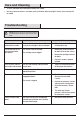
Operation 1 Flushing and checking for leaks IMPORTANT: After installation is completed, turn on the hot and cold water supplies. Check for leaks. Do not lose the gasket (1) in the hose. □ Pull the hose assembly out of the spout and remove the spray head by unscrewing it from the hose in a counterclockwise direction. Be sure to hold the end of the hose down into the sink and turn the faucet to the warm position where it mixes hot and cold water. □ Flush the water lines for one minute.
Care and Cleaning □ To clean, wipe down with a damp cloth and dry with a towel. □ Do not use abrasive cleaners, steel wool, or harsh chemicals when cleaning this faucet, or the warranty will be voided. Troubleshooting NOTE: Refer to the service parts section in this manual for a detailed drawing showing the location of the parts listed below. Problem Possible Cause Solution There are leaks underneath the handle. The bonnet nut has come loose and the o-ring on the cartridge is dirty or damaged.
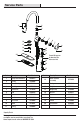
Service Parts 1 2 3 4 5 6 16 7 17 8 18 10 11 19 9 12 20 13 21 Faucet ID tags can be found on the hot water inlet 14 15 Part Description Part Number Part Description Part Number 1 Spray head and Hose RP38277* 2 O-ring RP60006 3 Wearable ring RP70541 4 Cartridge 5 Bonnet nut 6 Cap RP80503* 16 Washer RP64131 7 Screw RP50015 17 Washer RP64146 8 Handle RP13433* 18 Nut RP56077 9 Set screw RP50002 19 Screw RP50004 Escutcheon RP80504* Gasket RP80505
Questions, problems, missing parts? Before returning to the store, call Glacier Bay Customer Service 8 a.m. - 7 p.m., EST, Monday - Friday 9 a.m. - 6 p.m., EST, Saturday 1-855-HD-GLACIER (1-855-434-5224) HOMEDEPOT.COM Retain this manual for future use.
Modelo núm. SKU núm. 67551-0001 724627 67551-0006 715883 67551-0008D2 715955 67551-0027H2 724626 GUÍA DE USO Y MANTENIMIENTO GRIFO RETRÁCTIL PARA COCINA ¿Problemas, preguntas o piezas faltantes? Antes de regresar a la tienda, llama al servicio al cliente de Glacier Bay de lunes a viernes entre 8 a.m. y 7 p.m. y los sábados entre 9 a.m. y 6 p.m.(hora estándar del Este) 1-855-HD-GLACIER (1-855-434-5224) HOMEDEPOT.
Tabla de contenido Información importante .........................12 Garantía...................................................12 Pre-instalación .......................................12 Planificación de la instalación .............12 Herramientas y herrajes necesarios ....12 Contenido del paquete .........................13 Instalación ..............................................14 Funcionamiento ......................................17 Cuidado y limpieza ................................
Pre-instalación (continuación) CONTENIDO DEL PAQUETE A B F C D G H I Pieza E Descripción Cantidad A Ensamblaje del grifo 1 B Arandela 1 C Tuerca 1 D Tornillo 2 E Conector rápido 1 F Placa protectora 1 G Junta 1 H Peso 1 I Sujetador con peso 1 13 HOMEDEPOT.COM Para obtener asistencia, llama al 1-855-HD-GLACIER.
Instalación prepararse para la 1 Cómo instalación instalar el ensamblaje 2 Cómo del grifo PRECAUCIÓN: Cierra siempre el suministro de agua antes de quitar un grifo existente o reemplazar cualquier pieza de un grifo. Abre la llave del grifo para liberar la presión de agua y asegúrate de que el suministro de agua esté completamente cerrado. NOTA: Este paso es para una instalación sin placa protectora (opcional).
Instalación (continuación) instalar el ensamblaje fijar el ensamblaje del 3 Cómo 4 Cómo del grifo grifo NOTA: Este paso es para la instalación de la placa protectora (opcional). Si no usarás la placa protectora, instala el ensamblaje del grifo como se describe en el paso 2. □ Coloca la placa protectora (F) y la junta (G) en la parte inferior del ensamblaje del grifo nuevo (A). □ Coloca el ensamblaje del grifo (A) en el orificio de la placa protectora (F).
Instalación (continuación) montar el conector 5 Cómo rápido al bloque receptor □ 6 Instalar la peso Presiona firmemente el conector rápido (E) hacia arriba y fíjalo en el bloque receptor (1). Hala hacia abajo ligeramente para asegurar que la conexión es segura. □ Instala el sujetador de la peso (I) en la punta de la manguera marcada “weight here” (peso aquí). □ Inserta la peso (H) en el sujetador (I) deslizándola en el sujetador (I).
Funcionamiento 1 Cómo purgar las tuberías y comprobar que no haya fugas IMPORTANTE: Luego de terminar la instalación, abre los suministros de agua caliente y fría. Revisa si hay filtraciones. No aflojes la junta (1) en la manguera. □ Retira del caño el ensamblaje de la manguera y retira el cabezal del rociador desenroscándolo de la manguera en el sentido contrario a las manecillas del reloj.
Cuidado y limpieza □ Para limpiar, usa un paño húmedo y seca con una toalla. □ No uses limpiadores abrasivos, esponjas de alambre o productos químicos fuertes para limpiar esta mezcladora, pues ello anulará la garantía. Solución de problemas NOTA: Consulta la sección de piezas de repuesto de este manual para ver un dibujo detallado que muestra la ubicación de las piezas enumeradas a continuación. Problema Posible causa Hay filtraciones debajo de la manija.
Piezas de repuesto 1 2 3 4 5 16 6 7 17 8 18 10 11 19 12 20 13 21 9 Las etiquetas de identificación de la mezcladora pueden encontrarse en la entrada de agua caliente.
¿Problemas, preguntas o piezas faltantes? Antes de regresar a la tienda, llama al servicio al cliente de Glacier Bay de lunes a viernes entre 8 a.m. y 7 p.m. y los sábados entre 9 a.m. y 6 p.m.(hora estándar del Este) 1-855-HD-GLACIER (1-855-434-5224) HOMEDEPOT.COM Conserva este manual para uso futuro.
Modèle n° 67551-0001 67551-0006 67551-0008D2 67551-0027H2 UGS n° 724627 715883 715955 724626 GUIDE D’INSTALLATION ET D’ENTRETIEN ROBINET DE CUISINE RÉTRACTABLE Questions, problèmes, pièces manquantes? Avant de retourner au magasin, appelez le service à la clientèle Glacier Bay entre 8 h et 19 h, HNE, du lundi au vendredi au entre 9 h et 18 h, HNE, le samedi au 1-855-HD-GLACIER (1-855-434-5224) HOMEDEPOT.
Table des matières Information importante ..........................22 Garantie...................................................22 Pré-installation .......................................22 ................22 Outils et quincaillerie requis ................22 Contenu de l’emballage .......................23 Installation ..............................................24 Utilisation ................................................27 Entretien et nettoyage ............................28 Dépannage ............
Pré-installation (suite) CONTENU DE L'EMBALLAGE A B F C D G H I Pièce A E Description Quantité Robinet 1 B Rondelle 1 C Écrou 1 D Vis 2 E Raccord à branchement rapide 1 F Rosace 1 G Joint d'étanchéité 1 H Poids 1 I Pince lestée 1 23 HOMEDEPOT.COM Veuillez composer le 1-855-HD-GLACIER pour une assistance supplémentaire.
Installation 1 2 Préparation en vue de l'installation ATTENTION : Coupez l’alimentation en eau CAUTION: Always turntoujours off the water supply before avant d’enlever un robinet ou de any remplacer removing an existing faucetexistant or replacing part of a n’importe quelle robinet. Ouvrezwater la poignée du faucet. Open the partie faucetdu handle to relieve pressure robinet pourthat libérer pression de l’eau et vous and ensure the la water is completely shut off.
Installation (suite) 3 4 Installation de l'ensemble de robinetterie REMARQUE : Cette étape est pour l'installation de la rosace (facultatif). Si vous n'utilisez pas la rosace, installez l'ensemble de robinetterie comme décrit dans l'étape 2. □ Placez la rosace (F) et le joint d'étanchéité (G) sur le bas du nouvel ensemble de robinetterie (A). □ Insérez l'ensemble de robinetterie (A) dans les trous de la rosace (F).
Installation (suite) 5 □ Attacher le raccord à branchement rapide au bloc récepteur 6 Installation du poids de lest Poussez fermement le raccord à branchement rapide (E) vers le haut et attachez-le au bloc récepteur (1). Tirez modérément vers le bas pour vous assurer que le branchement est bien fait. □ Installez la pince lestée (I) au point du tuyau flexible avec la marque «weight here (poids ici)». □ Insérez le poids de lest (H) sur la pince (I) en le faisant glisser vers le bas sur la pince (I).
Utilisation 1 Purge et recherche de fuites IMPORTANT : Une fois l'installation terminée, ouvrez l’alimentation en eau chaude et en eau froide. Vérifiez s’il y a des fuites. Ne perdez pas le joint d’étanchéité (1) dans le tuyau flexible. □ Retirez du bec l’assemblage du tuyau, puis retirez du tuyau la tête de pulvérisation en la tournant dans le sens contraire des aiguilles d’une montre.
Entretien et nettoyage □ Pour nettoyer, essuyez avec un linge humide et séchez avec une serviette. □ N'utilisez pas de nettoyants abrasifs, de la laine d’acier ou de produits chimiques abrasifs pour nettoyer ce robinet, sinon la garantie sera annulée. Dépannage REMARQUE : Consultez la section pièces de rechange de ce guide pour une illustration détaillée de l’emplacement des pièces énumérées ci-dessous. Problème Cause possible Il y a des fuites sous la manette.
Pièces de rechange 1 2 3 4 5 6 16 7 17 8 18 10 11 19 9 12 20 13 21 Les étiquettes d’identité du robinet se trouvent sur l’arrivée d’eau chaude 14 15 Pièce Description Numéro de pièce Pièce Description Numéro de pièce 12 Raccord à branchement rapide RP70429 RP60006 13 Joint torique RP60089 RP70541 14 Poids RP70441 Cartouche RP20044 15 Pince lestée RP64204 Écrou de chapeau RP70528 16 Rondelle RP64131 Rondelle RP64146 1 Tête et tuyau de pulvérisation RP38277*
Questions, problèmes, pièces manquantes? Avant de retourner au magasin, appelez le service à la clientèle Glacier Bay entre 8 h et 19 h, HNE, du lundi au vendredi au entre 9 h et 18 h, HNE, le samedi au 1-855-HD-GLACIER (1-855-434-5224) HOMEDEPOT.COM Conservez ce manuel pour référence future.
SKU# Model# 67551-0001 1001803255 883872 67551-0006 883432 67551-0008D2 INSTALLATION AND CARE GUIDE PULL-DOWN KITCHEN FAUCET Questions, problems, missing parts? Before returning to the store, call Glacier Bay Customer Service 8 a.m. - 7 p.m., EST, Monday - Friday 9 a.m. - 6 p.m., EST, Saturday 1-855-HD-GLACIER (1-855-434-5224) HOMEDEPOT.COM/GLACIERBAY THANK YOU We appreciate the trust and confidence you have placed in Glacier Bay through the purchase of this kitchen faucet.
Table of Contents Important Information ..............................2 Warranty ...................................................2 Pre-Installation .........................................2 Planning Installation ..............................2 Tools and Hardware Required ...............2 Package Contents ..................................3 Installation ................................................4 Operation...................................................7 Care and Cleaning ......................
Pre-Installation (continued) PACKAGE CONTENTS A B F C D G H I Part A E Description Quantity Faucet assembly 1 B Washer 1 C Nut 1 D Screw 2 E Quick connector 1 F Escutcheon 1 G Gasket 1 H Weight 1 I Weight clip 1 3 HOMEDEPOT.COM/GLACIERBAY Please contact 1-855-HD-GLACIER for further assistance.
Installation 1 Preparing for installation 2 Installing the faucet assembly CAUTION: Always turn off the water supply before removing an existing faucet or replacing any part of a faucet. Open the faucet handle to relieve water pressure and ensure that the water is completely shut off. □ Shut off the water supply. □ Unscrew the nut (C), and remove the washer (B). NOTE: This step is for no escutcheon installation (optional).
Installation (continued) 3 Installing the faucet assembly 4 Securing the faucet assembly NOTE: This step is for escutcheon installation (optional). If the escutcheon will not be used, install the faucet assembly as described in step 2. □ Place the escutcheon (F) and the gasket (G) on the bottom of the new faucet assembly (A). □ Insert the faucet assembly (A) through the hole in the escutcheon (F). □ Install the washer (B) onto the threaded mounting shank.
Installation (continued) the quick connector 5 Attaching 6 Installing the weight to the receiving block □ Push the quick connector (E) firmly upward and attach it to the receiving block (1). Pull down moderately to ensure the connection has been made. □ Install the weight clip (I) at the point of the hose marking “weight here”. □ Insert the weight (H) onto the clip (I) by sliding it down onto the clip (I). Weight here 1 H E H I Weight here I the water supply 7 Making connections □ Use 1/2 in.
Operation 1 Flushing and checking for leaks IMPORTANT: After installation is completed, turn on the hot and cold water supplies. Check for leaks. Do not lose the gasket (1) in the hose. □ Pull the hose assembly out of the spout and remove the spray head by unscrewing it from the hose in a counterclockwise direction. Be sure to hold the end of the hose down into the sink and turn the faucet to the warm position where it mixes hot and cold water. □ Flush the water lines for one minute.
Care and Cleaning □ To clean, wipe down with a damp cloth and dry with a towel. □ Do not use abrasive cleaners, steel wool, or harsh chemicals when cleaning this faucet, or the warranty will be voided. Troubleshooting NOTE: Refer to the service parts section in this manual for a detailed drawing showing the location of the parts listed below. Problem Possible Cause Solution There are leaks underneath the handle. The bonnet nut has come loose and the o-ring on the cartridge is dirty or damaged.
Service Parts 1 2 3 4 5 6 16 7 17 8 18 10 11 19 9 12 20 13 21 Faucet ID tags can be found on the hot water inlet 14 15 Part Description Part Number Part Description Part Number 1 Spray head and Hose RP38277* 2 O-ring RP60006 3 Wearable ring RP70541 4 Cartridge 5 Bonnet nut 6 Cap RP80503* 16 Washer RP64131 7 Screw RP50015 17 Washer RP64146 8 Handle RP13433* 18 Nut RP56077 9 Set screw RP50002 19 Screw RP50004 Escutcheon RP80504* Gasket RP80505
Questions, problems, missing parts? Before returning to the store, call Glacier Bay Customer Service 8 a.m. - 7 p.m., EST, Monday - Friday 9 a.m. - 6 p.m., EST, Saturday 1-855-HD-GLACIER (1-855-434-5224) HOMEDEPOT.COM/GLACIERBAY Retain this manual for future use.
Modelo núm. SKU núm. 67551-0001 1001803255 67551-0006 883872 67551-0008D2 883432 GUÍA DE USO Y MANTENIMIENTO GRIFO RETRÁCTIL PARA COCINA ¿Problemas, preguntas o piezas faltantes? Antes de regresar a la tienda, llama al servicio al cliente de Glacier Bay de lunes a viernes entre 8 a.m. y 7 p.m. y los sábados entre 9 a.m. y 6 p.m.(hora estándar del Este) 1-855-HD-GLACIER (1-855-434-5224) HOMEDEPOT.
Tabla de contenido Información importante .........................12 Garantía...................................................12 Pre-instalación .......................................12 Planificación de la instalación .............12 Herramientas y herrajes necesarios ....12 Contenido del paquete .........................13 Instalación ..............................................14 Funcionamiento ......................................17 Cuidado y limpieza ................................
Pre-instalación (continuación) CONTENIDO DEL PAQUETE A B F C D G H I Pieza E Descripción Cantidad A Ensamblaje del grifo 1 B Arandela 1 C Tuerca 1 D Tornillo 2 E Conector rápido 1 F Placa protectora 1 G Junta 1 H Peso 1 I Sujetador con peso 1 13 HOMEDEPOT.COM/GLACIERBAY Para obtener asistencia, llama al 1-855-HD-GLACIER.
Instalación prepararse para la 1 Cómo instalación instalar el ensamblaje 2 Cómo del grifo PRECAUCIÓN: Cierra siempre el suministro de agua antes de quitar un grifo existente o reemplazar cualquier pieza de un grifo. Abre la llave del grifo para liberar la presión de agua y asegúrate de que el suministro de agua esté completamente cerrado. NOTA: Este paso es para una instalación sin placa protectora (opcional).
Instalación (continuación) instalar el ensamblaje fijar el ensamblaje del 3 Cómo 4 Cómo del grifo grifo NOTA: Este paso es para la instalación de la placa protectora (opcional). Si no usarás la placa protectora, instala el ensamblaje del grifo como se describe en el paso 2. □ Coloca la placa protectora (F) y la junta (G) en la parte inferior del ensamblaje del grifo nuevo (A). □ Coloca el ensamblaje del grifo (A) en el orificio de la placa protectora (F).
Instalación (continuación) montar el conector 5 Cómo rápido al bloque receptor □ 6 Instalar la peso Presiona firmemente el conector rápido (E) hacia arriba y fíjalo en el bloque receptor (1). Hala hacia abajo ligeramente para asegurar que la conexión es segura. □ Instala el sujetador de la peso (I) en la punta de la manguera marcada “weight here” (peso aquí). □ Inserta la peso (H) en el sujetador (I) deslizándola en el sujetador (I).
Funcionamiento 1 Cómo purgar las tuberías y comprobar que no haya fugas IMPORTANTE: Luego de terminar la instalación, abre los suministros de agua caliente y fría. Revisa si hay filtraciones. No aflojes la junta (1) en la manguera. □ Retira del caño el ensamblaje de la manguera y retira el cabezal del rociador desenroscándolo de la manguera en el sentido contrario a las manecillas del reloj.
Cuidado y limpieza □ Para limpiar, usa un paño húmedo y seca con una toalla. □ No uses limpiadores abrasivos, esponjas de alambre o productos químicos fuertes para limpiar esta mezcladora, pues ello anulará la garantía. Solución de problemas NOTA: Consulta la sección de piezas de repuesto de este manual para ver un dibujo detallado que muestra la ubicación de las piezas enumeradas a continuación. Problema Posible causa Hay filtraciones debajo de la manija.
Piezas de repuesto 1 2 3 4 5 16 6 7 17 8 18 10 11 19 12 20 13 21 9 Las etiquetas de identificación de la mezcladora pueden encontrarse en la entrada de agua caliente.
¿Problemas, preguntas o piezas faltantes? Antes de regresar a la tienda, llama al servicio al cliente de Glacier Bay de lunes a viernes entre 8 a.m. y 7 p.m. y los sábados entre 9 a.m. y 6 p.m.(hora estándar del Este) 1-855-HD-GLACIER (1-855-434-5224) HOMEDEPOT.COM/GLACIERBAY Conserva este manual para uso futuro.