
Installation Guide


6
Installation (continued)
K
A
A
M
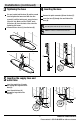
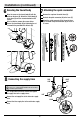
Attaching the quick connectorSecuring the faucet body
Remove the cap from the outlet hose (H).
Reattach the quick connector (G) to the hose (E).
Attach the quick connector (G) to the outlet hose
(H). Pull down the quick connector (G) to ensure it
is secure.
Align the arrow on the faucet body (A) with the
arrow on the base (K). Attach the faucet body (A)
to the base (K) and turn counterclockwise until
it locks.
After installation, remove the arrow sticker.
Secure the faucet body (A) by tightening the set
screw with the provided allen wrench (M).
76
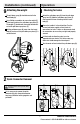
Connecting the supply lines
Use an adjustable wrench to connect and tighten
the supply lines to the supply valves.
Connect the red supply line to the hot water supply
valve.
Connect the blue supply line to the cold water supply
valve.
8
CAUTION: Ensure the supply lines do not kink, twist or bend
into a “V” or “L” shape during installation. Do not use if there
are visible signs of damage.
H
H
G
G
E
F
RED
LINE
HOT
COLD
BLUE
LINE
1
1
2