
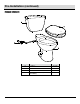
Instructions / Assembly


6
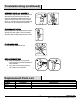
Installation (continued)
3
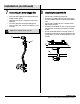
Installing the wax ring
4
Installing the toilet
□ Turn the toilet bowl (B) upside down onto a towel or
cushioned surface. With the rounded (tapered) end of th
e
wax ring (CC) facing the toilet, place the wax ring (CC)
around the raised outlet ring of the bowl (B), and press
firmly enough so the wax ring (CC) adheres to the bowl (B).
□ Place the toilet bowl (B) over the toilet flange (1) in
alignment with the floor bolts (AA) so they protrude through
the slots on the base of the toilet bowl (B). Press down on
the toilet bowl (B).
5
Securing the toilet
6
Installing the tank
□ From the backside of the toilet (B), place the plastic discs
(DD) over the floor bolts (AA), noting ‘this side up’ on the
top of the discs.
□ Tighten the floor bolt wing nuts (EE) onto the floor bolts
(AA) to secure the position of the plastic discs (DD).
□ Place the bolt cap covers (FF) over the floor bolts (AA) and
snap into place.
□ Attach the rubber sealing gasket (KK) to the center drain
hole under the tank (A).
□ Gently place the tank (A) on the toilet bowl (B) with bolts (II)
protruding out underneath.
□ Place an oval metal washer (LL) followed by a wing nut
(MM) onto each protruding bolt (II).
□ Tighten the wing nuts (MM) enough so that the tank (A) sits
level and secure on the toilet bowl (B). Make sure the tank
(A) is parallel to the wall and straight on the toilet bowl (B).
CAUTION: Do not overtighten the nuts. Severe damage
may occur.