
Instructions / Assembly


9 HOMEDEPOT.COM
Please contact 1-855-434-5224 for further assistance.
Troubleshooting (continued)
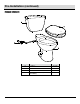
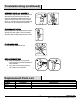
REMOVING VALVE CAP ASSEMBLY
Turn off water supply and flush out tank. Push float up
with right hand (see picture). Grip and hold shaft
under float with right hand. With left hand, twist cap
and lever counter clockwise 1/8
th
of a turn to unlock
the top cap. Pressing down on top may be helpful with
older valves. Let cap assembly hand out float cup.
FLUSHING OUT DEBRIS
Hold cup upside down over uncapped valve to prevent
splashing. Turn water supply on and off a few times.
Turn water supply off when putting cap back on valve.
IF REPLACING SEAL
Use only a genuine Fluidmaster 242 seal.
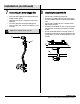
REPLACING VALVE CAP
A. Place cap assembly on top of grey valve
body by aligning cap arm and adjustment rod
next to refill tube.
B. Press down on top cap while rotating top
arm clockwise to locked position.
Replacement Parts List
Part Name
Model Number
Home Depot SKU
Fill Valve
□ 400ARHR
□ #717773, #1001281180
Flapper
□ 5401GB
□ #1000047464
3” Flush Valve
□ 540AKR
□ #723956
242
SEAL
SEAL
LOCA TION
A
B