
Installation Sheet

9
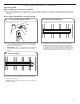
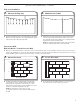
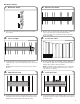
■ Panels are installed with the interlock tongue up and the
groove down.
■ Cut the rst panel to this length, making sure the cut is
square. Be sure to also cut around any windows, doors, and
outlets.
NOTE: Panels shorter than 24” (60.96 cm) long should not
be used.
■ Holding the panel up in the desired location, drive a screw
through the top slot groove and into the stud nearest to the
middle of the channel until it is ush with the surface.
■ Measure from the starting edge of the desired coverage area
to the center of the last wooden stud that is within
4 ft (1.22 m). Take note of interference with any windows,
doors, and outlets.
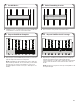
■ Place the panel above the horizontal chalk line applied in
the “Prepare the Wall” section. Align the panel with both the
starting edge and the horizontal chalk line.
NOTE: If installing an optional trim kit, be sure to apply the
trim at this time if mounting against an interior corner (see
“Trim Options” for details).
■ Check that the panel is level, and then drive a second screw
through the bottom slot groove and into the same stud as in
the previous step.
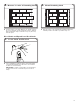
BUBBLE LEVEL
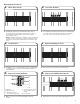
1. Orient the Panel
3. Cut to Length
5. Drive First Screw
2. Measure the Panel
4. Locate the Panel
6. Level the Panel
Mount the Panels