
Installation & Assembly
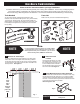

Glass Door Track Installation
5. Attach and Secure Rollers to the Brackets
Insert one of the rollers into the top of the bracket. Screw into
place, making sure that the piece on the roller sloping down is
facing to the outside of the door. Turn the metal nut into place
and tighten with the 13mm wrench provided. Repeat with the
other bracket.
See Figure #4.
Fig. 4
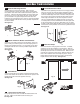
6. Install Handle
Unscrew the handle into two pieces and place the thicker piece
on the under side of the handle hole. Place the thin piece on the
topside of the hole and screw together until snug.
See Figure #5.
Fig. 5
7. 7. Place door into the Track
Using 2 people, lift the door and slide the attached rollers into
the track. Make sure the black screws are facing out.
See Figure #6.
8. Secure Bottom Door Glide
The Bottom Door glide keeps the door from swinging outward
away from the wall. To locate the proper installation position
in the oor, slide the door into the desired closed position and
mark the outside edge of the door on the oor. Now place the
door into the open position and slide the Door glide onto the
inside edge of the bottom of the door and place it onto the
spot you marked. Make sure whether the door is in the open
or closed position, the door NEVER leaves the Door glide. This
is the proper location for the Door glide. Make sure your glide
location is well marked. Slide the door out of the way and using
a drill and the screw provided, secure the Door glide to the oor.
See Figure #7.
9. Insert Door Stops
Make sure the door is hanging level on the track. If needed,
adjust the nuts on the brackets for a level position. With the
door level and in the fully closed position, take one of the white
doorstops and insert into one end of the track. Make sure the
end with the V goes into the track rst. Slide the stop into the
track until it meets the roller and snaps into place. Using a
Phillips head screwdriver, tighten the screw in the doorstop.
Repeat with the other doorstop. See Figure #8.
Fig. 7
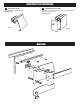
4. Install the Mounting Brackets
Place the door on sturdy work surface. Take one of the
mounting brackets, remove the 4 black screws and separate
the bracket. Each side of the bracket should have a plate with
a hole in it. Place the side of the bracket with groove and silver
tube facing up on the under side of the glass. Insert the silver
pin into the hole in the glass and place the other half of the
bracket on top of the glass so they match up. Reinsert the black
screws and tighten with the Allen wrench provided. Repeat with
the other bracket.
See Figure #3.
Fig. 3
Fig. 8