
Assembly Instructions

2
LED BACK LIT PANEL, 0-10V DIMMABLE
Assembly Instructions
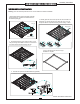
PREPARE PANEL FOR INSTALLATION
1. Remove the Screw (A) from the back Cover (B)
of the junction box. Lift the cover off and remove
the Accessory Bag (C).
NOTE: Save these Instructions.
Cover (B)
Accessory Bag (C)
Screw (A)
3. Connect AC input wire and dimmable wire (optional):
Metal Conduit
4. Carefully place the wires into the junction box and re-install cover
plate back on to housing and secure in place with screw. Turn the
suspension tabs 90° to position and hang over the ceiling "T" Bars.
5. Turn on electrical power and turn on light.
Installation is complete.
Warning: Turn off electrical power at fuse or curcuit breaker box before installation.
DIM+ (Purple)
AC Input Wire:
L (Black)
N (White)
GND (Yellow/Green)
DIM- (Gray)
Optional Dim:
2. Lift LED Panel Light up to the ceiling location. Locate
and poke through the suitable hole on the cover and feed
the metal conduit connections through the hole.
Metal Conduit
Poke Through