Ascom Ascom Wireless Solutions ® 9p23 portable handset User guide MkI software release R4B, MkII software release R2D
Contents Battery Information . . . . . . . . . . . . . . . . . . . . . . . . . . . . . . . . . . . . . . . . . . . . . . . . . . . . . . . . . . . . . . . . . . . . . . . . 6 Getting Started . . . . . . . . . . . . . . . . . . . . . . . . . . . . . . . . . . . . . . . . . . . . . . . . . . . . . . . . . . . . . . . . . . . . . . . . . . .
About The 9p23 Portable Handset User Guide The Ascom 9p23 portable handset user guide is organized according to the sections listed below: Important safety information. Safety considerations for using electronic products. Guidelines for safe and efficient use. Recommendations for best performance for 9p23 portable handset. Battery information. Useful information about the 9p23 portable handset rechargeable batteries. Getting started. How to prepare your 9p23 portable handset for use.
Guidelines For Safety And Efficiency Please observe all necessary safety precautions when using the 9p23 portable handset. Save this manual. It includes important safety information and operating instructions. Save all instructions for future reference. Before using the 9p23 portable handset, please follow the operating instructions and adhere to all warnings and safety precautions located on the product and in the user guide. Do not expose the handset to extreme temperatures.
Guidelines For Safety And Efficiency Exposure to radio frequency signals This portable handset is designed and manufactured not to exceed the emission limit for exposure to radio frequency (RF) energy set by the Federal Communications Commission (FCC) of the U.S. Government and Canada. These limits are part of comprehensive guidelines and established permitted levels of RF energy for the general population. These guidelines are based on the safety standards previously set by both U.S.
Guidelines For Safety And Efficiency Battery Information Operation procedures In the U.S., telephones are subject to the rules and regulations of the FCC. Following these rules will help to eliminate confusion, ensure the most efficient use of the existing frequencies, and result in a smoothly functioning radio network. The following offenses are punishable by fine, imprisonment, or both: • Use of profane, indecent, or obscene language. • Transmission of a false distress signal or call.
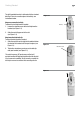
Getting Started Battery installation 1. Attach the battery to the back of the handset by sliding the tabs on the battery into the appropriate slots on the handset, then press down firmly (see Figure 1.1). Figure 1.1 Side view of 9p23 portable handset 2. While holding the battery firmly against the handset, push the battery lock tabs located on the bottom of the handset outward to the “locked position” (see Figure 1.2) to secure the battery. 3.
Getting Started The 9p23 portable handset is delivered with the standard belt clip. If there is a need to replace the belt clip, see instructions below. Figure 2.1 Step one: remove the belt clip To detach the belt clip from the handset: 1. Loosen the retention screw of the belt clip from the handset (see Figure 2.2). Belt clip 2. Slide the metal clip upward in the slot (see Figure 2.3). Step two: attach the belt clip To attach the belt clip to the handset: 1.
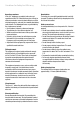
The Ascom 9p23 Portable Handset Figure 3.
Display Indicators 10 Indicator light functions The color and state of the indicator light is located on the upper left side of the front of the 9p23 portable handset. System Indicator icon. Static icon indicates handset locked to a system; blinking icon occurs when not locked. Handset will only lock to systems for which it has been programmed. Slow flashing red Low Battery, No System, or No Access. See “Problems You Can Solve”, page 42. Off Hook icon.
Key Functions 11 Figure 4.1 Off Hook key This blue key performs positive functions, including powering on the 9p23 portable handset. It also takes the handset off hook when pressed, providing a dial tone. • Press and hold to power the handset on. • Enter a telephone number and press to make a call. • Press to hear a dial tone before dialing. • Press to answer a call. On Hook key The gray On Hook key performs negative functions, including powering off the 9p23 portable handset.
Basic Operation Figure 5.1 Power on Press and hold the blue Off Hook key. An audible tone is heard, and ascom appears on the display. Once the handset is powered on, the Standby mode display is visible (see Figure 5.1). The System Indicator icon will be steady when the handset is locked to the system. Power off Press and hold the gray On Hook key until a tone is sounded. Once the handset is powered off, the main Standby mode display is no longer visible.
Basic Operation Voice Mail options When the 9p23 portable handset is programmed to access a Voice Mail system the option “Connect to Voice Mail” is presented (see page 30 for more information). Use the Left Soft key to select Menu press the Left Soft key to select Messages. Use the up and down arrows of the Scroll key to browse to Voice Mail, then use the Left Soft key to select this option. “Connect to Voice Mail” will appear in the display.
Basic Operation Option 4 Use the Left Soft key to choose Menu, then use the down arrow of the Scroll key to Scroll to the Phone Book menu. Use the Left Soft key to select the Phone Book menu, then use the Left Soft key to select the Search option from the menu options listed. Enter the first character of the name, with a space character separating the first and last name, then use the Left Soft key to choose Confirm. This will display the first name on the stored list beginning with that character.
Basic Operation 15 Function Action Power the 9p23 portable handset on Press and hold Power the 9p23 portable handset off Press and hold Place a call Press , dial number, or dial number, then press Answer a call Press , or use the Left Soft key to choose Accept End a call Press Temporarily mute the ringer Press Left Soft key to select Menu, press To restore ringer sound Press Left Soft key to select Menu, press Enter main menu mode Press Left Soft key to select Menu or the down arrow of
Enhanced Digital Integration Standby mode While in Standby mode, the MLA icon indicates which handset line will be active the next time the handset is used to place a call (see Figure 7.1). 16 Figure 7.1 MLA Icon indicates line 1 is active. Select Line To select another line, use the Left Soft key to choose Menu. Use the Scroll key to navigate to the Settings menu, then press the Left Soft key to select. Figure 7.
Mobility Server Standby Mode When the 9p23 portable handset is in Standby mode, the MLA icon indicates which handset line will be active the next time the handset is used to place a call (see Figure 7.1). Select Line To select another line, use the Left Soft key to choose Menu. Use the up and down arrows of the Scroll key to Scroll to the Settings menu and use the Left Soft key to select this menu.
In Call Menu Operation 18 Depending on the system configuration, either Standard or Enhanced Digital, control of the In Call menu features may vary. Based on the current handset system, some In Call Menu Options may not be available. If the system configuration is for Mobility Server, please refer to page 19. Callback Allows the 9p23 handset to notify users when an unavailable (busy) dialed number is available. PBX functions allows users to access features provided by the PBX (phone switch).
In Call Menu Operation Mobility Server configuration Mobility Server configuration is applicable when there is a PRI interface to the PBX. The Mobility Server (MS) In Call menu allows users access to features during a call the same way as with the standard system configuration. Since MS configuration may support multiple lines and allows for each line to be placed on hold, a blinking line appearance on the top left of the display indicates which line is on hold.
In Call Menu Operation Menu Options Conference Depending on system configuration, a conference call can be invoked in two ways. Depending on configuration, some of the following features may not be available. Check with your system administrator to determine if your 9p23 portable handset is enabled for Limited or Full Menu support. Option 1. Pre-conference Used with the EDI interface to Meridian and Avaya PBXs, and with all analog and T1 CAS PBX interfaces. 1.
Menu Options Use the steps described previously to view and change handset settings in all menus. To exit any menu or submenu without changing settings use the Right Soft key to choose Back, Cancel or Save. To change a handset setting within a menu or submenu, use the Left Soft key to Confirm or Save. “Data Saved” may appear briefly in the display to indicate that handset settings were successfully changed. If no action is taken within 30 sec., the handset returns to Standby mode.
Menu Overview 22 Full Menu ICS Msg Templates Add Edit Delete Def. Alternates2 Set Primary Set Secondary Messages Inbox Voice Mail Send New Msg2 Delete All Options Voice Mail No. SMS Reminder Off 30 sec 1 min 2 min 5 min SMS Autodelete Invert Text Call Info Missed Calls Received No. Dialed No.
Menu Descriptions Some of the following features may not be available if the 9p23 portable handset is configured for Limited Menu. Check with the system administrator to learn whether the handset is configured for Limited or Full Menu support. For details on Limited Menu Options see the Limited Menu section of this guide.
Menu Descriptions Once a message has been read the status indicator will change from ‘N’ representing a new message to ‘R’ (see Figure 10.2) indicating that the message has been read. In the instance where a number identified within the message was called, the status indicator would change to ‘C’ indicating the entry was called. See the Short Message Service section of this guide for more information about message status indicators. Figure 10.2 Voice Mail Allows access to a predefined Voice Mail number.
Menu Descriptions Call Info Missed calls View a list of Missed calls. The Missed calls icon will appear in the display. The Missed calls display shows an index number identifying the entry (up to 20 entries), the time or date the call was received, and the telephone number of the caller. Received No. View the last 20 telephone numbers of calls received and answered.
Menu Descriptions 26 Delete All Deletes all user-defined entries from the Local Phone Book. Select Delete All from the Phone Book menu, then press the Left Soft key to confirm. Central Phone Book entries are only available when configured by the system administrator. Entries cannot be edited or deleted and are indicated by the Locked icon below the name. Memory Monitor This percentage represents memory used for personal Phone Book entries. Figure 11.
Menu Descriptions Customize From the Sound Setup menu select Sound Profiles, then use the Scroll key to browse to Customize. Use the Left Soft key to select Option. Under Normal Profile or Discreet Profile, use the Left Soft key to select the following options: Ring Volume Adjusts ring volume by using the up and down arrows of the Scroll key. The display will indicate volume level by the length of the horizontal bar.
Menu Descriptions Time and Date Time Mode Configures the time format. Use the Scroll key to browse the time formats, then the Left Soft key to confirm. Date Mode Configures date format. Use the Scroll key to browse the date formats, then the Left Soft key to confirm. Keylock Options Opens a submenu for the following options: Auto Keylock Locks the keypad if the handset is idle for one minute. Set Password Sets a 4 digit password required to unlock the handset.
Menu Descriptions Prio. Interrupt. Overrides muted ringer for an incoming priority one or two message. Prio. Interrupt has the following sub menus: 29 Figure 13.1 Priority 1. Sets the priority interrupt for incoming priority one messages. Select ON or OFF by using the Scroll key and press Confirm to accept. Priority 2. Sets the priority interrupt for incoming priority two messages. Choose ON or OFF by using the Scroll key and press Confirm to accept. Alternates Determines the visibility of Def.
Menu Descriptions Limited Menu description Figure 13.3 Consult with your system administrator to determine Limited Menu or Full Menu configuration. 30 The Limited Menu configuration provides users with Limited Menu items as defined by the site administrator. Default items are Messages, Call Info and Phone Book. Use the Left Soft key to choose Menu, then the Scroll key to browse menu options and the Left Soft key to select. Figure 13.4 Figure 14.1 Figure 13.
Short Message Service Consult with your system administrator to determine support for short text messages. Managing text messages Upon receipt of a text message, use the Left Soft key to select Options or use the Right Soft key to close the message. If no action is taken, messages are stored and the text message icon appears. If the SMS reminder option is activated, an audible message notification tone will sound periodically until the message is opened.
Advanced Nurse Call System Integration 32 Advanced Nurse Call System Integration (ANCSI) Some of the following features may not be available, depending on how the 9p23 portable handset is configured. Check with your system administrator for additional information. Priority ringing when Off Hook The message delivery notification while a user is off hook mimics the ring patterns listed above using audible tones in the speech path.
Advanced Nurse Call System Integration Retrieve a stored nurse call message When unread nurse call messages are available, the Text Message icon will appear. From Standby mode, use the Left Soft key to select Menu. In the Messages menu, use the up and down arrows of the Scroll key to Scroll to Inbox, then use the Left Soft key to Select this option. Use the up and down arrows of the Scroll key to preview the list of stored messages. Use the Left Soft key to select Open to view the entire message.
Custom Ring Tones 34 Default melodies Internal Call: Fur Elise . . . . . . . . . . . . . . . . . . . . . . . . . . . . . . . . . . . . . . . . . . . . . . . . . . 2e2D2e2D2e2D2e2b2d2c3a7 External Call: Tchaikovsky piano concerto . . . . . . . . . . . . . . . . . . . . . . . . . . . . . . . . . . . . 2G2f2D4C5f2D5F2f2c2C4A7 Call Back: House rhythm . . . . . . . . . . . . . . . . . . . . . . . . . . . . . . . . . . . . . . . . . . . . . . . . . . e3-1a1e1a1e3-1a1e1-2g2 Messages: door bell . . . . . . . .
Problems You Can Solve Problems and possible solutions The handset does not turn on Recharge or replace the battery, then remove and reinsert the battery. The handset doesn’t ring for incoming calls Check the Sound Setup menu to ensure the handset is not set for discreet profile. Check the ring volume to ensure it has not been set for the lowest setting. The handset becomes warm during calls It is normal for the handset to feel slightly warm during extended calls. 35 Figure 16.
© 2005 Ascom Corporation Ascom Wireless Solutions Inc. 598 Airport Blvd, Suite 300 Morrisville, NC 27560, USA ascomwireless.com Produced in the United States of America 09-05 All Rights Reserved The Ascom logo is a trademark of Ascom Corporation in the United States, other countries or both. Other company, product and service names may be trademarks or service marks of others.