
- Ascom Phone User's Guide


7
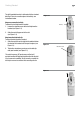
Figure 1.1
Side view of 9p23 portable handset
Figure 1.2
Bottom view
Battery lock tabs
Unlocked position
Locked position
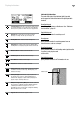
Figure 1.3
Desktop charger
Figure 1.4
Getting Started
Battery installation
1. Attach the battery to the back of the handset by
sliding the tabs on the battery into the appropriate
slots on the handset, then press down firmly (see
Figure 1.1).
2. While holding the battery firmly against the handset,
push the battery lock tabs located on the bottom of
the handset outward to the “locked position” (see
Figure 1.2) to secure the battery.
3. To remove the battery, while holding the battery
firmly against the handset, push the battery lock
tabs inward, to the “unlocked” position and pull the
battery off the handset.
Charge the battery
The desktop charger will charge the battery while it
is attached to the handset as well as charge a single
battery pack by standing the battery pack in the
compartment of the desktop charger. The battery should
be fully charged before using the 9p23 portable handset.
Charge the battery when attached to the handset
1. Connect the AC adapter to the desktop charger (see
Figure 1.3).
2. Plug the AC adapter into a wall outlet.
3. Place the handset into the desktop charger (see
Figure 1.4). The red indicator light located on the
bottom right corner of the desktop charger indicates
charging is in progress when the handset is properly
seated on the desktop charger.
4. A green indicator light on the desktop charger
indicates the 9p23 portable handset is fully charged
when the handset is properly seated on the desktop
charger.
The available rack charger is similar to the desktop
charger. For more information, please refer to the Ascom
RC23 Charging Rack Installation Guide.