® powered by GP-FLEX-30 Solar Flex TM Owner’s Manual
GP-FLEX-30 Table of Contents 1.0 General Information 2 1.1 How Does a Go Power! Solar Charging Kit Work? 3 1.2 Warnings 3 1.3 Required Tools 3 1.4 Parts Checklist 4 1.5 Module Specifications 4 2.0 Wiring the Solar Module and Power Cable 5 2.1 Installling your 30 watt Solar FlexTM Kit (GP-FLEX-30) 5 3.0 Routing Power Cable through the Fridge Vent 5 3.1 Method 1 – Hole in Side of Vent 5 3.2 Method 2 – Through Screen Grid 5 4.0 Mounting the Solar Module 6 5.
GP-FLEX-30 1.1 How Does a Go Power! Solar Charging Kit Work? The solar module converts the sun’s energy into DC electricity and this electricity charges the battery. The battery stores the electricity, similar to a water tank storing water. The battery power may be used at any time to operate devices connected to the battery. To stop the battery from being overcharged by the solar module, a solar controller is connected in between the solar module and the battery.
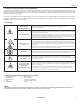
GP-FLEX-30 1.4 Parts Checklist GP-FLEX-30 PART 2 01. Ring Terminal Battery Connector 1 02. 50’ MC4 Cable with Male and Female MC4 Connectors 6 03. Tie Wrap 6 04. #10 x 1” Wood Screws 6 05. #10 x 1.5” Machine Screws 6 06. #10 Well Nuts 07. #10 Lock Washers 6 08. #10 Flat Washers 6 09. 3/8” Plastic Cable Clamps 6 10. #8 Screws for Cable Clamps 6 11. Fuse Holder Inline with 10A Fuse 1 12. Solar Flex Module 1 13.
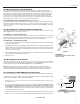
GP-FLEX-30 2.0 Wiring Modules with MC4 Cables Solar Kits with MC4 cables contain a potted or sealed junction box with a positive and negative MC4 connector. This is referred to as an MC4 junction box. MC4 connectors are either positive or negative and each connector has its polarity symbol embossed close to the connection point. To extend a cable from an MC4 junction box, a polarity opposite connector must be used. E.G. a negative connector must plug into a positive connector in order to extend it.
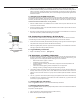
GP-FLEX-30 battery terminal. See Figure 2: “12 Volt Battery Connected to Solar Controller with Inline Fuse”. 4. Wire the controller according to the terminal identification on the back of controller, starting with the battery connections. Tighten the positive and negative battery connections and then set the battery type (see controller manual for instruction). Then, connect and tighten the positive and negative solar module connections. 5.
GP-FLEX-30 7.3 Additional Information Unless approved by Go Power! management, all product shipped collect to Go Power! will be refused. Test items or items that are not under warranty, or units that are not defective, will be charged a minimum bench charge of ($50.00 US) plus taxes and shipping. A 15% restocking charge will be applied on goods returned and accepted as “new” stock. 7.
GP-FLEX-30 ® powered by © 2013 Go Power! By Carmanah Technologies GP_MAN_Solar Flex_GP-30 8 gpelectric.