
Installation Guide

IMPORTANT:
• ALLINSTALLATIONWORKSHOULDBEDONEBYACCREDITEDPROFESSIONAL.
• SHUTOFFPOWERSUPPLYATFUSEORCIRCUITBREAKER!
• USEONLYTHESPECIFIEDBULBS.DONOTEXCEEDTHEMAXIMUMWATTAGE!
PREPARING FOR INSTALLATION
Removeallofthecontentsfromthecarton.Seetheimportantnotesabove.Shutoffthepoweratthecircuitbreakerandcompletely
removetheoldxturefromthewall,includingtheoldmountingstrap.
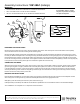
Mountingstrap(B)containsseveralpairsofthreadedholes.Findthepairofholesthatmatchesthespacingoftheholesonthejunction
boxandyourxture’sbackplate.Twoofmountingscrews(A)shouldbeattachedtomountingstrap(B).Youmayneedtotightenthenuts
thatholdthesescrewsinplace.Pullthehousewiresthroughthecenterofmountingstrap(B).Placemountingstrap(B)overthejunction
boxsothatmountingscrews(A)arehorizontal,andinalignmentwiththeholelocationsonxturebackplate(F).Securemountingstrap(B)
tothejunctionboxwithmountingscrews(D)andascrewdriver.Tightenthescrewssecurely.
CONNECTING THE WIRES
Attachthexture’swirestothepowersupplywiresfromthejunctionbox.Connectblacktoblack(orsmooth);whitetowhite(orribbed);
groundtoground(greenorcopper).Twisttheendsofthewirepairstogether,thentwistonawireconnector.Makesurealltwistsare
inthesamedirection.Ifthereisnogroundwire(greenorcopper)fromthejunctionbox,locategroundscrew(E)onmountingstrap(B)
andwrapthexture’sgroundwirearoundthegreengroundscrew(E).Useascrewdrivertosecuregroundscrew(E)ontothemounting
bracket.Tuckallwiresneatlyintothejunctionbox.
FINISHING THE INSTALLATION
Placethexture’sbackplate(F)overmountingscrews(A)sothattheyprotrudethroughtheholesinthefrontofthebackplate.Thread
deconuts(G)ontomountingscrews(A).Twistuntilthebackplateofthextureissnugagainstthewall.
Slideglass(I)overthesocket(H)andsecureinplacewithsocketring(J).
Installlightbulb(notincluded)inaccordancewiththexture’sspecications.Donotexceedthemaximumrecommendedwattage.
Yourinstallationisnowcomplete.Turnonthepowerandtestthexture.
BLACK
(Hot)
WHITE
(Neutral)
GREEN
(Ground)
HOUSE WIRES
SMOOTH
(Or Black)
FIXTURE WIRES
RIBBED
(Or White)
BARE COPPER
(Or Green)
For Customer Service, contact
the place of purchase to arrange
for replacement parts.
AssemblyInstructions:1051-BA1 (Hidalgo)
CLEANING TIPS
Treat the xture gently! Regular cleaning will reduce the need for deep cleaning. For regular cleaning, turn off the light and wipe down the
xture with a clean lint-free cotton or microber cloth. Never spray cleaner directly onto the xture.
D
C
A
E
B
I
J
H
G
F