
Installation Sheet

Assembly Instructions: 0821-3P (Medici)
IMPORTANT:
• ALL INSTALLATION WORK SHOULD BE DONE BY ACCREDITED PROFESSIONAL.
• SHUT OFF POWER SUPPLY AT FUSE OR CIRCUIT BREAKER!
• USE ONLY THE SPECIFIED BULBS. DO NOT EXCEED THE MAXIMUM WATTAGE!
PREPARING FOR INSTALLATION
Remove all of the contents from the carton. See the important notes above. Shut off
thepoweratthecircuitbreakerandcompletelyremovetheoldxturefromtheceiling,
includingtheoldmountingstrap.
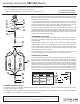
1. Fromthepartsbagremove the mounting strap assembly. One end of nipple (F)
shouldbeattachedto mountingstrap (A)with washer(C) andhex nut(D) inplace.
Theotherendshouldhavecanopyloop(H)attached.Attachmountingstrap(A)tothe
junctionboxusingmountingscrews(B)andascrewdriver.Tightensecurely.
2. Unscrew canopy loop collar (I) from canopy loop (H). Pass canopy (G) over the
mounted canopy loop to test the height. Approximately half of the canopy loop’s
exteriorthreadsshouldbeexposed,andthecanopyloopcollarshouldtsnuglyonto
thecanopyloop.Removecanopy(G)andadjusttheheightofnipple(F)andcanopy
loop(H)untilthedesiredheightisreached.
ASSEMBLING THE FIXTURE
3.Laythextureonitssideandpushthreadedrod(M)intothebottomofxture(P)at
opening(Q).Threadbottomcap(N)andbottomnial(O)ontotheexposedthreadsof
threaded rod (M).
4. By measuring, determine the correct number of chain links needed for proper
hangingheight.Ifnecessary,useapairofplierstoopenandremoveanyexcesschain.
5.Attachchainconnectors(K)toeachendofchain(J)beforeattachingoneendofthe
chain connector/chain to top loop (L). Close the chain connector. Connect the other
chain connector (K) to canopy loop (H).
6.Passthexture’swiresupthroughtoploop(L)andthroughchain(J)(everythree
links or so). Slide canopy loop collar (I) and canopy (G) onto the chain/wire.
CLEANING TIPS
Treat the xture gently! Regular cleaning will reduce the need for deep cleaning. For regular cleaning, turn off the light and wipe down the
xture with a clean lint-free cotton or microber cloth. Never spray cleaner directly onto the xture.
For Customer Service, please
contact the place of purchase.
CONNECTING THE WIRES
7.Haveanassistantsupporttheweightofthexturewhilecompletingthewiring.Cut
awayexcesswire.Threadthexture’swiresthroughcanopyloop(H)andnipple(F).
Attachthexture’swirestothepowersupplywiresfromthejunctionbox.Connectblack
toblack(orsmooth);whitetowhite(orribbed);groundtoground(greenorcopper).
Twisttheendsofthewirepairstogether,andthentwistonawireconnector.Makesure
alltwistsareinthesamedirection.Ifthereisnogroundwire(greenorcopper)coming
fromthejunctionbox,locategroundscrew(E) onmounting strap(A) andwrap the
xture’sgroundwirearoundthegreengroundscrew(E).Useascrewdrivertosecure
groundscrew(E)ontothemountingbracket.Tuckallwiresneatlyintothejunctionbox.
FINISHING THE INSTALLATION
8.Pushcanopy(G)uptotheceilingandslidecanopyloopcollar(I)upbeneaththecanopy.Tightlythreadcanopyloopcollar(I)ontocanopy
loop (H) to secure canopy (G) in place.
9.
Installlightbulbs(notprovided)inaccordancewiththexture’sspecications.Donotexceedthemaximumrecommendedwattage.
Yourinstallationisnowcomplete.Turnonthepowerandtestthexture.
House Wires
Fixture Wires
Hot
How to Identify the Fixture’s Wires
Hot Neutral Ground
Smooth
Ribbed
Bare Metal,
Green, or
Green Inner
Thread
Black
White
Black Inner
Thread
White Inner
Thread
A
C
B
D
E
F
H
I
G
J
K
L
M
N
O
Q
P