
Installation Sheet

Assembly Instructions: 1051-3P (Hidalgo)
IMPORTANT:
• ALL INSTALLATION WORK SHOULD BE DONE BY ACCREDITED PROFESSIONAL.
• SHUT OFF POWER SUPPLY AT FUSE OR CIRCUIT BREAKER!
• USE ONLY THE SPECIFIED BULBS. DO NOT EXCEED THE MAXIMUM WATTAGE!
PREPARING FOR INSTALLATION
Remove all of the contents from the carton. See the important notes above. Shut off the power
atthecircuitbreakerandcompletelyremovetheoldxturefromtheceiling,includingtheold
mounting strap.
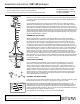
From the parts bag remove the mounting strap assembly. One end of nipple (F) should be
attachedtomountingstrap(A)withwasherandhexnut(C,D)inplace.Theotherendshould
havecanopyloop(H)attached.Attachmountingstrap(A)tothejunctionboxusingmounting
screws (B) and a screwdriver. Tighten securely. Unscrew canopy loop collar (I) from canopy loop
(H).Passcanopy(G)overthemountedcanopylooptotesttheheight.Approximatelyhalfofthe
canopyloop’sexteriorthreadsshouldbeexposed,andthecanopyloopcollarshouldtsnugly
onto the canopy loop. Remove canopy (G) and adjust the height of nipple (F) and canopy loop
(H) until the desired height is reached.
ASSEMBLING THE FIXTURE
Takethexture’sbodyoutofthebox.Arms(N)ofthextureareclosedinthepackaging.
Gently spread the arms until they are evenly spaced. Place center ring (R) up to arms (N) and
line up the holes in metal clip (Q) of center ring (R) so that they pass over screw posts (O).
Secure center ring (R) to arms (N) by threading deco nut (S) onto screw post (O). Top loop (L)
maybeonthexture’swires,butnotthreadedontothexture’sframeatpost(M).Ifitisnot
notconnected,pullthexture’swiresthroughtoploop(L)beforetwistingtoploop(L)ontopost
(M)ofthexture’sbody.Bymeasuring,determinethecorrectnumberofchainlinksneededfor
properhangingheight.Ifnecessary,useapairofplierstoopenandremoveanyexcesschain.
Attach chain connectors (K) to each end of chain (J) before attaching one end of the chain
connector/chain to top loop (L). Close the chain connector. Connect the other chain connector
(K)tocanopyloop(H).Feedthexture’swiresupthroughtoploop(L)thenthroughchain(J)
(every three links or so). Pull the wires until taut. Slide canopy loop collar (I) and canopy (G) onto
thechain/wire.Thenthreadnipple(T)intosocketcluster(P)andlockintopositionwiththehex
nut that is on nipple (T).
CONNECTING THE WIRES
Haveanassistantsupporttheweightofthexturewhilecompletingthewiring.Cutaway
excesswire.Threadthexture’swiresthroughcanopyloop(H)andnipple(F).Attachthe
xture’swirestothepowersupplywiresfromthejunctionbox.Connectblacktoblack(or
smooth); white to white (or ribbed); ground to ground (green or copper). Twist the ends of the
wirepairstogether,andthentwistonawireconnector.Makesurealltwistsareinthesame
direction.Ifthereisnogroundwire(greenorcopper)comingfromthejunctionbox,locate
groundscrew(E)onmountingstrap(A)andwrapthexture’sgroundwirearoundthegreen
ground screw (E). Use a screwdriver to secure ground screw (E) onto the mounting bracket.
Tuckallwiresneatlyintothejunctionbox.
FINISHING THE INSTALLATION
Push canopy (G) up to the ceiling and slide canopy loop collar (I) up beneath the canopy. Tightly
thread canopy loop collar (I) onto canopy loop (H) to secure canopy (G) in place.
Installlightbulbs(notprovided)inaccordancewiththexture’sspecications.Donot
exceedthemaximumrecommendedwattage.Slideglassshade(U)followedbyspacer(V)
andwasher(W)overnipple(T)andsecureinplacewithhexnut(X).Slidebottomcap(Y)
overtheexposedthreadsofnipple(T).Screwnial(Z)ontotheexposedthreadsofnipple(T)
belowbottomcap(T).Tightenuntilnialissecure.
Yourinstallationisnowcomplete.Turnonthepowerandtestthexture.
CLEANING TIPS
Treat the xture gently! Regular cleaning will reduce the need for deep cleaning. For regular cleaning, turn off the light and wipe down the
xture with a clean lint-free cotton or microber cloth. Never spray cleaner directly onto the xture.
For Customer Service, contact
the place of purchase to arrange
for replacement parts.
BLACK
(Hot)
WHITE
(Neutral)
GREEN
(Ground)
HOUSE WIRES
SMOOTH
(Or Black)
FIXTURE WIRES
RIBBED
(Or White)
BARE COPPER
(Or Green)
A
B
C
D
E
F
G
H
I
J
K
L
M
N
O
P
Q
R
S
T
U
V
W
X
Y
Z