
Installation Sheet

Assembly Instructions: 2073-SF
IMPORTANT:
• ALL INSTALLATION WORK SHOULD BE DONE BY ACCREDITED PROFESSIONAL.
• SHUT OFF POWER SUPPLY AT FUSE OR CIRCUIT BREAKER!
• USE ONLY THE SPECIFIED BULBS. DO NOT EXCEED THE MAXIMUM WATTAGE!
PREPARING FOR INSTALLATION
Remove all of the contents from the carton. See the important
notes above. Shut off the power at the circuit breaker and
completelyremovetheoldxturefromtheceiling,includingthe
oldmountingstrap.
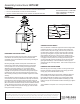
Mountingstrap(B)containsseveralpairsofthreadedholes.
Findthepairofholesthatmatchesthespacingoftheholes
onthejunctionbox.Twoofmountingscrews(A)shouldbe
attachedtomountingstrap(B).Youmayneedtotighten
nuts(C)whichholdthesescrewsinplace.Placemounting
strap(B)overthejunctionboxsothatmountingscrews(A)are
pointingdown.Securemountingstrap(B)tothejunctionbox
withmountingscrews(D)andascrewdriver.Tightenthescrews
securely.
Placethexture’ssocketcluster(R)onaatsurface.Rod(N)is
onthexture’swires,butnotattachedtothebodyofthexture.
Passthexture’swiresthroughrod(N)andpullthewiresuntil
taut.Twistrod(N)ontothexture’sbodyuntilsecure.Attachrods
(M)tothehooksonthexture’sbody.Haveanassistantholdthe
canopyabovethexture’sbody,thenattachrod(N)tocanopy
(F).Attachrods(M)tothehooksoncanopy(F).Pushthewires
throughthecenterofcanopy(F).
CONNECTING THE WIRES
Haveanassistantorassistantssupportthexture’sweightwhile
completingthewiring.Cutawaytheexcesswires.Attachthe
xture’swirestothepowersupplywiresfromthejunctionbox.
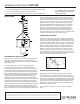
Connectblacktoblack(orsmooth);whitetowhite(orribbed);
groundtoground(greenorcopper).Twisttheendsofthewire
pairstogether,thentwistonawireconnector.Makesureall
twistsareinthesamedirection.Ifthereisnogroundwire(green
orcopper)fromthejunctionbox,locategroundscrew(E)on
mountingstrap(B)andwrapthexturegroundwirearoundthe
greengroundscrew(E).Useascrewdrivertosecureground
screw(E)ontothemountingbracket.Tuckallwiresneatlyintothe
junctionbox.
FINISHING THE INSTALLATION
Raisecanopy(F)totheceiling.Positionmountingscrews(A)so
thattheyprotrudethroughtheopeningsofcanopy(F).Secure
canopy(F)inplacewithdecorativenuts(G).
Slidecandlesleeves(Q)overthesockets.Installlightbulbs(O)
(notincluded)inaccordancewiththexture’sspecications.
Placeglassshade(S)ontobottomcap(T).Raiseglassshade
(S)andbottomcap(T)upbeneathbottomassembly(R).Twist
bottomnial(U)ontothethreadsofbottomassembly(R).Tighten
securely.
Your installation is complete. Turn on the power and test the
xture.
CLEANING TIPS
Treat the xture gently! Regular cleaning will reduce the need for deep cleaning. For regular cleaning, turn off the light and wipe down the
xture with a clean lint-free cotton or microber cloth. Never spray cleaner directly onto the xture. For deep cleaning, turn off the light
and remove the glass prior to cleaning. Hand wash glass with warm water and mild detergent. Dry with a lint-free or microber cloth.
D
C
B
A
S
T
U
M
N
P
O
Q
E
F
G
R
FLUSH
INSTALLATION
BLACK
(Hot)
WHITE
(Neutral)
GREEN
(Ground)
HOUSE WIRES
SMOOTH
(Or Black)
FIXTURE WIRES
RIBBED
(Or White)
BARE COPPER
(Or Green)
For Customer Service, contact the
place of purchase to arrange for
replacement parts.