
Installation Sheet

IMPORTANT:
• ALLINSTALLATIONWORKSHOULDBEDONEBYACCREDITEDPROFESSIONAL.
• SHUTOFFPOWERSUPPLYATFUSEORCIRCUITBREAKER!
• USEONLYTHESPECIFIEDBULBS.DONOTEXCEEDTHEMAXIMUMWATTAGE!
FINISHING THE INSTALLATION
5.Placebackplate(F)overmountingstrap(A)sothatmountingscrews(C)protrudethroughtheholesinbackplate(F).Securethe
backplatetothemountingstrapwithdecorativenuts(G).Twistthenutsuntilthebackplateofthextureissnugagainstthewall.
6.Placetherod(L)ontothenipple(H).Ifthextureyoupurchasedcomeswithashade,slideglass(J)overthesocket(I)andsecurein
placewithsocketcover(K).Ifyoudidnotpurchasethisxturewithashade,simplyscrewonthesocketcover(K)overthesocket(I).
Installalightbulb(notincluded)inaccordancewiththexture’sspecications.Donotexceedthemaximumrecommendedwattage.
Yourinstallationisnowcomplete.Turnonthepowerandtestthexture.
For Customer Service, contact
the place of purchase.
AssemblyInstructions:2120-BA1 (Ormond)
CLEANING TIPS
Treat the xture gently! Regular cleaning will reduce the need for deep cleaning. For regular cleaning, turn off the light and wipe down the
xture with a clean lint-free cotton or microber cloth. Never spray cleaner directly onto the xture.
PREPARING FOR INSTALLATION
Remove all of the contents from the carton. See the important notes above. Remove the old xture from the wall, including
the old mounting strap.
1.Mountingstrap(A)containsseveralpairsofthreadedholesandtwosetsofmountingscrews(B&C).Youmayneedtotightenhex
nuts(D)toholdmountingscrews(C)inplace.
2.Placemountingstrap(A)upagainstyourjunctionbox.Placebackplate(F)overthemountingstrap(A)andlineupmounting
screws(C)withtheholesinbackplate(F).Thiswillallowyoutoensurethatyouarehangingthexturestraight.Removethe
backplateandsetasideforlater.
3.Pullthehousewiresthroughthecenterofmountingstrap(A).Securemountingstrap(A)tothejunctionboxwithmountingscrews
(B)andascrewdriver.Tightenthescrewssecurely.
CONNECTING THE WIRES
4.Attachthexture’swirestothehousewiresfromthejunctionbox.ConnectHottoHot(blackorsmooth),NeutraltoNeutral(white
orribbed),andGroundtoGround(greenorcopper).Twisttheendsofthewirepairstogether,andthentwistonawireconnector.
Makesurealltwistsareinthesamedirection.Ifthereisnohousegroundwirecomingfromthejunctionbox,locategroundscrew
(E)onthemountingbracket/mountingstrap(A)andwrapthexture’sgroundwirearoundthegroundscrew(E).Useascrewdriverto
tightenthetopofgroundscrew(E)ontothewiresandintothemountingbracket/mountingstrap.Tuckthewiresintothejunctionbox.
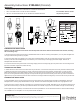
How to Identify the Fixture’s Wires
Hot Neutral Ground
Smooth
Ribbed
Bare Metal,
Green, or
Green Inner
Thread
Black
White
Black Inner
Thread
White Inner
Thread
House Wires
Fixture Wires
Hot
G
A
B
C
F
E
L
J
D
I
H
K