Betriebsanleitung User manual Mode d‘emploi Istruzioni per l‘uso Art.
Betriebsanleitung BETRIEBSANLEITUNG.............................3 USER MANUAL..........................................13 MODE D‘EMPLOI.......................................23 ISTRUZIONI PER L‘USO............................33 BETRIEBSANLEITUNG Inhalt 1 Sicherheitshinweise............................................................................ 4 1.1 Allgemeines.................................................................................. 4 1.2 Warnstufen...........................................
1 Sicherheitshinweise 1.1 Allgemeines 1.2 Warnstufen Die Betriebsanleitung ist Bestandteil des Produktes und enthält wichtige Hinweise zum korrekten Gebrauch. >> Betriebsanleitung vollständig und sorgfältig vor Gebrauch lesen. Die Betriebsanleitung muss bei Unsicherheiten und Weitergabe des Produktes verfügbar sein. >> Betriebsanleitung aufbewahren. >> Installations-, Demontage-, Wartungs- und Reparaturarbeiten nur von ausgebildetem Elektro-Fachpersonal ausführen lassen.
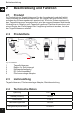
Betriebsanleitung 2 Beschreibung und Funktion 2.1 Produkt 2.2 Produktteile Ihr Produkt ist ein Tageslichtsensor für den Innenbereich und stellt elektrotechnisches Installationsmaterial.dar. Es reagiert auf natürliches Licht, welches den Erfassungsbereich ausleuchtet. Wird der Erfassungsbereich des Tageslichtsensors ausgeleuchtet, wird der angeschlossene elektrische Verbraucher in Relation zum Tageslicht gedimmt.
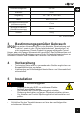
Deckenmontagehöhe 2,2-4 m Schutzart IP20 Umgebung -20 ~ +40 °C, <93 % RH Maße Ø22 x 63,5 mm Montagelochdurchmesser (Hohlkammerprofile) 17 mm Montagelochabstand (Oberflächenmontage) 28 mm Gewicht 228 g Tab. 1: Technische Daten 3 Bestimmungsgemäßer Gebrauch andere Verwendung als in den Kapiteln „Beschreibung und IP20 Eine Funktion“ sowie in den „Sicherheitshinweisen“ beschrieben, ist nicht zugelassen.
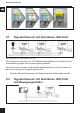
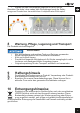
Betriebsanleitung Fig. 2: Funktionsweise 5.1 Tageslichtsensor mit dimmbaren LED-Trafo Fig. 3: Tageslichtsensor mit dimmbaren LED-Trafo Die Verbraucher leuchten mit 100% Beleuchtungsstärke oder werden je nach Voreinstallung gegen das Umgebungslicht gedimmt. Die Verbraucher werden auf Mindestlichtstärke gedimmt, erlöschen aber nie, auch bei ausreichend Umgebungslicht nicht. • Schalten Sie die Verbraucher bei Bedarf über den Lichtschalter aus/an. 5.
Ist das Umgebungslicht heller als die voreingestellte Auslöse-Beleuchtungsstärke am Tageslichtsensor, bleibt der Verbraucher auch dann aus, wenn eine Bewegung erkannt wird. Fig. 5: Funktionsweise 5.2-1 Ist das Umgebungslicht dunkler als die voreingestellte Auslöse-Beleuchtungsstärke am Tageslichtsensor, wird der Verbraucher eingeschaltet, wenn eine Bewegung erkannt wird. Fig. 6: Funktionsweise 5.
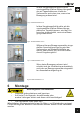
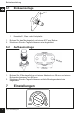
Betriebsanleitung 6.1 Einbaumontage 1 Fig. 9: Einbaumontage 1 1. 2. Kunststoff-, Glas- oder Holzplatte Bohren Sie das Montageloch mit einem Ø17 mm Bohrer. Montieren Sie den Tageslichtsensor wie abgebildet. 6.2 Aufbaumontage Fig. 10: Aufbaumontage 1. 2. Bohren Sie 2 Montagelöcher mit einem Abstand von 28 mm und einem Bohrerdurchmesser von Ø4 mm. Montieren Sie den Tageslichtsensor mittels Montagematerial wie abgebildet. 7 Einstellungen 9 Fig.
• Stellen Sie den Ziellichtpegel zwischen 50-800 Lux ein. Beachten Sie dabei, dass neben dem Ziellichtpegel auch die Entfernung zum Fenster bzw. der natürlichen Lichtquelle eine Rolle spielt. Fig. 12: Einstellungen 2 8 Wartung, Pflege, Lagerung und Transport Die Produkte sind wartungsfrei. Sachschäden • Nur ein trockenes und weiches Tuch zum Reinigen verwenden. • Keine Reinigungsmittel und Chemikalien verwenden. • Kühl und trocken lagern.
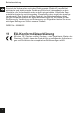
Betriebsanleitung Sie sind als Verbraucher nach dem Elektrogesetz (ElektroG) verpflichtet, elektrische und elektronische Geräte am Ende ihrer Lebensdauer an den Hersteller, die Verkaufsstelle oder an dafür eingerichtete, öffentliche Sammelstellen kostenlos zurückzugeben. Einzelheiten dazu regelt das jeweilige Landesrecht. Das Symbol auf dem Produkt, der Betriebsanleitung oder/ und der Verpackung weist auf diese Bestimmungen hin.
12
User manual BETRIEBSANLEITUNG.............................3 USER MANUAL..........................................13 MODE D‘EMPLOI.......................................23 ISTRUZIONI PER L‘USO............................33 USER MANUAL Content 1 Safety instructions............................................................................... 14 1.1 In general...................................................................................... 14 1.2 Warning levels..........................................
1 Safety instructions 1.1 In general 1.2 Warning levels The user manual is part of the product and contains important information for correct use. >> Read the user manual completely and carefully before use. The user manual must be available for uncertainties and passing the product. >> Keep this user manual. >> Installation, assembly, maintenance and repair work must be carried out only by trained electrical specialists.
User manual 2 Description and Function 2.1 Product 2.2 Product parts Your product is a daylight sensor for indoor use and provides electrical installation material. It responds to natural light, which illuminates the detection region. If the detection range of the daylight sensor lit, the connected electrical load is dimmed in relation to natural light. Moreover, it can be determined with a controller of the target light level around where the daylight sensor works. 1 2 3 4 5 Fig.
Protection level IP20 Environment -20 ~ +40 °C, <93 % RH Dimensions Ø22 x 63.5 mm Mounting hole diameter (Hollow profiles) 17 mm Mounting hole distance (Surface mount) 28 mm Weight 228 g 3 Intended Use Tab. 2: Specifications We do not permit using the device in other ways like described in IP20 chapter “Description and Function“ and „Safety Instructions“. This product is protected against medium sized foreign objects, but not against water ingress.
User manual 5.1 Daylight sensor with dimmable LED transformer Fig. 15: Daylight sensor with dimmable LED transformer Lamps shine with 100 % more light or dimmed depending on the setting against ambient light. Lamps are dimmed to minimum intensity, but never switch off, not even when sufficient ambient light. • Switch the lamps on / off via light switch on demand. 5.2 Daylight sensor with dimmable LED transformer and motion sensor Fig.
During the switch-off delay, set on the motion sensor, the lamp is dimmed to minimum intensity, but never switches off, even when sufficient ambient light. Fig. 19: Function 5.2-3 If no movement is detected, the lamp automatically switches off according the set switch-off delay on the motion detector. Fig. 20: Function 5.2-4 6 Mounting Risk of falling / Material damage • • Place and use tools safely.
User manual 6.2 Surface mounting Fig. 22: Surface mounting 1. 2. Drill 2 mounting holes with a distance of 28 mm and a drill diameter of Ø4 mm. Mount the daylight sensor by mounting material as shown. 7 Settings Fig. 23: Settings 1 • Adjust the target light level between 50-800 Lux. Note that in addition to the target light level and the distance to the window or natural light source plays a role. Fig.
8 Maintenance, Care, Storage and Transport The product is maintenance-free. Material Damage • Only use a dry and soft cloth for cleaning. • Do not use detergents or chemicals. • Store cool and dry. • Store the product out the reach of children and in a dry and dust-pro tected ambience when not in use. • Keep and use the original packaging for transport. 9 Liability notice • We reserve the right to printing errors and changes to product, packaging or product documentation.
Mode d‘emploi BETRIEBSANLEITUNG.............................3 USER MANUAL..........................................13 MODE D‘EMPLOI.......................................23 ISTRUZIONI PER L‘USO............................33 MODE D‘EMPLOI Contenu 1 Consignes de sécurité......................................................................... 22 1.1 En général.................................................................................... 22 1.2 Niveaux d‘alerte..........................................
1 Consignes de sécurité 1.1 En général 1.2 Niveaux d‘alerte Le mode d‘emploi fait partie intégrante du produit et comprend d‘importantes informations pour une bonne installation et une bonne utilisation. >> Lisez le mode d‘emploi attentivement et complètement avant de l‘utiliser. Le mode d‘emploi doit être disponible à des incertitudes et transfert du produit. >> Conservez soigneusement ce mode d‘emploi.
Mode d‘emploi 2 Description et fonction 2.1 Produit 2.2 Pièces et accessoires Votre produit est un capteur de lumière du jour pour une utilisation intérieure et représente l‘électrotechnique. Il répond à la lumière naturelle, qui éclaire la zone de détection. Si la plage de détection du capteur de lumière du jour allumé, la charge électrique connectée est grisée par rapport à la lumière naturelle.
Protection IP20 Alentours -20 ~ +40 °C, <93 % RH Dimensions Ø22 x 63,5 mm Diamètre des trous de montage (profilés creux) 17 mm Montage Espacement des trous (montage en surface) 28 mm Poids 228 g Tab. 3: Spécifications 3 Utilisation prévue Nous ne permettons pas d‘utiliser l‘appareil dans d‘autres façons, IP20 comme décrit dans le chapitre „Description et Fonction“ et „Consig- nes de sécurité“.
Mode d‘emploi Fig. 26: Installation 5.1 Capteur de lumière du jour avec transformateur LED dimmable Fig. 27: Capteur de lumière du jour avec transformateur LED dimmable Les lampes brillent avec 100 % de lumière ou grisés en fonction des paramètres à la lumière ambiante. Les lampes sont estompées à l‘intensité minimale, mais ne sortent jamais, pas même lorsque la lumière ambiante suffisante. • Mettre le consommateur à la demande via la lumière éteindre / allumer. 5.
Si la lumière ambiante est plus lumineux que le seuil d‘éclairement préréglé sur le capteur de lumière du jour, le consommateur reste éteint même si un mouvement est détecté. Fig. 29: Fonction 5.2-1 Si la lumière ambiante plus sombre que le seuil d‘éclairement prédéfini sur le capteur de lumière du jour, l‘appareil est allumé lorsqu‘un mouvement est détecté. Fig. 30: Fonction 5.
Mode d‘emploi 6 Montage Risque de chute / Dommages matériels • • Placez et outils d‘utiliser en toute sécurité. Faites attention à lignes du courant ou d‘autres, qui sont derrière le plâtre et ne pas les endommager! • La surface doit être stable. Supports d‘installation est uniquement pour béton et de pierre plafonds.Pour le montage sur d‘autres surfaces autres chevilles doivent être utilisées. 6.1 Montage encastré 1 Fig. 33: Montage encastré 1 1. 2.
7 Réglages Fig. 35: Réglages 1 • Réglez le niveau de lumière cible entre 50-800 Lux. S‘il vous plaît noter que, en plus du niveau d‘éclairage de la cible et la distance par rapport à la fenêtre ou la source de lumière naturelle joue un rôle. Fig. 36: Réglages 2 8 Maintenance, Entretien, Stckage et Transport Les produits sont sans entretien. Dommages matériels • Produit Nettoyez uniquement avec un chiffon doux et sec. • Ne pas utiliser de produits chimiques et de nettoyage.
Mode d‘emploi 9 Clause de responsabilité • Nous nous réservons le droit des erreurs d‘impression et des changements à produit, l‘emballage ou de la documentation du produit. S‘il vous plaît voir nos conditions de garantie. Ceux-ci sont maintenant disponibles dans leur forme actuelle, conformément aux coordonnées figurant.
30
Istruzioni per l‘uso BETRIEBSANLEITUNG.............................3 USER MANUAL..........................................13 MODE D‘EMPLOI.......................................23 ISTRUZIONI PER L‘USO............................33 ISTRUZIONI PER L‘USO Contenuto 1 Istruzioni per la sicurezza................................................................... 32 1.1 Generalmente............................................................................... 32 1.2 Livelli di allarme...........................
1 Istruzioni per la sicurezza 1.1 Generalmente 1.2 Livelli di allarme Le instruzioni per l‘uso è parte integrante del prodotto e contiene importanti informazioni per un uso corretto. >> Leggere attentamente e completamente le istruzioni prima dell‘uso. Le istruzioni per l‘uso essere disponibile per le incertezze e trasferimento del prodotto. >> Conservare questo istruzioni per l‘uso.
Istruzioni per l‘uso 2 Descrizione e Funzione 2.1 Prodotto 2.2 Parti di prodotto Il prodotto è un sensore di luce diurna per uso interno e rappresenta impianti elettrotecnici. Risponde alla luce naturale, che illumina la regione di rilevamento. Se il campo di rilevamento del sensore luce accesa, il carico elettrico collegato è oscurata in relazione alla luce naturale. Inoltre, può essere determinata con un controllore del livello di luce target intorno in cui lavora il sensore di luminosità.
Soffitto altezza di montaggio 2.2-4 m Protezione IP20 Dintorni -20 ~ +40 °C, <93 % RH Dimensioni Ø22 x 63.5 mm Diametro foro di montaggio (profilati cavi) 17 mm Spaziatura fori di montaggio (montaggio in superficie) 28 mm Peso 228 g Tab. 4: Specifiche generali 3 Scopo d‘utilizzo Non permettiamo di utilizzare il dispositivo in altri modi, come IP20 descritto nel capitolo „Descrizione e funzione“ e „Istruzioni per la sicurezza“.
Istruzioni per l‘uso Fig. 38: Installazione 5.1 Sensore di luce del giorno con trasformatore . dimmerabile a LED Fig. 39: Sensore di luce del giorno con trasformatore dimmerabile a LED I consumatori brillano con il 100% di luce in più o in grigio a seconda delle impostazioni per la luce ambiente. I consumatori sono disattivati per intensità minima, ma non passano mai, nemmeno quando sufficiente luce ambientale. • Accendere il consumatore on demand attraverso la luce spegnere / accendere. 5.
Se la luce ambiente è più luminoso del illuminamento soglia preimpostata sul sensore di luce diurna, il consumatore rimane spento anche se viene rilevato un movimento. Fig. 41: Funzione 5.2-1 Se la luce ambiente più scuro del illuminamento soglia preimpostata sul sensore di luce diurna, il dispositivo è acceso quando viene rilevato un movimento. Fig. 42: Funzione 5.
Istruzioni per l‘uso 6.1 Montaggio ad incasso 1 Fig. 45: Montaggio ad incasso 1 1. 2. in plastica, vetro o pannello di legno Eseguire il foro di montaggio con una punta Ø17 mm. Montare il sensore di luce come illustrato. 6.2 Montaggio superficiale Fig. 46: Montaggio superficiale 1. 2. Effettuare due fori di montaggio con una distanza di 28 mm e un diametro della punta di Ø4 mm. Montare il sensore di luce dal materiale di montaggio mostrato. 7 Impostazioni 37 Fig.
• Regolare il livello di luminosità di destinazione tra 50-800 Lux. Si prega di notare che, oltre al livello di luce di destinazione e la distanza dalla finestra o fonte di luce naturale gioca un ruolo. Fig. 48: Impostazioni 2 8 Manutenzione, cura, conservazione e trasporto Il prodotto è esente da manutenzione. Danni alla proprietà • Utilizzare un panno asciutto e morbido solo per la pulizia. • Non utilizzare detergenti e prodotti chimici. • Conservare fresco e asciutto.
Istruzioni per l‘uso Il consumatore è obbligato per legge a portare le attrezzature elettriche ed elettroniche presso punti di raccolta pubblici oppure presso il rivenditore o il produttore al termine della loro durata utile. Devono anche essere osservate tutte le leggi e le normative locali. Il simbolo apposto sul prodotto, nel manuale o sulla confezione richiama l’attenzione su questi termini.
40
Istruzioni per l‘uso 41
42
Betriebsanleitung User manual Mode d‘emploi Istruzioni per l‘uso Art. 71366 V 1.1 REV 2016-09-09 Goobay ® by Wentronic GmbH Pillmannstraße 12 38112 Braunschweig Germany *(0,14 € / Minute aus dem deutschen Festnetz) (0.14 € / minute from German landline) (0,14 € / minute depuis un poste fixe allemand) (0,14 € / minuto dalla rete fissa tedesca) Made in China © by Wentronic Deutschland Hotline: +49 (0180) 5005882 E-Mail: info@goobay.de Web: www.goobay.