
Operation Manual


Instructions for use, mounting and connection
21
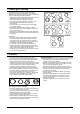
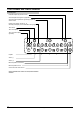
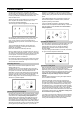
Control elements
Once the glass ceramic hob is connected to the mains
(including the power failure), the appliance carries out the
harmonization with the conditions of the exterior in order to
provide most efficient sensor function and render the best
control environment.
After the successful accommodation to the environment, the
indicators show the mark "-" for a moment which eventually
disappear.
The sound signal confirms the appliance is ready for use.
Do not place any objects upon the sensor surface during the
accommodation period, otherwise you may provoke error
mode. In such cases the process is interrupted and the
appliance signals error. The hob fails to respond to commands.
The hob is equipped with electronic sensors which are
switched on by touching or pressing the sensor surface with
your fingertip.
Each sensor reaction is confirmed by the beep.
Always take care to touch only one sensor at the time for a
short period of time (approximately 1 second). If more than one
sensor is pressed at the same time the relevant command is
not accepted. If the touch is prolonged it provokes error mode
and the appliance is switched off.
Do not place any objects upon the sensor surface (error mode)
nor any hot dishes which may damage the sensors. Keep the
sensor surface clean at all times.
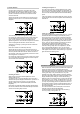
Switching the hob on
When the hob is turned off all the hotplates are off and
indicator LED's are off.
To switch the hob on, touch the ON/OFF sensor. The hob is
activated and all power displays indicate »0« for a period of 10
seconds. Using the (+) or (-) sensor you may select the
desired cooking power of a particular hotplate (see Power
Regulation).
Next setting of a particular hotplate should be selected within
ten seconds, otherwise the hob will automatically be switched
off and a short warning beep is heard.
Switching the hotplates on
Once the hob is switched on with the ON/OFF sensor, within
the next ten seconds, while the indicators are illuminated, you
have to switch on a particular hotplate by touching the (-) or (+)
sensors for the selected hotplate and set the desired heating
power.
If the power setting is not selected within the next ten seconds,
the "0" indicator turns off and the hotplate will automatically be
switched off.
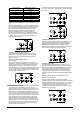
Setting of cooking level
As long as the indicators are lit the heating power (1...) may be
selected and altered accordingly by pressing the (-) or (+)
sensor. By the (+) sensor the power is gradually increased to
the maximum level (9), while with the (-) sensor it is reduced
back to 0 (hotplate is switched off). In case you start the setting
by pressing the (-) sensor, the heating power starts from the
level 4, and if you start the setting by pressing the (+) sensor,
the heating power starts from the maximum level 9,
simultaneously starting the automatic cooking mode (see
Automatic cooking mode). When one hotplate is on, the "0"
sign on other hotplate indicators is off. If you wish to start
another hotplate, press either the (-) or (+) sensor, and the "0"
mark appears on the indicator. Now press the (-) or (+) sensor
again and select the heating power.
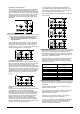
Automatic cooking mode
When the automatic cooking mode is activated the hotplate will
operate at maximum power for a limited period of time
(depending upon the power level required for continuation) and
then automatically switch to the reduced power level to resume
cooking (see chart). It may be switched on in any of the
hotplates for all power settings except for maximum setting 9.
By touching the hotplate (+) sensor switch the hotplate on. The
display indicates power setting »9« and the decimal dot (•).
Within the next ten seconds press the (-) sensor and select the
power setting (8...1) for cooking. The decimal dot is on for the
entire time this function is on. By touching the (-) or (+) sensor
you may vary the heating power at any desired moment. If no
power setting for further cooking is selected within the next 10
seconds the automatic cooking mode is switched off and the
decimal dot disappears.
Once the time from the above chart expires, the function is
switched off and the decimal dot disappears.
Cooking automatics can be tupned off at any time with (-)
sensor, by setting cooking level to “0”.