
Operation Manual


Instructions for use, mounting and connection
22
Power setting Maximum power time
(in seconds)
182
2 164
3 246
4 328
5 410
682
7 164
8 164
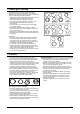
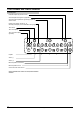
Switching the extended hotplate rings on (hotplates 2 and
4)
Switch the relevant hotplate ( 2 or 4) and consequently switch
the extended hotplate ring by pressing the relevant sensor (see
the control element board illustration). The LED signal lamp
above the indicator displays the extended ring is on. Now
select the random heating power for both hotplate rings
together. Extended ring may be switched off either by
consequent pressing the sensor or by reducing the heating
power to "0", as well as by simultaneous pressing of both the
(-) and (+) sensor. It may of course be switched off also by
switching off the entire hob.
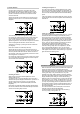
Switching the second hotplate ring on
The rear right hotplate (4) is equipped with the extended
hotplate ring, which is switched on by pressing the special
second ring sensor. The signal lamp above the indicator
displays the ring is on.
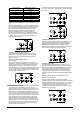
Switching the third hotplate ring on
(certain models)
The front left hotplate (2) is equipped with two extended
hotplate rings. To switch the second ring on, press the special
second ring sensor (top left). The LED signal lamp above the
indicator displays the ring is on. To switch on the third ring
press the same sensor once again, another LED signal lamp is
on. Both extended rings are switched off by repeated pressing
the sensor. They may also be switched off by switching off the
relevant hotplate or the entire hob.
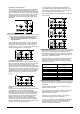
Blocking the hob operation
This function mode is intended as a protection against
accidental start or change of heating power by children or pets.
The hob may be blocked by pressing the relevant sensor for
about 3 seconds, illuminating the LED signal lamp above the
sensor. The hob may be blocked both with the hob switched on
or off. The functioning of the complete hob is blocked, except
for the main hob switch and the blocking sensor. In the blocked
mode all hotplates may be switched off only by pressing the
main ON/OFF hob sensor, while the blocked mode remains
active. To activate a particular sensor in the blocked mode, the
signal lamp goes on for a few seconds. If a particular hotplate
is in timer automatic mode, the countdown proceeds normally
and the hotplate is switched off at the expiry of preset time,
signaling the end by the triple beep.
The blocked mode may be switched off at anytime by pressing
the sensor. Short beep confirms the action, and the LED signal
lamp goes off.
Switching the hotplate off
Particular hotplate is switched off either by pressing the sensor
(-) to bring the heating power to "0", or by simultaneously
pressing both the (+) and (-) sensor. Hotplate is switched off
automatically after the set timer period elapses. Display
indicates "0" for a short time, then the hotplate is switched off
and the indicator displays the remaining heat "H".
Remaining heat display
Immediately after a particular hotplate is switched off, or in
case the complete hob is switched off, the indicator shows the
letter "H" as a warning that the "hotplate is hot". The period
of this warning signal is calculated in accordance with the
working time and the power setting of the hotplate. When the
warning signal is on do not touch the hotplate or place any
temperature sensitive objects on the relevant hotplate. Danger
of burns!
When the indicator goes off, the hotplate surface is cool
enough to be touched safely.
In case of mains interruption, the warning signal »H«
reappears when the power comes back, and remains displayed
until the calculated time from the last appearance has expired.
It is therefore possible that the "H" indication is still on if the
power failure took long time, although the hotplate is
completely cold, but it may also be still hot in case the power
failed for only a short period.