������ ������������ ����������������������
Table of Contents FCC and Safety Information ..............3 Other Disc Playback .........................16 Front View ..........................................................5 Side Views ..........................................................6 Remote Control ..................................................7 Inserting Remote Control Batteries ....................7 Playing Audio CDs ............................................16 Playing Kodak Picture CDs .............................
FCC and Safety Information NOTE: This equipment has been tested and found to comply with the limits for a Class B digital device pursuant to part 15 of the FCC Rules. These limits are designed to provide reasonable protection against harmful interference in a residential installation. This equipment generates, uses and can radiate radio frequency energy and, if not installed and used in accordance with the instructions, may cause harmful interference to radio communications.
Important Safety Instructions 1 2 3 4 5 6 7 Read these instructions. Keep these instructions. Heed all warnings. Follow all instructions. Do not use this apparatus near water. Clean only with a damp cloth. Do not block any of the ventilation openings. Install in accordance with the manufacturer’s instructions. 8 Do not install near any heat sources such as radiators, heat registers, stoves, or other apparatus (including amplifiers) that produce heat.
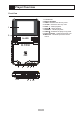
Player Overview Front View 1 LCD Screen 2 Built-in Speakers 3 OPEN - Releases the disc tray cover. 4 CLOSE - Closes the disc tray cover. 5 PLAY - Starts playback. 6 STOP - Stops playback. 7 PAUSE - Pauses playback. 8 OPEN - Releases the player’s top panel. 9 Power Indicator - Lights when player is on. 10 IR Sensor - Receives input from remote control.
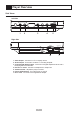
Player Overview Side Views Left Side VIDEO 1 AUDIO 2 COAXIAL PHONES 3 4 VOLUME 5 Right Side POWER OFF DC IN 12V ON 6 7 1 Video Output - Connects to a TV or display device. 2 Audio Output - Connects to a stereo TV or analog amplifier. 3 Coaxial Digital Audio Output - Connects to a digital amplifier/receiver with a Dolby Digital or DTS decoder. 4 Phones 1-2 Jacks - Connect to headphones or earphones. 5 Volume Control - Adjusts the player’s volume.
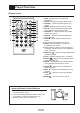
Player Overview Remote Control 5 6 7 8 9 Setup Info. Menu LCD Mode Title Play Sel. 1 2 3 4 5 6 7 8 9 1/All 1 INFO. - Displays current chapter/track information. 2 SETUP - Displays the player’s Setup menu. 3 PAUSE - Pauses playback. Moves up in menus. 4 MENU - Displays the disc menu of a DVD. 5 REV - Scans backward at variable speed during playback. Moves left in menus. 6 PLAY/SEL.- Starts playback. Also makes selections in menus.
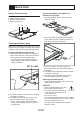
Quick Start Step 1 - Connect AC Adapter Step 4 - Turn on Power Connect the supplied AC adapter to the DC IN jack on the right side of the portable DVD player. • You can also use the supplied cigarette lighter adapter in place of the AC adapter to supply power to the player. Slide the POWER button to the On position to turn on the player. Step 5 - Open Disc Cover Press the OPEN Step 2 - Connect Headphones (Optional) button to open the disc cover.
Quick Start Battery Pack Overview 1 2 3 4 Charging the Battery Pack While it is Attached to the Player DC In Jack Battery Release Button Battery Charge Indicator Battery Connectors 1 2 1 Connect the battery pack to the back of the player as shown. 3 4 2 Plug the supplied AC adapter into a standard power outlet, and then connect it to the DC In jack on the right side of the player. Charging the Battery Pack Before using the battery pack, make sure it is fully charged.
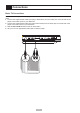
Connections Basic TV Connections You can connect the portable DVD player to a standard television using the player’s Audio and Video jacks. 1 Connect the supplied audio cable (mini-plug to RCA stereo) from the Audio jack on the left side of the player to the Audio Inputs on your television. 2 Connect the supplied video cable (mini-plug to RCA video) from the Video jack on the left side of the player to the Video Input on your television. 3 Slide the AV Out/AV In switch to the AV Out position.
Connections Enhanced Audio Connections For enhanced audio quality, you can connect the portable DVD player to a stereo system or digital amplifier/receiver. Analog Audio Connections 1 Connect the supplied audio cable (mini-plug to RCA stereo) from the AV Out jack on the left side of the player to the left and right Audio Inputs on your stereo or 2-channel analog receiver. 2 Slide the AV Out/AV In switch to the AV Out position. 3 Set your stereo to its appropriate input to hear the player.
DVD Playback Before You Begin... Viewing Disc Menus Connect the portable DVD player to a power outlet and plug in headphones or listen to the built-in speakers. You can also connect the player to external equipment, such as a TV and/or audio system. If you do this, remember to: • Turn on your TV and select the appropriate video input. • Turn on your stereo or audio system and select the appropriate audio input. • Slide the AV Out/AV In switch to the AV OUT position. Press MENU.
DVD Playback Forward/Reverse Scan Pause Press or during playback. • Normal playback is resumed when you press PLAY/SEL.. • The Forward Scan ( x2, x4, etc.) and Reverse Scan ( x2, x4, and etc.) speed changes each time you press the / buttons. Press PAUSEonce during playback. • The screen is paused. • To return to normal playback, press PLAY/SEL..
Special DVD Features Displaying Scene Information Subtitles Press INFO. during playback. • Press INFO. repeatedly to display the title number, chapter number, and other information on the screen. If a disc provides subtitles, you can choose to hide or display them. This operation works only with discs that provide subtitles. Stop Displaying Scene Information 1 Press SUBTITLE • Press INFO. repeatedly until the scene information disappears.
Special DVD Features Angle Title Some DVD discs contain scenes which have been shot simultaneously from a number of Some DVDs have Title menus, which allow you to choose among multiple titles (usually movies). different angles. Use the ANGLE view these alternative scenes. 1 Press ANGLE button to 1 Press TITLE in stop mode • The Title menu appears, if available. 2 Press /// to select the preferred item. 3 Press PLAY/SEL.. during playback.
Other Disc Playback Playing Audio CDs Skipping Ahead Press during playback. • Skips a track each time you press the button. Before You Begin... Connect the portable DVD player to a power outlet and plug in headphones or listen to the built-in speakers. You can also connect the player to external equipment, such as a TV and/or audio system. If you do this, remember to: • Turn on your TV and select the appropriate video input.
Other Disc Playback Playing Kodak Picture CDs Play Mode Play mode allows you to view your images in a slide show. 1 Press / to select the Play icon ( ), then press PLAY/SEL.. 2 The slide show starts playing from the current image. • Press and to view the previous or next image. • Press / to rotate the current image in 90 degree increments. • Press PAUSE to pause the slide show. • Press PLAY/SEL.to resume the slide show. • Press STOP to return to Thumbnail mode.
Other Disc Playback Playing JPEG Picture CDs Program Mode Program mode allows you to create a custom slide show. 1 Press /// to highlight the desired images, then press PLAY/SEL.to mark them with a yellow box and add them to your Program List. 2 Press / to choose “Program List”, then press PLAY/SEL.. • The Program List menu appears with a list of all of your marked images. 3 Press / to choose the Play icon ( ), then press PLAY/SEL.to play the programmed files.
Other Disc Playback Playing MP3 CDs Programming MP3 CDs Program mode allows you to create a custom play list. 1 Press POWER on. 2 Press OPEN to open the disc cover. 3 Hold the edge of the MP3 disc and place it in the tray with the label side up. • Press the disk onto the spindle in the center of the tray. 4 Close the disc cover. • After a few moments, the first MP3 file in the disc’s root directory will start playing automatically. 1 Press STOP to stop playback.
Language Setup On Screen Display (OSD) Language Disc Menu Language You can select among various languages for the player’s on-screen display (OSD). You can select your preferred language for DVD disc menus. 1 Press SETUP in Stop mode. 2 Press / to select “Language Setup”, then press PLAY/SEL.. 3 Press / to select “OSD”, then press PLAY/SEL.. 1 Press SETUP in Stop mode. 2 Press / to select “Language Setup”, then press PLAY/SEL.. 3 Press / to select “Menu”, then press PLAY/SEL..
Language Setup Audio Language [DVD] Subtitle Language [DVD] You can select your preferred language for DVD audio sound tracks. You can select your preferred language for DVD subtitles. 1 Press SETUP in Stop mode. 2 Press / to select “Language Setup”, then press PLAY/SEL.. 3 Press / to select “Audio”, then press PLAY/SEL.. 1 Press SETUP in Stop mode. 2 Press / to select “Language Setup”, then press PLAY/SEL.. 3 Press / to select “Subtitle”, then press PLAY/SEL..
Screen Setup TV Type Screen Saver The TV Type feature allows you to set your preferred aspect ratio for DVD movies. Choose from the following: • 4:3 PS (Pan & Scan) - Crops widescreen movies to fit a standard television. • 4:3 LB (Letterbox) - Shows the full width of widescreen movies on a standard television with black bars above and below the picture. • 16:9 - Select if you have a widescreen television.
Screen Setup TV System When connecting the portable DVD player to a TV, you must specify the broadcast system of your television. Choose from the following: • NTSC - The color TV broadcast standard for the USA, Canada, Latin America and Taiwan. • PAL - The color television broadcast standard for Western Europe (except France, where SECAM is the standard), Australia, China, Singapore and Malaysia. • AUTO - Select if you have a multi-system TV that supports both NTSC and PAL.
Audio Setup Digital Audio Output [DVD] The digital audio output jack (labeled “Coaxial”) is used to output the audio signal recorded on DVD discs to an external amplifier/receiver. The player provides three options for this audio signal: • SPDIF/PCM - Select if you are using a 2channel digital amplifier. • SPDIF/RAW - Select if you are using a Dolby Digital 5.1 or DTS capable amplifier. • Off - Select if you are not using the Coaxial audio output.
Custom Setup Parental Control [DVD] Change Password [DVD] The Parental Control feature enables you to block playback of movies based on their rating. For example, if you set the rating level to PG-13, the player will block playback of movies rated PG-13, R, NC-17 and X unless the correct password is entered. • You can only use the Parental Control feature with rated DVD discs. To change the Parental Control password: 1 Press SETUP in Stop mode. 2 Press / to select “Custom Setup”, then press PLAY/SEL..
Custom Setup Angle Mark [DVD] Restore Defaults Some DVDs feature scenes filmed at different angles, which you can select by pressing the Select “Default” to restore the portable DVD player to its factory default settings. ANGLE button. You can have the player alert you when multiple angles are available by displaying an Angle Mark ( ) on screen. • Whether Angle Mark is set to On or Off, 1 Press SETUP in Stop mode. 2 Press / to select “Custom Setup”, then press PLAY/SEL..
LCD Setup Brightness The LCD button provides a shortcut to five common screen adjustments. 1 Press LCD repeatedly to select Bright. 2 Use the / buttons to decrease or increase Panel screen brightness from -3 to +3. 1 Press LCD repeatedly to select Panel. 2 Use the / buttons to select from the following: • Normal - Stretches the on-screen image to fill the screen. • 16:9 - Sets the image to the standard widescreen aspect ratio. • 4:3 - Sets the image to the standard TV aspect ratio.
Troubleshooting SYMPTOM REMEDY No power. • Insert AC adapter plug securely into power outlet. • Check if POWER button on right side of player is set to ON. • Check power at AC outlet by testing another appliance. Player does not start playback when PLAY/SEL. is pressed. • • • • Player starts playback but stops immediately. • Disc may be dirty and may require cleaning. • Ensure that disc is inserted label side up. No picture. • • • • • Ensure that equipment is connected properly.
Disc Handling & Maintenance Handling Precautions If the disc is brought from a cold to a warm environment, moisture may form on the disc • Hold the disc by the edges so the surface will not be soiled with fingerprints. • Fingerprints, dirt and scratches can cause skipping and distortion. • Do not write on the label side with a ball-point pen or other writing utensil. • Do not use record cleaning sprays, benzine, thinner, static electricity prevention liquids, or any other solvent.
Parts & Accessories A number of replacement parts and optional accessories are available for this portable DVD player. To order any of the items below, please contact the GoVideo Parts department at: • 800-736-7679, option 8 • or via e-mail at: parts@govideo.com ITEM DESCRIPTION Rechargeable NiMH Battery Pack NiMH 3800mAh (~2.
Limited Warranty Who Provides the Limited Warranty During the warranty period, the GoVideo Warranty Administrator will honor service for 90 days labor, 1 year parts from the original date of consumer purchase. See below for Commercial, Industrial or Educational use coverage. Remote controls are warrantied for 90 days from the date of purchase. Who is Protected This warranty protects the original consumer owner of this GoVideo product.