User Manual HandyTone-488 Analog Telephone Adaptor For SW Release Version 1.0.0.4 Grandstream Networks, Inc. www.grandstream.
HandyTone-488 User Manual Grandstream Networks, Inc. Table of Contents 1 WELCOME......................................................................................................... 3 2 INSTALLATION ................................................................................................. 4 3 WHAT IS INCLUDED IN THE PACKAGE ......................................................... 6 3.1 4 PRODUCT OVERVIEW....................................................................................
HandyTone-488 User Manual Grandstream Networks, Inc. 1 Welcome Congratulations on becoming an owner of HandyTone-488. You made an excellent choice and we hope you enjoy all of its capabilities. Grandstream's HandyTone-488 is an all-in-one VoIP integrated access device that features superb audio quality, rich functionalities, high level of integration, compactness and ultraaffordability.
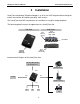
HandyTone-488 User Manual Grandstream Networks, Inc. 2 Installation HandyTone-488 Analog Telephone Adaptor is an all-in-one VoIP integrated device designed to be a total solution for networks providing VoIP services. The HandyTone-488 VoIP functionalities are available via a regular analog telephone. The following photo illustrates the appearance of a HandyTone-488.
HandyTone-488 User Manual Grandstream Networks, Inc. HandyTone-488 has one FXS port and one FXO port. The RJ11 jack next to the LAN port is a FXS port. The RJ11 jack on the side of the HandyTone-488 is a FXO port. Both the FXS port and the FXO port can have a separate SIP account. This is a key feature of HandyTone488. Telephone calls can be originated or terminated from/to the PSTN network via FXO port. Following are the steps to install a HandyTone-488: 1.
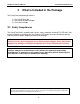
HandyTone-488 User Manual 3 Grandstream Networks, Inc. What is Included in the Package The HandyTone-488 package contains: 1) One HandyTone-488 2) One universal power adaptor 3) One Ethernet cable 3.1 Safety Compliances The HandyTone-488 is compliant with various safety standards including FCC/CE and C-tick. Its power adaptor is compliant with UL standard. The HandyTone-488 should only operate with the universal power adaptor provided in the package.
HandyTone-488 User Manual Grandstream Networks, Inc. 4 Product Overview 4.1 Key Features • • • • • • • • • • • • • • • Supports SIP 2.0(RFC 3261), TCP/UDP/IP, RTP/RTCP, HTTP, ICMP, ARP/RARP, DNS, DHCP (both client and server), NTP, PPPoE, STUN, TFTP, etc.
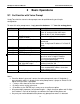
HandyTone-488 User Manual Grandstream Networks, Inc. 4.2 Hardware Specification The table below describes the difference among these models. Model HandyTone-488 LAN interface WAN interface FXS telephone port FXO port Button LED Universal Switching Power Adaptor 1xRJ45 10Base-T 1xRJ45 10Base-T 1xFXS 1xFXO 1 Green and red color Input: 100-240VAC 50-60 Hz Output: +5VDC, 1200mA, UL certified 70mm (W) 130mm (D) 27mm (H) 0.6lbs (0.
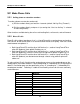
HandyTone-488 User Manual Grandstream Networks, Inc. 5 Basic Operations 5.1 Get Familiar with Voice Prompt HandyTone-488 has stored a voice prompt menu for quick browsing and simple configuration. To enter this voice prompt menu, simply press the button or “***” from the analog phone.
HandyTone-488 User Manual Grandstream Networks, Inc. 5.2 Make Phone Calls 5.2.1 Calling phone or extension numbers To make a phone or extension number call: a) Dial the number directly and wait for 4 seconds (default “No Key Entry Timeout”) . Or b) Dial the number directly, and press # (assuming that “Use # as dial key” is selected in web configuration). Other functions available during the call are call-waiting/flash, call-transfer, and call-forward. 5.2.
HandyTone-488 User Manual *4 Grandstream Networks, Inc. : (column character) Examples: If the target IP address is 192.168.0.160, the dialing convention is Voice Prompt with option 47, then 192168000160 followed by pressing the “#” key if it is configured as a send key or wait 4 seconds. In this case, the default destination port 5060 is used if no port is specified. If the target IP address/port is 192.168.1.
HandyTone-488 User Manual Grandstream Networks, Inc. 1. A presses FLASH (on the analog phone, or Hook Flash for old model phones) to get a dial tone 2. A then dial C’s number then # (or wait for 4 seconds). A and C now in conversation. 3. A can hang up. Note: When intended Transfer failed, if A hangs up, the HandyTone-488 will ring user A again to remind A that B is still on the call, by pressing FLASH or Hook again will restore the conversation between A and B. 5.2.
HandyTone-488 User Manual Grandstream Networks, Inc. *50 *51 *70 *71 *72 Disable Call Waiting (for all subsequent calls) Enable Call Waiting (for all subsequent calls) Disable Call Waiting. (Per Call) Enable Call Waiting (Per Call) Unconditional Call Forward. To use this feature, dial “*72” and get the dial tone. Then dial the forward number and “#” for a dial tone, then hang up. *73 Cancel Unconditional Call Forward To cancel “Unconditional Call Forward”, dial “*73” and get the dial tone, then hang up.
HandyTone-488 User Manual Grandstream Networks, Inc.
HandyTone-488 User Manual 6 Grandstream Networks, Inc. Configuration Guide 6.1 Configuring HandyTone-488 WAN IP through Voice Prompt 6.1.1 DHCP Mode Follow section 5.1 with voice menu option 01 to enable HandyTone-488 to use DHCP. 6.1.2 STATIC IP Mode Follow section 5.1 with voice menu option 01 to enable HandyTone-488 to use STATIC IP mode, then use option 02, 03, 04 to set up HandyTone-488’s IP, Subnet Mask, Gateway respectively. 6.
HandyTone-488 User Manual Grandstream Networks, Inc. Grandstream Device Configuration Password Login All Rights Reserved Grandstream Networks, Inc. 2004 The password is case sensitive and the factory default password for End User is ‘123’. After a correct password is entered in the login screen, the embedded Web server inside the HandyTone-488 will respond with the Configuration page which is explained in details below.
HandyTone-488 User Manual Grandstream Networks, Inc. NAT/DHCP Server Information & Configuration: Cloned WAN MAC Addr: LAN Subnet Mask: LAN DHCP Base IP: DHCP IP Lease Time: 255.255.255.0 (default is 255.255.255.0) 192.168.2.1 120 (in hex format) (base IP for the LAN port, default is 192.168.2.
HandyTone-488 User Manual Grandstream Networks, Inc. Time Zone This parameter controls how the displayed date/time will be adjusted according to the specified time zone. Daylight Savings Time This parameter controls whether the displayed time will be daylight savings time or not. If set to Yes, then the displayed time will be 1 hour ahead of normal time. Cloned WAN MAC Address: Allow the user to set a specific MAC address. Set in Hex format LAN Subnet Mask Sets the LAN subnet mask.
HandyTone-488 User Manual Grandstream Networks, Inc. MAC Address The device ID, in HEX format. This is a very important ID for ISP troubleshooting. WAN IP Address This field shows WAN port IP address. Product Model This field contains the product model info. Software Version Program: This is the main software release, its number is always used for firmware upgrade. Bootloader: This is normally not changed. HTML: This is the user interface, normally not changed.
HandyTone-488 User Manual Grandstream Networks, Inc. Advanced User configuration includes not only the end user configuration, but also advanced configuration such as SIP configuration, Codec selection, NAT Traversal Setting and other miscellaneous configuration. Following is a snap shot of the advanced configuration page. Grandstream Device Configuration STATUS BASIC SETTINGS ADVANCED SETTINGS Admin Password: (purposely not displayed for security protection) FXS Port: SIP Server: sip.mycompany.
HandyTone-488 User Manual Name: Register Expiration: John Doe 60 5062 local RTP port: 5008 (default 5062) (1024-65535, default 5008) No Yes (if Yes, Call Forwarding & Call-Waiting-Disable are supported locally) Send DTMF: DTMF Payload Type: in-audio choice 3: choice 4: choice 5: choice 6: choice 7: 2 G723 rate: current setting is " PCMA" current setting is " G723" current setting is " G729" current setting is " G726-32" current setting is " G728" current setting is " iLBC" (up to 10/20/32/64 for
HandyTone-488 User Manual Grandstream Networks, Inc.
HandyTone-488 User Manual WAN side http access: PSTN access code: No Grandstream Networks, Inc. Yes (WAN side access to http server will be rejected if set to No) (key pattern to use the PSTN line, default is "*00") Update All Rights Reserved Grandstream Networks, Inc. 2004 Admin Password This contains the password to access the Advanced Web Configuration page. This field is case sensitive.
HandyTone-488 User Manual Grandstream Networks, Inc. DTMF Payload Type This parameter sets the payload type for DTMF using RFC2833 Preferred Vocoder The HandyTone ATA supports up to 7 different Vocoder types including G.711 A-/U-law,G.723.1, G.726, G.728, G.729A/B, iLBC. Depending on the product model, some of these Vocoders may not be provided in standard release. Users can configure Vocoders in a preference list that will be included with the same preference order in SDP message.
HandyTone-488 User Manual Grandstream Networks, Inc. Unregister on Reboot Default is No. If set to yes, the SIP user will be unregistered on reboot. Layer 3 QoS This field defines the layer 3 QoS parameter which can be the value used for IP Precedence or Diff-Serv or MPLS. Default value is 48. Layer 2 QoS This contains the value used for layer 2 VLAN tag. Default setting is blank. Use DNS SRV: Default is No.
HandyTone-488 User Manual Grandstream Networks, Inc. Keep-alive interval This parameter specifies how often the HandyTone ATA sends a blank UDP packet to the SIP server in order to keep the “hole” on the NAT open. Use NAT IP: NAT IP address used in SIP/SDP message. Default is blank. Proxy-Require SIP Extension to notify SIP server that the unit is behind the NAT/Firewall. TFTP Upgrade Server This is the IP address of the configured TFTP server.
HandyTone-488 User Manual Grandstream Networks, Inc. Disable Call Waiting Default is No. Polarity Reversal Default is No. If set to Yes, polarity will be reversed upon call establishment and termination. NTP server This parameter defines the URI or IP address of the NTP server which is used by the HandyTone ATA to display the current date/time.
HandyTone-488 User Manual Grandstream Networks, Inc. 6.2.4 Saving the Configuration Changes Once a change is made, users should press the “Update” button in the Configuration page. The HandyTone-488 will then display the following screen to confirm that the changes have been saved. Grandstream Device Configuration STATUS BASIC SETTINGS ADVANCED SETTINGS Your configuration changes have been saved. They will take effect on next reboot. All Rights Reserved Grandstream Networks, Inc.
HandyTone-488 User Manual Grandstream Networks, Inc. 6.3 Configuration through a Central Server Grandstream HandyTone ATAs can be automatically configured from a central provisioning system. When HandyTone ATA boot up, it will send TFTP or HTTP request to download configuration files, there are two configuration files, one is “cfg.txt” and the other is “cfg000b82xxxxxx”, where “000b82xxxxxx” is the MAC address of the HandyTone ATA.
HandyTone-488 User Manual Grandstream Networks, Inc. 7 Software Upgrade 7.1 Upgrade through HTTP To upgrade software, HandyTone-488 can be configured with an HTTP server where the new code image file is located. For example, following URL in the HTTP Upgrade Server: http://firmware.mycompany.com:6688/Grandstream/1.0.0.4 Where firmware.mycompany.com is the FQDN of the HTTP server, “:6688” is the TCP port the HTTP server listening to, “/Grandstream/1.0.0.
HandyTone-488 User Manual Grandstream Networks, Inc. environment if possible. For those who do not have a local TFTP server, Grandstream provides a NAT-friendly TFTP server on the public Internet for firmware upgrade. Please check the Service or Support section of Grandstream’s Web site to obtain this TFTP server’s IP address.
HandyTone-488 User Manual 8 Grandstream Networks, Inc. Restore Factory Default Setting Warning: Restore the Factory Default Setting will delete all configuration information of the device. Please disconnect network cable and power cycle the unit before trying to reset the unit to factory default. The steps are as follows: A. Find the MAC address of the device. It is a 12 digits number located on the bottom of the unit. B. Encode the MAC address.