
Installation Guide


INSTALLATION BASICS
Leave a minimum of 1/8" clearance at all openings and stops
to allow for normal expansion and contraction. When installing
in temperatures below 40° F/4.4° C, increase minimum
clearance to 3/8" (9.5mm).
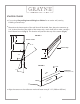
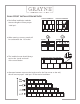
When lapping panels, leave 1/8" gap at nailing hem (FIG 1).
When installing a siding panel, push up from the bottom until
the lock is fully engaged with the piece below it. The panels
should not be under tension or compression when they are fastened.
Allow the butt edge to rest on the top edge of the course below (FIG 2).
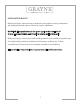
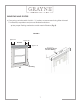
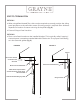
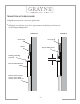
Do not drive the head of the fastener tightly against the nail hem. Allow clearance
between the fastener head and the siding nail hem (approx. 1/32"). Drive fasteners
straight and level to prevent any restriction of the panel. Nail panels every 10".
Grayne Panel Fastener: 3/8" (9.5mm) Head with .120" (3mm) Shank, fastener must
penetrate 3/4" (19mm) beyond solid substrate. Kleer Trim Fasteners: Recommended
Cortex system, optional using 6d & 8d stainless steel or hot-dipped galvanized nails
12" on-center and approximatly 3/4" (19mm) from each edge. Use the proper quantity
and size of fasteners that will penetrate the substrate at least 1-1/2". Refer to trim
manufacturing guide for additional installations techniques.
1/8"
FIGURE 1
FIGURE 2
1. Align panels
2. Engage lock
3. Press upward
to fully engage
4. Let top panel rest
on panel below
4